Wednesday, June 29, 2016

Chocolate Chip Cookies


Chocolate Chip Cookies
Ingredients:
2 cups minus 2 tablespoons (8 1/2 ounces) cake flour
1 ⅔ cups (8 1/2 ounces) bread flour
1 ¼ teaspoons baking soda
1 ½ teaspoons baking powder
1 ½ teaspoons coarse salt
2 ½ sticks (1 1/4 cups) unsalted butter
1 ¼ cups (10 ounces) light brown sugar
1 cup plus 2 tablespoons (8 ounces) granulated sugar
2 large eggs
2 teaspoons natural vanilla extract
1 ¼ pounds bittersweet chocolate disks or fèves, at least 60 percent cacao content (see note)
Sea salt.


  • Nutritional Information

PREPARATION

  1. Sift flours, baking soda, baking powder and salt into a bowl. Set aside.
  2. Using a mixer fitted with paddle attachment, cream butter and sugars together until very light, about 5 minutes. Add eggs, one at a time, mixing well after each addition. Stir in the vanilla. Reduce speed to low, add dry ingredients and mix until just combined, 5 to 10 seconds. Drop chocolate pieces in and incorporate them without breaking them. Press plastic wrap against dough and refrigerate for 24 to 36 hours. Dough may be used in batches, and can be refrigerated for up to 72 hours.
  3. When ready to bake, preheat oven to 350 degrees. Line a baking sheet with parchment paper or a nonstick baking mat. Set aside.
  4. Scoop 6 3 1/2-ounce mounds of dough (the size of generous golf balls) onto baking sheet, making sure to turn horizontally any chocolate pieces that are poking up; it will make for a more attractive cookie. Sprinkle lightly with sea salt and bake until golden brown but still soft, 18 to 20 minutes. Transfer sheet to a wire rack for 10 minutes, then slip cookies onto another rack to cool a bit more. Repeat with remaining dough, or reserve dough, refrigerated, for baking remaining batches the next day. Eat warm, with a big napkin

Friday, June 24, 2016

Crispy Hash Browns


PERFECTLY CRISPY HASH BROWNS

Serves 4
Ingredients
2 1/2 pounds russet potatoes, peeled
6 tablespoons unsalted butter 
1 teaspoon kosher salt, or to taste
freshly ground pepper, to taste
Directions
Take your peeled potatoes and grate them with the large-holed side of a cheese grater, or use the coarse grating blade in your food processor.

Transfer potato shreds to a large bowl of water and let them soak, stirring occasionally, until starches are released and water is murky.  Rinse under running water until runoff is clean.

Place potatoes (in batches, if necessary) in a cheesecloth or clean kitchen towel, and wrap and wring until thoroughly drained and as dry as possible. 
Repeat.

After you’ve drained them, put potatoes on a paper towel-lined plate and microwave on high for 2 minutes to par-cook them.

Transfer cooked potatoes to a large bowl and season with salt and pepper, adding more or less to taste.

Heat butter in a large, non-stick pan or skillet over medium heat until frothy. Skim off top solids, then, once hot, add potatoes and flatten them out into a 1/4-inch thick, even layer. Note: butter is hot enough when you drop a few shreds of potato in and they sizzle. 

Cook potatoes undisturbed for 5-6 minutes, or until a golden crust has formed on the bottom.

Flip potatoes over and cook for another 5-6 minutes, or until other side is also golden brown.

Top with more salt, if desired, and serve immediately.

Tuesday, June 21, 2016

How To Smoke Salmon

How to Smoke Salmon 
By Hank Shaw on August 12, 2012 

 I smoke a lot of salmon, and I am proud of this recipe, although it would be the height of arrogance to say that what I do is the end-all, be-all of salmon smoking recipes. Lots of people smoke their salmon in lots of ways, and many of them are good. But I’ve been smoking fish for many years, and I’ve developed a system that works well.
Keep in mind this is a hot-smoking recipe. Cold smoking, which is the kind of slice-able smoked fish you get in fancy boxes from Scotland is an entirely different thing. 

Almost everyone in Salmon Country hot smokes their fish. If you’re unfamiliar with hot-smoked fish, think about those golden smoked whitefish you see in delicatessens; those are hot smoked. How do you eat it? Well, you can just eat it plain, or you can flake it and make it into a smoked salmon salad, you can pound it with butter and make salmon rillettes, serve it in deviled eggs, tossed with pasta… you get the point.
Here’s what you need to get started: 


A smoker. I use a Bradley digital smoker and I love it. It lets me control the temperature independently of the smoker and tells me exactly what the temperature is inside the chamber. I’ve used a lot of smokers over the years, and I prefer the Bradley. No matter what smoker you use, you will need to be able to a) know your smoking chamber’s temperature, and b) control the heat, at least in a rough sense.
Wood. The only downside to a Bradley smoker is that you need to use their pressed wood pucks. As a guy who used a Brinkmann wood-fired BBQ for years, fueling it with scraps of almond and other fruit woods, buying wood can be annoying. I prefer to use alder wood for my salmon, but apple, cherry, oak or maple work fine.
Salt. Buy a box of kosher salt from the supermarket. Do not use regular table salt, as it contains iodide and anti-caking agents that will give your salmon an “off” flavor. I use Diamond Crystal, which is cut finer than Morton’s. 

Something sweet — salmon love sweet. I prefer to sweeten my brine with birch syrup; It’s just like maple syrup, only tapped from birch trees instead. Super cool stuff. But maple syrup is just as good; just use real maple syrup, OK? Not the imitation crap.
A large plastic container. Buy the big, flat ones from the supermarket. They stack easily in a normal fridge, so you can have two different brines going. And they clean easily and are pretty cheap. 

A wire rack. You need to rest your brined fish on a rack with plenty of air circulation to form the all-important pellicle (more on that in a bit), and you will use it to rest the smoked fish before storing it.
A basting brush. You probably already have this in your kitchen, but if not, pick one up. Get the flat kind, like you use to paint detail on window trim.
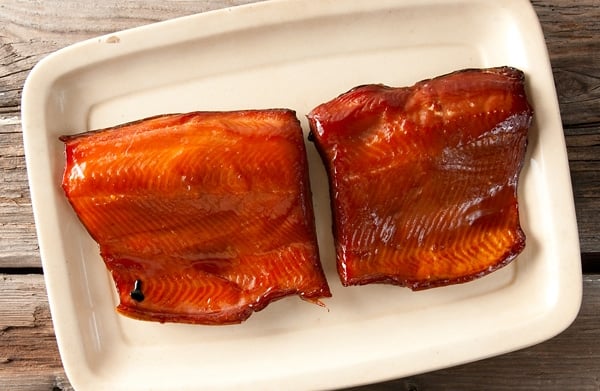
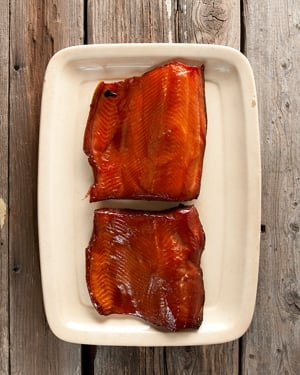
Smoked Salmon, Glazed with Birch or Maple Syrup 
When you are ready to start, you will need smallish pieces of salmon about 1/4 to 1/2 pound each. Any salmonid fish will work with this recipe. I’ve done it with king salmon, sockeye and pink salmon, plus kokanee, steelhead and Lahontan trout. There is no reason it would not work with coho salmon, chum salmon or any other char or trout species. And yes, it works with farmed Atlantic salmon, but I never eat the stuff. I prefer to smoke salmon with its skin on, but I’ve done it with skinless pieces and it works fine. 

Note that my salmon cure is very simple. Feel free to add things if you like. I’ve added bay leaves, chiles, thyme, garlic and minced onion. All are fine, but subtle. And since I often use smoked salmon as a base for another dish, I want mine to remain simple and clean-tasting.
One last piece of advice: Try to fill up your smoker with fish. This process takes a while to do, and your smoker doesn’t care if its full or half-empty, so you might as well make a big batch. 

Note: This recipe is for basic smoked salmon. Other options are smoked salmon candy, a great snack, and, once you have your smoked salmon, you can use it in smoked salmon dip on crackers.
Makes enough brine for 5 pounds of fish.
Prep Time: 24 hours, almost all of it passive in the fridge.
Cook Time: 6 hours, depending on your smoker’s temperature and how smoky you want your fish
Ingredients:
5 pounds salmon, trout or char
1 quart cool water
1/3 cup Diamond Crystal kosher salt (about 2 ounces of any kosher salt)
1 cup brown sugar
1/2 cup birch syrup or maple syrup
More birch or maple syrup for basting 

Directions:
Mix together all the brine ingredients and place your fish in a non-reactive container (plastic or glass), cover and put in the refrigerator. This curing process eliminates some of the moisture from the inside of the fish while at the same time infusing it with salt, which will help preserve the salmon. You will need to cure your salmon about 8 hours, even for thin fillets from trout or pink salmon. In my experience, large trout or char, as well as pink, sockeye and silver salmon need 12 hours. A really thick piece of king salmon might need as much as 36 hours in the brine. Never go more than 48 hours, however, or your fish will be too salty. Double the brine if it’s not enough to cover the fish.

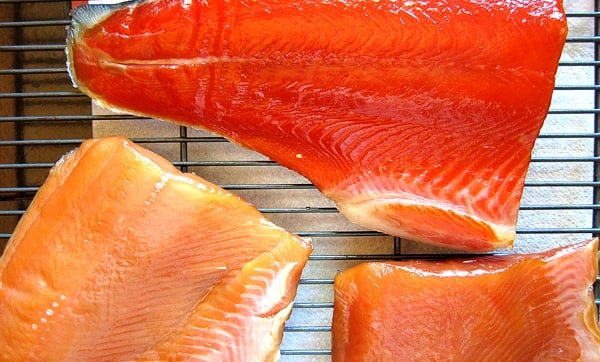
Take your fish out of the brine and pat it dry. Sit the fillets on your cooling rack, skin side down. Ideally you’d do this right under a ceiling fan set on high, or outside in a cool, breezy place. By “cool” I mean 60°F or cooler. Let the fish dry for 2 to 4 hours (or up to overnight in the fridge). You want the surface of the fish to develop a shiny skin called a pellicle.

This is one step many beginning smokers fail to do, but drying your cured, brined fish in a cool, breezy place is vital to properly smoking it. The pellicle, which is a thin, lacquer-like layer on top of the fish, seals it and offers a sticky surface for the smoke to adhere to. Don’t worry, the salt in the brine will protect your fish from spoilage. Once you have your pellicle, you can refrigerate your fish for a few hours and smoke it later if you’d like. 

Now you are ready to smoke your fish. Even though this is hot smoking, you still do not want high temperatures. Start with a small fire and work your way up as you go. It is important to bring the temperature up gradually or you will get that white albumin “bleed” on the meat. I can control my heat with the Bradley smoker, so I start the process at 120°F for 2 hours. Then I step up the heat to 140°F for another 2 hours, then finish at 175°F for a final two hours. 

NOTE: What my smoker is set at is not necessarily what the actual temperature is. Smoking is an art, not a science. To keep temperatures mild, always put water in your drip pan to keep the temperature down. If your smoker is very hot, put ice in the tray.

After an hour in the smoker, baste the fish with the birch or maple syrup; do this every hour. This is a good way to brush away any albumin that might form. In most cases, you will get a little. You just don’t want a ton of it. 

(Incidentally, yes, I keep the smoke on the whole time. I don’t find this to be too much smoke, but if you want a lighter smoke, finish the salmon without smoke or in a 200°F oven.) 

Even if you can’t control your temperature this precisely, you get the general idea. You goal should be an internal temperature of about 130°F to 140°F.   You must be careful about your heat. Other than failing to dry your salmon long enough, the single biggest problem in smoking salmon is too high heat. If you’ve ever seen salmon “bleed” a white, creamy substance, that’s a protein called albumin. If you see lots of it, you’ve screwed up; a little is normal. Here’s what happens: If you cook a piece of salmon (or trout or char) at too high a heat, the muscle fibers in the meat contract so violently that they extrude albumin, which immediately congeals on the surface of the fish. It’s ugly, and it also means your salmon will be drier than it could have been. 

You prevent this with a solidly formed pellicle, and by keeping your heat gentle. All this said, if you let your heat get away from you and you do get a white mess on your salmon all is not lost. Just flake it out and make salmon salad with it: The mayonnaise in the salad will mask any dryness. 

Once your fish is smoked, let it rest on the cooling rack for an hour before you put it in the fridge. Once refrigerated and wrapped in plastic, smoked fish will keep for 10 days. If you vacuum-seal it, the fish will keep for up to 3 weeks. Or freeze your fish for up to a year.


Monday, June 20, 2016

Perfect Coleslaw

COLE SLAW
Serves 8-10
Ingredients
2 (10 oz.) bags shredded cabbage
2 large carrots, shredded
1/2 red cabbage, shredded
2/3 cup mayonnaise
1/3 cup buttermilk
1/3 cup sugar
2 tablespoons apple cider vinegar
1 tablespoon lemon juice
1 tablespoon dry mustard
1 teaspoon celery salt
kosher salt and freshly ground pepper, to taste
Directions:
Mix cabbages and carrots in a large bowl and set aside.

In a separate bowl, whisk together mayonnaise, buttermilk, vinegar and lemon juice, until combined.


Stir in sugar, dry mustard and celery salt, and mix until smooth, then season with salt and pepper.


Taste and adjust seasoning, if necessary.


Pour dressing over cabbage and carrots and toss so that everything is thoroughly coated.


Cover bowl with plastic wrap and refrigerate at least 2 hours before serving.

Spinach And Artichoke Stuffed Chicken Breast

Spinach & Artichoke Stuffed Chicken


Spinach And Artichoke Stuffed Chicken

Serves 2

Ingredients:5 ounces frozen, chopped spinach
1 (6-ounce) jar marinated artichokes, drained, coarsely chopped
1 cup grated fontina cheese
½ cup ricotta cheese
½ cup chopped, oil-packed sun-dried tomatoes, drained and coarsely chopped
1 tablespoon dried basil
1 pound boneless skinless Chicken breasts or thighs
Salt, pepper, and paprika to taste

*
Directions:
Preheat oven to 375°F.

Place the spinach in a clean kitchen towel, twist the towel around the spinach and wring it out until the spinach is dry. Mix together the spinach, artichokes, cheese, tomatoes, and basil.

For chicken breasts, insert knife halfway through the chicken breast (horizontally) and swing the knife in a half-circle motion to create a pocket. Fill the chicken with the spinach mixture, pushing it to the bottom of the pocket until filled. Secure the opening with a wooden toothpick. For chicken thighs, lay them out and pound to flatten until approximately ⅛-inch thick. Top with a spoonful of spinach mixture and tightly roll it up. Secure the seam with toothpicks, or tie with kitchen twine.

Transfer chicken to a baking dish, and season with salt, pepper, and paprika. Bake 30 to 35 minutes for chicken thighs and 35 to 45 minutes for chicken breasts, or until the internal temperature of the chicken reaches 165°F.


Saturday, June 18, 2016

Impossible Coconut Pie


IMPOSSIBLE COCONUT CUSTARD PIE
...magically makes it's own crust!

1/2 cup Bisquick
3/4 cup sugar
4 eggs
2 cup milk
1 cup flaked coconut
1 tsp. vanilla
1 TBS. butter, softened

*
Directions:
Combine all ingredients and pour into 9 inch buttered pie pan. Bake at 400 degrees for 25-30minutes until custard sets. Like magic it layers into crust, custard, coconut topping. Cool.make sure you click on share to save this awesome recipe.

Tip: One cup of Bisquick can be substituted by a mix of one cup of flour, 1½ teaspoons of baking powder, ½ teaspoon of salt, and 1 tablespoon of oil or melted butter.

Thursday, June 16, 2016

Sausage Rolls

Phillis Carey’s Recipe of the Week
June 14, 2016
Sausage Rolls
Makes 40 pieces.
1 T. grapeseed or vegetable oil 
1 cup finely chopped onion
1 T. soy sauce
2 tsp. fresh lemon juice

2 cloves garlic, minced
Tabasco to taste
3 eggs, divided use
1-1/2 lbs. pork or turkey sausage
1 (19 ounce) package frozen puff pastry sheets, thawed 1 T. water

Variety of mustard for dipping Chutney.

Sauté the onion in oil over medium high heat until just tender, 4 minutes. Stir in the soy sauce, lemon juice and garlic and Tabasco to taste. Heat briefly. Set aside to cool.

Break two of the eggs into the uncooked sausage. Stir onion and sausage mixtures together. Combine well without over mixing. Chill until ready to use.

Unfold a puff pastry sheets onto a lightly floured work surface and roll out into a 10 x 12 inch rectangle. Repeat with second sheet of pastry. Cut rectangles in half lengthwise. You now have four pieces of pastry.

Spoon 1/4 of the sausage mixture down the center of each piece of pastry. Form sausage into a log shape. Beat the remaining egg with water and brush the edge of the pastry at the far side. Roll the pastry around the meat and seal. Place rolls on a cookie sheet and freeze 10 minutes (or freeze up to 3 months).

Preheat oven to 400°F. Brush each cold sausage roll with egg mixture and slice into 10 rounds. Place on a parchment-lined baking sheet and bake for about 20 minutes or until the sausage is cooked through and pastry is golden. Serve with a variety of Dijon mustards and/or chutney for dipping. 

Wednesday, June 15, 2016

Cubano Pork Tenderloin With Mango Mojo Sauce

Cubano Pork Tenderloin With 
Mango Mojo Sauce
Serves 6 to 8.
Ingredients:
Pork:
1/2 cup fresh orange juice 
1/4 cup fresh lime juice
1/4 cup dark rum (Myers)
1 medium onion, thinly sliced 

6 garlic cloves, minced
2 tsp. dried oregano
2 tsp. ground cumin
2 tsp. salt
1 bay leaf, crumbled
1/2 tsp. ground black pepper 3 pork tenderloins


Mango Mojo:

1 mango, peeled and coarsely chopped
1/4 cup fresh lime juice
1 clove garlic, peeled
1 T. chopped jalapeno with or without seeds or to taste 

1 tsp. salt or to taste
2 T. chopped cilantro

*
Directions:
1. For pork marinade, mix all but pork in large resealable plastic bag. Trim pork of all fat and silverskin and to marinade. Close bag and turn pork to coat. Refrigerate overnight, turning pork once.


2. Preheat oven to 400 degrees. Transfer pork to baking pan; discard marinade. Roast until thermometer inserted into center of pork registers 150 degrees, about 25 minutes. Let pork stand 5 minutes.

3. While pork is resting make the Mango Mojo by combining all but the cilantro in a blender and pureeing. Stir in cilantro.

4. Cut pork crosswise into 1/2-inch-thick slices. Arrange on platter and pour on the Mango Mojo.


Monday, June 13, 2016

Gumdrops

Gumdrops
Prep time 15 mins
Cook time 5 mins
Total time 20 mins
Ingredients:
2 cups sugar {plus a little for rolling gum drops}
1⅓ cups applesauce, unsweetened
2 small (3 oz) boxes Jello, any flavor
2 envelopes (4 teaspoons) unflavored gelatin {like Knox}
1 teaspoon lemon juice

*
Instructions:
Line 13×9 pan with parchment paper

In a large saucepan, combine all ingredients, let stand 1 minute

Bring to a boil over medium heat, stirring constantly, boil for 1 minute.  Immediately pour into prepared pan.

Place in refrigerator for 3 hours or until firm.

Loosen sides from pan with a spatula.

Turn Gum Drops onto a cutting board.

Cut out gum drops using a knife dipped in hot water to cut squares or a cookie cutter.

Roll Gum Drops in extra sugar, set onto wax paper until slightly dry.

Store in an airtight containering dish. Refrigerate until firm {about three hours should do it. I left mine in overnight.}

Sunday, June 12, 2016

Traegar Grill Salsa

Traegar Grill Salsa

Roma Tomatoes cut in halves
1 onion, quartered
Jalopená pepper (s), cut into halves with seeds
    removed 
Garlic cloves whole with skins removed
1 lime cut in half

fresh cilantro, chopped
diced green onions
cumin

Place vegetables on tray and smoke setting for 45 minutes.  Bake at 325 for 30 minutes.
Cool and place in Vita Mix.  Blend till chunky.

Add chopped fresh cilantro and diced green onion to taste.

Friday, June 10, 2016

Pineapple Salsa

Pineapple Salsa
Ingredients:
1 whole pineapple
1 cup tomatoes, chopped
1/4 cup onion, chopped
1 cup peppers, chopped
1/3 cup cilantro
1 jalapeño, chopped
Lime juice
Salt
Ground pepper
Tortilla chips

Directions:
Cut 1/3 off the pineapple.

With the larger piece, make a cut around the outer edge, and divide the interior into 1-inch slices.

Scoop out the middle pineapple chunks.
In a mixing bowl, combine tomatoes, 1 cup of pineapple chunks, onion, peppers, cilantro, jalapeño, lime juice, salt, and ground pepper.
Transfer salsa to the pineapple shell.
Serve with tortilla chips and enjoy!

Thursday, June 9, 2016

Artichoke And Spinach Stuffed Portabello Mushrooms


Artichoke And Spinach 
Stuffed Portabello Mushrooms
Ingredients:
2 tbsp. extra-virgin olive oil
4 medium portobello mushrooms, 

   stems and gills removed
1 (10) oz. package frozen chopped spinach, 
   drained and squeezed dry
1 (14) oz. can artichoke hearts, 
   drained and chopped
4 oz. cream cheese, room temperature
2 tbsp. sour cream
2 tbsp. mayonnaise
1/2 c. grated Parmesan cheese, divided
1 c. shredded mozzarella cheese, divided
2 cloves garlic, minced
red pepper flakes
kosher salt
Freshly ground black pepper

Directions:
Preheat oven to 375 degrees F.

Brush face-down mushroom caps with olive oil. Cook on baking sheet for about 10 minutes until beginning to soften.

Meanwhile, combine spinach, artichoke, cream cheese, mayonnaise, sour cream, 1/2 cup mozzarella, 1/4 cup Parmesan cheese, garlic, and red pepper flakes in a large bowl. Season with salt and pepper to taste.

Flip over mushrooms and stuff each cap with an equal amount of the spinach mixture.

Sprinkle tops with remaining cheeses.

Return pan to oven and bake for another 10-15 minutes, until the mushrooms are easily pierced with fork and the cheese is melted. Once melted, broil the mushroom caps for a few minutes until the cheese starts to brown.

Wednesday, June 8, 2016

Buttermilk Brined Garlicky Turkey Tenderloins With Grilled Corn Relish


Buttermilk Brined Garlicky Turkey 
TenderloinsWith Grilled Corn Relish
Serves 6.
Ingredients:
2 cups buttermilk
3 T. sugar
4 T. olive oil, divided use
3 T. kosher salt plus more for tasting
6 cloves garlic, smashed
6 bay leaves
2 tsp. hot sauce
12 black peppercorns
4 wide strips of lemon peel
Juice of 1 lemon, divided use
6 turkey tenderloins (remove as much of the tendon as possible) 

6 ears of fresh corn, husked
1/4 cup chopped fresh Italian parsley
2 T. chopped chives

Directions:
1. For the brine, combine the buttermilk, sugar, 2 T. olive oil, 3 T. salt, garlic, bay leaves, hot sauce and peppercorns in a large bowl. Stir in lemon peel and juice from 1/2 lemon. Add the turkey tenderloins, turning to coat well. Cover and refrigerate 4 hours.

2. Remove turkey from refrigerator 30 minutes before grilling. Preheat grill to medium and lightly brush the grates with oil. Remove turkey from the brine, letting the excess drip off. Add to the grill; cover and cook until turkey reaches an internal temperature of 160 degrees, 7 to 9 minutes per side. Let rest for about 8 minutes before slicing and serving.

3. Meanwhile, rub the corn with 1 T. olive oil and season with salt. Grill the corn until charred, about 10 minutes, turning often. Cut the corn kernels from the cob and combine with juice from remaining 1/2 lemon, the remaining 1 T. olive oil, the parsley and chives; toss to combine well and season to taste with salt. Serve with turkey tenderloins.

Tip: Also great with chicken tenders or pounded out chicken breasts. 

Tuesday, June 7, 2016

Grilled Salmon And Citrus Salsa


Grilled Salmon With Citrus Salsa
Ingredients:
Salsa:
2 large oranges
1/4 cup extra-virgin olive oil
1/4 cup fresh lemon juice
1/2 cup chopped fresh flat-leaf parsley
2 scallions, finely sliced
3 tablespoons chopped fresh mint leaves
2 tablespoons capers, rinsed, drained and coarsely chopped
2 tablespoons orange zest
1 teaspoon lemon zest
1 teaspoon crushed red pepper flakes
Kosher salt and freshly ground black pepper
Salmon:
Vegetable or canola oil, for oiling the grill
4 (4 to 5-ounce) center cut salmon fillets, skinned, each about 3-inches square
2 tablespoons amber agave nectar
Kosher salt and freshly ground black pepper

Directions:
For the salsa: Peel and trim the ends from each orange. Using a paring knife, cut along the membrane on both sides of each segment. Free the segments and add them to a medium bowl. Add the olive oil, lemon juice, parsley, scallions, mint, capers, orange zest, lemon zest, and red pepper flakes. Toss lightly and season with salt and pepper, to taste. Set aside.
For the salmon: Put a grill pan over medium-high heat or preheat a gas or charcoal grill. Brush the grilling rack with vegetable oil to keep the salmon from sticking. Brush the salmon on both sides with the agave nectar and season with salt and pepper, to taste. Grill until the fish flakes easily and is cooked through, about 3 to 4 minutes on each side. Transfer the salmon to a platter and allow to rest for 5 minutes.
Spoon the salsa verde on top of the salmon or serve on the side as an accompaniment.

Sunday, June 5, 2016

Chocolate Brownie Pudding

Chocolate Brownie Pudding
Ingredients
1/2 pound (2 sticks) unsalted butter, plus extra for buttering the dish
4 extra-large eggs, at room temperature
2 cups sugar
3/4 cup good cocoa powder
1/2 cup all-purpose flour
Seeds scraped from 1 vanilla bean
1 tablespoon framboise liqueur, optional
Vanilla ice cream, for serving


Directions
Preheat the oven to 325 degrees F. 


Lightly butter a 2-quart (9 by 12 by 2-inch) oval baking dish. Melt the 1/2 pound of butter and set aside to cool.

In the bowl of an electric mixer fitted with the paddle attachment, beat the eggs and sugar on medium-high speed for 5 to 10 minutes, until very thick and light yellow. Meanwhile, sift the cocoa powder and flour together and set aside.


When the egg and sugar mixture is ready, reduce the speed to low and add the vanilla seeds, framboise, if using, and the cocoa powder and flour mixture. Mix only until combined. With mixer still on low, slowly pour in the cooled butter and mix again just until combined.


Pour the brownie mixture into the prepared dish and place it in a larger baking pan. Add enough of the hottest tap water to the pan to come halfway up the side of the dish and bake for exactly 1 hour. 


A cake tester inserted 2 inches from the side will come out 3/4 clean. The center will appear very under-baked; this dessert is between a brownie and a pudding.

Allow to cool and serve with vanilla ice cream.


Read more at: http://www.foodnetwork.com/recipes/ina-garten/brownie-pudding-recipe.html?oc=linkback

Saturday, June 4, 2016

Roasted Beet Sandwich With Cashew Cream

Roasted Beet Sandwich 
With Cashew Cream
Ingredients:
Toasted Bread of choice
12 to 16 beets, good for several sandwiches
1 to 2 tablespoons coconut oil
Boston lettuce leaves
Garlic spread
Pink salt to taste

Directions:
To Roast Beets;
Preheat oven to 400 degrees.  Scrub the skins, rinse and pat dry.  Rub with coconut oil. add a pinch of salt, abad wrap in foil.  Bake for 40 to 45 minutes, or until beets are tender.  Let beets cool enough to handle; the skins should rub right off.  At this point you can refrigerate overnight or  begin making the sandwiches.

To Build Sandwich:
Thinly slice the beets with a mandolin or by hand up to 1/8" think.

Apply garlic spread to toast,  generously layer beets adding a little salt and pepper to each layer, then top with butter lettuce.  Serve with a dollop of Cashew Cream.

Cashew Cream
1 1/2 cups raw cashews
1 1/2 cups water
1 tablespoon nutritional yeast
1/2 Tablespoon sea salt

Directions:
Place all ingredients in a blender or food processor and allow to soak for 30 minutes.  Blend for up to 3 minutes, or until it's smooth and creamy.  Keep leftovers refrigerated. 

Friday, June 3, 2016

Coconut Spiced Rice In The Rice Cooker Recipe

Coconut Spiced Rice

Time: 5 minutes
Cook Time: 10 minutes
Total Time: 20 minutes
Serves 4.


Ingredients
1 cup long-grain rice, such as basmati or jasmine, white or brown
1/4 cup unsweetened grated coconut, toasted if possible
The seeds from 1 pod cardamom
1/4 teaspoon cumin seeds
1/4 teaspoon mustard seeds
1/2 teaspoon salt (optional)
Fresh mint or cilantro, finely snipped, for serving


Instructions

Rinse the rice in several baths of fresh water until the water runs more or less clear. Drain thoroughly.
Place the rice in the bowl of the rice cooker, and add the coconut, cardamom, cumin, mustard, and salt, if using.

Thursday, June 2, 2016

California Spaghetti Salad

California Pasta Salad

Prep time: 15 minutes
A delicious spaghetti salad filled with fresh summer veggies and olives. Topped with a zesty italian dressing and parmesan cheese, this will be the hit of your next gathering!

Serves: 10-12
Ingredients
1 pound thin spaghetti, broken into 1 inch pieces
1 pint cherry tomatoes, chopped in half
2 medium zucchini, diced
1 large cucumber, diced
1 medium green bell pepper, diced
1 red bell pepper, diced
1 large red onion, diced
2 cans (2-1/4 ounces each) sliced ripe olives, drained

Dressing:
1 bottle (16 ounces) Italian salad dressing
¼ cup grated Parmesan cheese
1 tablespoon sesame seeds
1 teaspoon paprika
½ teaspoon celery seed
¼ teaspoon garlic powder

Directions:
Cook the pasta according to package directions. Drain and rinse in cold water. Add cherry tomatoes, zucchini, cucumber, green and red bell pepper, red onion and olives in a large bowl.

To make the dressing: Whisk together italian salad dressing, parmesan cheese, sesame seeds, paprika, celery seed, and garlic powder. Pour over salad and toss until coated. Cover and refrigerate for 3 hours or overnight.