Showing posts with label Lemons. Show all posts

Monday, January 19, 2026

Slow-Roasted Lamb Shoulder And Root Vegetables & Gremolata

Slow-Roasted Lamb Shoulder and 
Root Vegetables & Gremolata
Lamb shoulder is an affordable cut of a pricey meat. When slow-roasted—here with herbs, lemon and honey—it emerges from the oven deeply flavoured and incredibly succulent. Throw in a bed of carrots and potatoes plus a zesty gremolata finish, and you’ve got a comforting one-pan meal, perfect for a casual winter gathering.  Serves 6
Ingredients:
Gremolta
1 cup (250 mL) packed flat-leaf parsley leaves
2 cloves garlic, grated on rasp
Finely grated zest of 1/2 lemon
1 tbsp (15 mL) fresh lemon juice, plus more as needed
1/2 cup (125 mL) extra virgin olive oil
Salt and freshly ground pepper to taste
Lamb
1 head garlic, broken into individual cloves, divided
10 sprigs fresh thyme
10 sprigs fresh oregano
5 tbsp (75 mL) olive oil, divided
2 medium-size shallots, finely diced
2 tbsp (30 mL) thyme leaves, finely chopped
1 tbsp (15 mL) dried oregano
1 tsp (5 mL) ground coriander
1/4 tsp (1 mL) dried chili flakes
Finely grated zest of 1 1/2 lemons, divided
4 tsp (20 mL) fine sea salt, plus more to taste
Freshly ground pepper to taste
6 lb (2.72 kg) boneless lamb shoulder
3/4 cup (175 mL) chicken broth
3 tbsp (45 mL) honey, divided
1 tbsp (15 mL) fresh lemon juice
1 lb (455 g) carrots, peeled and cut into 1-inch (2.5-cm) batons
2 lbs (905 g) Yukon Gold potatoes, cut into 1-inch (2.5-cm) chunks.

Directions
Gremolata, place parsley in a small food processor. Pulse until finely chopped. Add remaining ingredients and pulse a few more times until combined. Taste and adjust salt and lemon. Transfer to an
airtight container. Refrigerate up to 2 days—it improves in flavour as 
it mellows. Serve at room temperature.
Lamb
Preheat oven to 325°F (163°C).

Peel and mince 3 garlic cloves. Place in a ramekin. Put remaining unpeeled garlic cloves in centre of a roasting pan along with thyme and oregano sprigs. Set aside.

In a medium-size frying pan, heat 2 tbsp (30 mL) olive oil over medium heat. When it’s hot, add shallots and minced garlic. Cook, stirring regularly, until they start to soften, about 3 minutes.

Reduce heat if they start to brown. Remove from heat and stir in chopped thyme, dried oregano, coriander, chili flakes, zest of 1 lemon,
 4 tsp (20 mL) salt and pepper. Stir to form a paste. Set aside. 

Score fat on lamb, being careful not to cut into meat. Open up shoulder and trim and discard large pockets of fat. Spread half of shallot mixture over inside, using your fingers to push it into crevices. Roll shoulder back up and spread remaining shallot mixture over exterior. Using butcher’s twine, tie it into a tight roll and place it in roasting pan, fat side up, on top of herbs and garlic. Pour chicken 
broth around lamb and cover with a double layer of foil. Transfer to oven. Cook for 2 hours.

While lamb is roasting, heat 2 tbsp (30 mL) honey, lemon juice, remaining zest and a small pinch of salt over low heat. Warm, stirring, until just combined. Set aside.

In a large mixing bowl, toss carrots with 1 tbsp (15 mL) olive oil and remaining 1 tbsp (15 mL) honey. Season with salt and pepper.

When roast is at the 2-hour mark, remove from oven and carefully remove foil. Baste lamb with pan juices. Spoon off excess liquid in pan, leaving about 1/8 inch (3 mm). Evenly distribute carrots around lamb.

Using carrot bowl, toss potatoes with remaining 2 tbsp (30 mL) oil, salt and pepper. Spread evenly around lamb. Brush honey-lemon glaze over lamb. Roast, uncovered, until vegetables are fork-tender, lamb is deeply browned, and meat easily pulls away with a fork—an instant-read thermometer inserted in centre should read at least 175°F (79°C). Transfer lamb to a cutting board to rest.

Return vegetables to oven and raise heat to 450°F (232°C). Once vegetables have been in oven for 15 more minutes, remove.

Remove and discard string from lamb. Slice or shred the lamb and serve with roasted veggies and gremolata.  Serves 6

Sunday, December 28, 2025

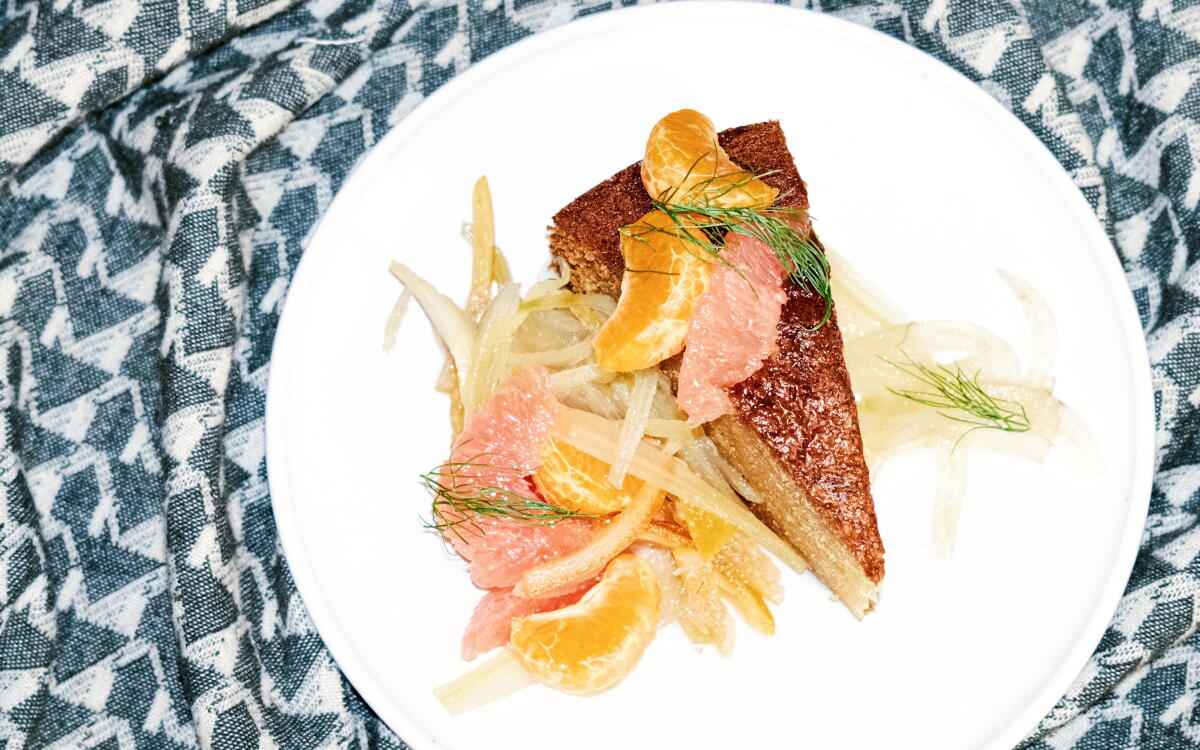
Olive Oil Cake With Candied Fennel


Olive Oil Cake With Candied Fennel
Fennel is the bulb vegetable with a very subtle licorice flavor.
Shannon Swindle is executive pastry chef of Italian restaurants Funke in Beverly Hills and Felix in Venice, and he’s probably got a recipe or a hundred in his back pocket when it comes to simple yet impressive desserts. This olive oil cake is one of them: lush, comforting and not too sweet. He’s tweaked the recipe over the years to come up with just the right amount of olive oil and crème fraîche (or sour cream) for the type of cake you can have with your coffee for breakfast or serve to guests for a special occasion. He bakes his cake in a large 10-inch cake pan that’s 3 inches high. You also could use 8- by 2-inch pans; just mind the baking time. Start checking it for doneness (the top will be firm) at 40 minutes. 

You can add whatever fruit is in season as garnish. In the fall he likes to make candied fennel. This recipe makes more candied fennel than you’ll need for the cake, 
but it keeps well. (The candied fennel recipe is also easily halved.)

Ingredients:
2 cups extra-virgin olive oil
500 grams (2 ½ cups) granulated sugar
2 teaspoons fine sea salt
3 lemons, zested
10 grams (1 ¾ teaspoons) baking soda
3 grams (¾ teaspoon) baking powder
5 eggs
400 grams (2 ¾ cups) all-purpose flour
500 grams (2 cups) crème fraîche or sour cream
Candied Fennel
3 fennel bulbs
2 cups water
400 grams (2 cups) granulated sugar
¼ teaspoon fine sea salt
1 ½ tablespoons lemon juice
½ teaspoon sambuca (optional)

Directions:
Heat the oven to 325 degrees. Spray a 10- by 3-inch cake pan with cooking spray and line the bottom with a circle of parchment paper. Set aside.

In a large bowl, whisk together the olive oil, sugar, salt, lemon zest, baking soda and baking powder. Add the eggs one at a time, whisking well after each addition. Mix in the flour until incorporated. Add the crème fraiche (or sour cream) and mix until just combined.

Pour the batter into the prepared cake pan. Bake in a conventional oven, or in a convection oven on low fan, until firm on top, about 1 hour 40 minutes. Cool completely before unmolding and slicing. Store wrapped well at room temperature for several days.

While the cake is baking, make the candied fennel. Remove any fennel tops and fronds and reserve for garnish or another use. Wash the bulbs well and peel off any discolored parts. Cut the bulbs in half and slice lengthwise about 1/16 of an inch thick on a mandolin.

Put the sliced fennel, water, sugar and salt in a heavy bottomed saucepan. Stir well and simmer gently over low heat until translucent, 30 to 45 minutes. 

Skim any foam that forms on the surface. Remove from the heat and add lemon juice and sambuca, if using. Cool to room temperature. Use immediately or store covered in the refrigerator for up to 2 weeks.

Thursday, April 3, 2025

Grilled Artichokes


Grilled Artichokes
The fourth-generation artichoke farmer Sean Pezzini is also the best chef in the family, according to his parents. His favorite ways to prepare it number two: 1) a quick fry for lightly breaded baby artichokes, and 2) this classic grill approach, which he calls, 
“my go-to and favorite.” One special thing to observe is the magic of their house Pezzini Farms Artichoke Seasoning. It’s a wonder drug that works nicely on everything, from eggs to toast to pizza to pasta to, yes, artichokes, which works well with all those things too.

Ingredients:
4 large to jumbo artichokes
4 tablespoons olive oil
4 teaspoons Pezzini Farms Artichoke Seasoning (or an Italian style         
   seasoning)
2 lemons
Directions:
Fill a large pot with 2–3 inches of water and add a vegetable steaming rack or four artichoke steamers. Bring water to a gentle boil. While you are waiting for the water, prepare your artichokes.

Trim the very ends of the stems and cut about 1 inch off the top of the artichokes (a serrated knife works best for this). You can trim off the thorns of the petals with scissors, if you like. We usually leave them if we’re cooking for our family but trim them if preparing them for guests.

Place artichokes on the steam racks with the stems facing up. Reduce heat to medium and cover pot. Steam for about 30 minutes depending on the size of your artichokes.

You can check if they’re cooked by putting a knife into the base of the stem. The knife should slide in fairly easily with just a bit of resistance. We like to cook our artichokes until they are “al dente” or about 5 minutes shy of being fully cooked since they will be finished on the grill.

Turn on the grill and get it to around 450–500° F while waiting for the artichokes to cool down.

Once cool enough to handle, cut artichokes in half lengthwise. Remove the choke (the inedible spiky and fuzzy part of the artichoke) with a paring knife by sliding the knife right along the underside of the fuzzy choke then pulling the fuzz and spiky leaves out. Be careful not to cut too 
far down underneath the fuzz or you risk cutting out some of the heart.

In a small bowl, stir together the olive oil, the juice of ½ lemon and the seasoning. Brush the mixture on all sides of the artichoke.

Place artichokes cut side down on the hot grill for about 3 minutes with lid closed. Once you get some nice grill marks and a bit of char, flip the artichokes over and cook for 2–3 more minutes.

Serve with the remaining lemon, cut into wedges, and your favorite dipping sauce. We usually go with a lemon aioli or a garlic Dijon. Serves 4–6.
NOTES

PEZZINI PRO TIPS
We recommend steaming artichokes instead of boiling them as they can become waterlogged from boiling and lose their flavor. We place them upside down (stem facing up) so the steam rises up between the leaves and cooks them a bit faster and more evenly.

Leave as much of the stem on as possible when preparing them. The stem is an extension of the heart, so the inside of the stem is edible. Artichokes oxidize (turn brown) very quickly when they are cut during preparation. To prevent this, have a cut lemon handy and rub the lemon on any parts of the artichoke you cut.

When picking out an artichoke, look for a thick and long stem. This usually means a larger heart. Wiggle the stem. It should be firm and not move much. If it feels rubbery and bends like an old carrot, it’s probably 1–2 weeks old and should be avoided. The artichoke should also feel dense for its size.

Store artichokes in the refrigerator. If they are fresh, they should last at least a week refrigerated..

Saturday, May 25, 2024

Smokey Lemon And Iced Tea

Smoky Lemon And Iced Tea
Add sultry smoke flavor to the classic summertime combo of lemonade and iced tea before flipping it into the Italian soda realm with the addition of fizz. The result is a big-batch punch that is superb with barbecued dishes. Applewood or hickory wood chips
Ingredients:
1 cup (250 mL) granulated sugar
1/2 cup (125 mL) water
8 lemons, cut in half
1 can (473 mL) hard iced tea
3 oz bourbon (optional)
Lemon wheels for garnish
Fresh thyme for garnish, preferably flowering lemon thyme
3 cups (750 mL) sparkling water or 2 cans (each 355 mL) club soda
Directions:
Soak wood chips in warm water for 20 minutes.

Meanwhile, pour sugar and 1/2 cup (125 mL) water into a small saucepan. Bring to a boil and stir until dissolved, about 5 minutes. Remove from heat and cool completely. Syrup will keep well, in an airtight container in the fridge, for up to 2 weeks.

When wood chips have soaked for 20 minutes, drain well. Place in a smoker box or wrap in heavy-duty foil. Lift grill and place smoker box on heat source.

Preheat grill to medium.

When chips start to smoke, turn grill on the side without smoker box to low. Place lemons, cut side down, on that side. Barbecue until they soften and grill marks form, about 10 minutes. Remove to a bowl. When lemons are cool enough to handle, squeeze juices through a fine sieve into a measuring cup. Swirl and press with a ladle if you’re dealing with a lot of pulp. Strained juices should measure about 1 1/2 cups (375 mL). Pour juice into a pitcher and stir in sugar syrup. Chill.

Just before serving, add iced tea and bourbon. Stir to mix. Pour into tall glasses filled with ice. Garnish with lemon wheels and thyme, if you like. Top with soda right before serving. 
Makes 6 cups (1.5 L) for 6 servings


Wednesday, September 13, 2023

No-Bake Lemon Cashew Pie ~ Vegan

no bake lemon cashew pie
No-Bake Lemon Cashew Pie
This new twist on a lemon meringue pie features a yummy vegan filling with a crust that won't leave you disappointed.
Ingredients:
For The Crust:
1 cup (155 g) raw almonds
1 cup (180 g) dates, pitted
3 Tablespoons (45 ml) unrefined coconut oil, melted

For The Filling:
¾ cup (180 ml) warm water
3 lemons, zested and peeled
¼ cup (60 ml) maple syrup
1 teaspoon vanilla extract
2½ cups (375 g) raw cashews
½ cup (90 g) dates, pitted

Directions:

For The Crust:
Place the almonds, dates and coconut oil in the Vitamix container and secure the lid. Select Variable 6 and pulse 10-15 times or until the ingredients resemble a wet/sandy mixture. Do not over process. Scrape the sides of the container if needed.  


Remove from the container into a 10" pie dish. Press into place around the middle and edges of the pie pan. Refrigerate for 1 hour.


For the Filling: 

Place all ingredients into the Vitamix container in the order listed and secure the lid. Start the machine on its lowest speed and increase to its highest speed. Blend for 60 seconds until it is smooth, using the tamper to press the ingredients into the blades.

Pour the filling evenly across the pie crust and place into the refrigerator for 2-3 hours or until the pie is set.

Sunday, September 10, 2023

Salt Cured Lemons OR Preserved Lemons or Fermented Lemons

Salt Cured Lemons OR Preserved Lemons OR Fermented Lemons

 Salt highlights the rich oils found in lemon peel in this recipe for preserved lemons. Use them in any dish that needs a salty, umami kick. I like to think of them as tiny olives or capers. Once the salt cure is complete, remove the spent lemon flesh and mince the preserved lemon peels finely, sprinkling them over pasta or potatoes with herbs, or blend them into soups, dressings and sauces.

12 or more Meyer, Lisbon or Eureka lemons
½ teaspoon salt per lemon

Choose fresh, firm lemons for this recipe. Slice the blossom and stem ends off of each lemon. Then, nearly quarter each fruit; slice it lengthwise almost down to the bottom, but leave just enough flesh so that the lemon now looks like a tulip flower, 4 citrus “petals” joined at the base.

Hold this lemon “flower” in your hand and sprinkle some salt into it. Recipes vary widely, from 1/8 to 1 teaspoon salt for each lemon, but I aim roughly for ¼ teaspoon salt per Meyer lemon and ½ teaspoon salt for the larger Eureka or Lisbon varieties. In a recipe like this, which is composed mostly of salt and acid, there is far more leeway than with other ingredients, which for food safety reasons may require stricter adherence to a balance of sugar, salt and acid.

Place each lemon into a pickling crock or Mason jar, the bottom of each lemon “tulip” resting in the open top of another. Periodically tamp the layers down, so that they fit tightly together, using a wooden muddler to release the juices from each layer as you go. Make sure that by the time the jar is full, the salty brine is covering the top layer of fruit. If necessary, use a glass or ceramic weight, a sterilized non-porous stone or a clean 4-ounce jelly jar to weigh the lemons down enough to keep them submerged in their brine.

Allow the lemons to ferment slowly on the counter at room temperature, out of direct sunlight, for approximately 8 weeks before tasting them. Because of their relatively high salt and acid content, they ferment much more slowly than other cultured foods. They are finished when their flavor is salty, with a mellow tartness and no bitterness to the rind. When the lemons are fermented to your liking, store in the refrigerator, where they will last for at least a year.

Tuesday, January 10, 2023

Salt-Cured Preserved Lemons

 
Salt-Cured Preserved Lemons
Salt highlights the rich oils found in lemon peel in this recipe for preserved lemons. Use them in any dish that needs a salty, umami kick. I like to think of them as tiny olives or capers. Once the salt cure is complete, remove the spent lemon flesh and mince the preserved lemon peels finely, sprinkling them over pasta or potatoes with herbs, or blend them into soups, dressings and sauces.

Ingredients:
12 or more Meyer, Lisbon or Eureka lemons
½ teaspoon salt per lemon

Directions:
Choose fresh, firm lemons for this recipe. Slice the blossom and stem ends off of each lemon. Then, nearly quarter each fruit; slice it lengthwise almost down to the bottom, but leave just enough flesh so that the lemon now looks like a tulip flower, 4 citrus “petals” joined at the base.

Hold this lemon “flower” in your hand and sprinkle some salt into it. Recipes vary widely, from 1/8 to 1 teaspoon salt for each lemon, but I aim roughly for ¼ teaspoon salt per Meyer lemon and ½ teaspoon salt for the larger Eureka or Lisbon varieties. In a recipe like this, which is composed mostly of salt and acid, there is far more leeway than with other ingredients, which for food safety reasons may require stricter adherence to a balance of sugar, salt and acid.

Place each lemon into a pickling crock or Mason jar, the bottom of each lemon “tulip” resting in the open top of another. Periodically tamp the layers down, so that they fit tightly together, using a wooden muddler to release the juices from each layer as you go. Make sure that by the time the jar is full, the salty brine is covering the top layer of fruit. If necessary, use a glass or ceramic weight, a sterilized non-porous stone or a clean 4-ounce jelly jar to weigh the lemons down enough to keep them submerged in their brine.

Allow the lemons to ferment slowly on the counter at room temperature, out of direct sunlight, for approximately 8 weeks before tasting them. Because of their relatively high salt and acid content, they ferment much more slowly than other cultured foods. They are finished when their flavor is salty, with a mellow tartness and no bitterness to the rind. When the lemons are fermented to your liking, store in the refrigerator, where they will last for at least a year.

To use, remove a piece of lemon and rinse it. (Add more fresh lemons to the brine as you use them up.) The minced rind is added at the very end of cooking or used raw; the pulp can be added to a simmering pot.

Thursday, May 12, 2022

Lavender & Honey Lemonade Swizzle

Lavender & Honey Lemonade Swizzle
A traditional swizzle has rum and tropical juices mixed up with a signature wooden stick for a perfectly frosty cocktail. Give this swizzle-style classic lemonade a seasonal spin with the addition of lavender, a perfect complement for the honey. If you don’t have gin, most spirits will work well, and if you don’t have a swizzle stick, you can use a barspoon or whatever you have on hand.


Makes 6 cocktails or 4 1/2 cups (1.125 L) lavender-honey lemonade
Ingredients:
2 lemons, plus 1 more for garnishing
2 1/2 cups (625 mL) water, divided
1/2 cup (125 mL) liquid honey
2 tbsp (30 mL) edible dried lavender buds
6 oz gin or vodka
Lavender sprigs for garnish (optional)
Directions:
Using a vegetable peeler, pull long strips of peel from 2 lemons, being careful to avoid pith. Place in a small saucepan along with 1/2 cup (125 mL) water. Stir in honey and lavender. Bring to a gentle simmer and let simmer about 5 minutes. Remove from heat. Let stand, allowing mixture to cool and flavours to infuse, 30 to 40 minutes.

Meanwhile, squeeze and strain 1/2 cup (125 mL) juice from peeled lemons into a large measuring cup.

When syrup is cooled and infused, strain into a pitcher. Stir in lemon juice and 2 cups (500 mL) cold water. If making ahead, lavender lemonade will keep well, covered and refrigerated, for 2 to 3 days.

To make cocktail, pour 1 oz each gin (or vodka) and some lemonade into a crushed ice– filled Collins glass. Using a swizzle stick or barspoon, stir by rubbing it between your palms or stirring until chilled. Top with more ice, if needed. Garnish with lemon peel strip and lavender sprig. Repeat for five more servings.

Makes 6 cocktails or 4 1/2 cups (1.125 L) lavender-honey lemonade

Tuesday, March 1, 2022

Salmon Baked With Herbs and Caramelized Lemons


Salmon Baked With Herbs And Caramelized Lemons 
Ingredients:
1 5⁄8 kg or 3 lb. salmon, scaled, gutted and washed (1 whole salmon)
olive oil, and drizzling (for cooking)
sea salt
fresh ground black pepper
2 bay leaves
3 sprigs rosemary
3 sprigs thyme
3 sprigs basil
3 sprigs sage
3 sprigs parsley
1 head garlic, halved horizontally, then broken into cloves (unpeeled)
2 -3 stalks lemongrass, split in half lenghtways and bruised with the back of a knife 
3 small lemons, thickly sliced 
5 -6 star anise
1 teaspoon mixed peppercorns (or black)

Directions
Trim a little of the tail and fins of the salmon with kitchen scissors and pat dry with kitchen paper. Pat the cavity dry as well. Score the skins of the salmon on both sides with a sharp knife at 1 - 2 intervals. Rub all over with olive oil, salt and pepper.

Tear two sheets of foil, large enough to envelope the salmon easily. Lay one on top of the other on the work surface and scatter the bay leaves, herb sprigs, garlic and lemongrass over the middle o the foil. Lay the fish on the bed of herbs and tuck some of the flavourings into the cavity.

Fry the lemon slices in a little olive oil for 2 - 3 minutes until caramelized around the edges, seasoning them with salt and pepper. Allow to cool slightly. Tuck the caramelized lemon slices around the fish, placing some in the cavity and some on top. Scatter the star anise and peppercorns over and around the fish, putting some inside the cavity. Drizzle the salmon with a little olive oil. Heat the oven to 190 degrees centigrade or 375 Fahrenheit.

Fold the edges of the foil tightly together over the salmon to seal, leaving some space in the parcel for steam to surround and cook the fish. Put the salmon parcel in the roasting tin and cook in the centre of the oven for 25 - 30 minutes, depending on the thickness of the salmon. Remove from the oven and without unwrapping the foil parcel, rest the fish for 5 - 10 minutes.

Unwrap the salmon and peel off the skin with a palette knife. Use the back of a spoon to slide the fish off the bone. Serve individual portions garnished with the caramelized lemons. Serves 4.

Saturday, September 18, 2021

Pancit


Pancit
Aunt Joan's recipe follows list of ingredients.
Sesame oil
Oyster Sauce
Soy Sauce
Carrots
Chinay (Chinese Celery)
Garlic,
Onion diced
Noodles for Pancit, non dyed
Bean Thread Noodles
Chicken Stock
Lemon

***
Ingredients
Serves: 6
340g rice noodles
1 teaspoon vegetable oil
1 onion, finely diced
3 cloves garlic, minced
2 cups (280g) diced cooked chicken breast meat
1 small head cabbage, thinly sliced
4 carrots, thinly sliced, diagonally
1/4 cup (60ml) soy sauce
2 lemons - cut into wedges, for garnish

Directions:   Cook time: 20min,  Ready in:40min
Place the rice noodles in a large bowl and cover with warm water. When soft, drain and set aside.

Heat oil in a wok or large frypan over medium heat. Saute onion and garlic until soft. Stir in chicken cabbage, carrots and soy sauce. Cook until cabbage begins to soften. Toss in noodles and cook until heated through, stirring constantly. 

Transfer pancit to a serving dish and garnish with quartered lemons.

Saturday, December 26, 2020

Moorish Lamb Chops With Charred Lemons

                   MOORISH LAMB CHOPS
                  WITH CHARRED LEMONS
Garlicky and robustly spiced, these lamb chops come together quickly for an easy weeknight dinner. Charring lemons softens their acidity and adds caramel notes to the juice. More commonly done with kebabs, this Spanish-style preparation was influenced by the Moors, who occupied parts of the Iberian Peninsula for centuries.

Ingredients:
2 tsp (10 mL) ground cumin
1 tsp (5 mL) ground coriander
1 tsp (5 mL) paprika
1/2 tsp (2 mL) turmeric
1/2 tsp (2 mL) dried oregano
1/4 tsp (1 mL) cayenne pepper
2 cloves garlic, finely grated on a rasp
2 tbsp (30 mL) extra virgin olive oil, plus more for brushing lemons
1 tbsp (15 mL) fresh lemon juice
12 small or 8 large lamb rib chops
Salt and freshly ground pepper to taste
2 small lemons, halved crosswise, visible seeds removed

Directions:
1. In a small bowl, whisk spices, garlic, oil and lemon juice. Set aside.

2. Lay out the lamb chops in a large nonreactive baking dish. Season both sides with salt and pepper. Spoon marinade over lamb and rub in with fingers to coat both sides evenly. Refrigerate at least 1 hour and up to 8 hours.

3. Preheat grill to medium-high. Clean and oil grate.

4. Brush cut sides of lemons with olive oil. Grill lamb chops until nicely charred and pink in the middle, 2 to 3 minutes per side for small chops and about 4 minutes per side for large. While lamb chops are cooking, grill lemons on cut-sides only until charred, about 3 to 4 minutes. Transfer chops and lemons to a serving platter.

Serves 4


Wednesday, March 11, 2020

Salmon With Whiole Lemon Dressing

Salmon With Whole Lemon Dressing

Ingredients:
2 lemons, seeds removed, peel, pith and fruit, finely 
   chopped
1 small shallot or garlic clove, finely chopped
3 oregano, or thyme sprigs, leaves stripped and 
   chopped
2 tablespoons white wine vinegar
Kosher salt and freshly ground black pepper
1/4 cup olive oil, plus more for drizzling
1 1/2 pounds skin-on salmon fillet (skinless is fine in
   a pinch)
1 head butter or Little Gem lettuce, torn into large 
   pieces
2 Persian cucumbers or radishes, or both, sliced for 
   serving

Directions:

Heat oven to 325 degrees. In a small bowl, combine finely chopped lemon, shallot, oregano and vinegar for the dressing. Season with salt and pepper, and add 1/4 cup olive oil. Set aside.

Season salmon on both sides with salt and pepper. Place skin-side down in a 9-by-13-inch baking dish (or other 2-quart equivalent). Spoon half the lemon dressing over the salmon, and place in the oven until salmon is just cooked through but still a nice orange-pink in the thickest parts for more of a medium-rare salmon, 15 to 20 minutes, depending on the thickness of the fillet.

Meanwhile, scatter lettuces onto a large serving platter. Once salmon is out of the oven, use a spoon or spatula to transfer it to the serving platter with the lettuces, leaving behind the skin. Spoon remaining lemon dressing over the salmon and lettuces. Serve alongside cucumbers or radishes, or both, for crunch.

Sunday, January 17, 2016

Braised Chicken With Lemon And Olives

Braised Chicken With Lemon And Olives

Use any olives with pits that you like; the Italian Castelvetrano bright green olives are sweeter than most olives, with a meaty bite. Chicken breast, legs, and/or wings will also work here, but white meat won’t be as succulent. This recipe is published by David Tanis’ in The New York Times. Maureen Abood.
Serves: 3 to 4
INGREDIENTS
1 tablespoon butter
1 tablespoon extra-virgin olive oil
6-8 chicken thighs
Kosher salt and freshly ground black pepper
¼ teaspoon red pepper flakes
½ teaspoon crushed fennel seeds
2 garlic cloves, minced
2 small lemons (Meyer lemons also work well), cut in wedges
1 cup olives with pits, ideally large green olives such as Castelvetrano
1 cup chicken stock
Chopped parsley, for finishing

Directions:
Heat the oven to 375°F. In a large ovenproof skillet, heat the butter and oil over medium high heat. Pat the chicken thighs dry with paper towel and season all over with salt and pepper.
Place the thighs skin side down in the hot pan and cook, without disturbing, until the thighs lift easily from the pan and the skin is deep golden brown, about 5 minutes. Turn the chicken over and sear for another few minutes, until golden. Take care not to burn the skin or the oil by adjusting the heat down a bit.
Remove the thighs to a plate and pour off all but a tablespoon of the fat. Return the pan to medium heat and deglaze it by pouring the chicken stock in and scraping up any browned bits as the stock comes to a boil.
Return the thighs to the pan skin side up. Season with the red pepper flakes and fennel seeds, then smear with the garlic. Arrange the lemon wedges and olives around the chicken, squeeze a couple of the wedges over the chicken and into the drippings.
Cover the skillet with foil or top and place on the center rack in the hot oven. Bake for about one hour, or until chicken is very tender and juices run clear.
Arrange the chicken, olives, and lemon wedges on a platter and tent with foil. Return the skillet to medium heat and spoon off as much fat as possible. Bring the pan juices to a boil and reduce for about a minute. Pour over the chicken, dust with chopped parsley, and serve immediately.

Sunday, November 23, 2014

How To Make Preserved Lemons A Moroccan And Middle Eastern Speciality

Unlock one of the secrets of Moroccan and Middle Eastern cuisine and discover how preserved lemons transform a dish into something indescribably exquisite!

If you’re a fan of Moroccan and Middle Eastern cooking you’ve probably had the experience of thumbing through recipes, drooling all the while, earmarking the ones you particularly like, only to then scan through the ingredients and see the words:  “Preserved Lemons”.  Your heart sinks for a moment as you realize you’re sorely lacking this crucial ingredient (and simultaneously wondering, what the heck is a “preserved lemon” anyway??)  And so with disappointment you un-earmark that page and move on to the next recipe.

DON’T let that scenario stop you again!
Preserved lemons are so easy and quick to make, last practically forever, and will enhance your dishes like nothing you’ve ever tasted.  If you’re willing to take a few minutes of your time to make these preserved lemons, you’ll be able to reap your lemony harvest throughout the rest of the year.

Okay, so first things first.  What are preserved lemons?  They’re lemons that have been pickled in salt and their own juices and left to sit for a month before using.


Preserved lemons will transform your dish from something good into something amazing.  Think about how much you love things flavored with lemon.  Preserved lemons are lemons on steroids.  They add an intense, concentrated lemon flavor to the dish without all the sour tartness.  The preserving process tempers the tartness while accentuating the lemon flavor.  Mildly tart but intensely lemony.  See, I told you.  Don’t think twice next time about leaving out this touch of heaven.

Preserved lemons are used throughout Morocco, the Middle East and in certain areas of India to add flavor to a variety of dishes – everything from meats to salads, stews and sauces.  And really, your imagination is the limit to how they can be used and enjoyed.

Here are a few more ideas:
Salad Dressings.  Blend some preserved lemon into it and that dressing will love you forever.  

Fish.  Seafood and lemons are soul mates.  Now think about relationship seafood and preserved lemons can form.  Till never do us part.  Whip up a lovely marinade for your fish with some finely diced or blended preserved lemon or add it to your sauce to drizzle over your fish.  

Healthy Grain Dishes and Salads.  Think nutty roasted barley or quinoa tossed with vegetables and tiny bits of preserved lemon with a tasty vinaigrette.  Or how about a preserved lemon risotto or pilaf?  Now you’re talking.  

Pasta.  Buttery pasta tossed with a creamy preserved lemon sauce?  Commmme to mama!  

Dips.  Try adding some preserved lemon to your hummus next time.  Or to your baba ganoush. 

Salsas.  Next time you make your famous mango/pineapple/however-you-make-it salsa, add some diced preserved lemon to it.  Life never was so good.

How To Make 
Toss the lemon slices in kosher salt to coat, and place them into a sterile 2 quart glass jar. Pour in the lemon juice, cover tightly, and let stand on the counter for 1 week. Turn the jar over daily. At the end of the week, top the jar off with enough olive oil to cover the lemons. This will keep in the refrigerator for up to 4 months.

How To Use 
To use, pull the lemon pulp from the peel, and scrape out the pith to leave only the yellow rind. Julienne, and add to your favorite dish for a lemony zing.