Showing posts with label AP Flour. Show all posts

Friday, October 23, 2026

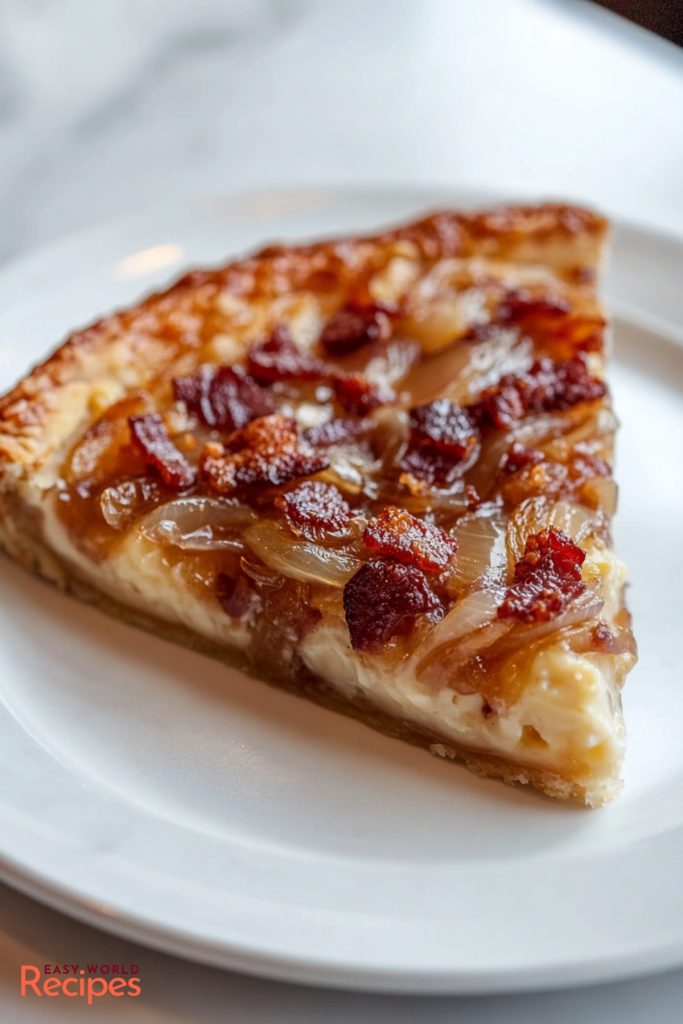
Authentic Zwebelkuchen ~. Bacon and Onion Pie

    Authentic German Zwebelkuchen
    Bacon and Onion Pie
    Treat yourself to an easy but nutritious dish.  Just add a vegetable and salad and the meal is ready.  Leftovers are easily reheated.  Serves 8.
    Ingredients:
    For the Dough:
    1 cup (240ml) warm milk (110°F/45°C)
    2 1/4 tsp active dry yeast
    1 tsp sugar
    2 1/2 cups (320g) all-purpose flour
    1 tsp salt
    2 tbsp butter, softened
    For the Filling:
    2 lbs (900g) yellow onions, thinly sliced
    6 oz (170g) bacon, chopped
    2 tbsp butter
    1 cup (240g) sour cream
    3 large eggs
    1/2 tsp ground nutmeg
    1/2 tsp salt
    1/2 tsp freshly ground pepper
    1 tsp caraway seeds (optional)
Directions:
Prepare Dough: Activate yeast in warm milk with sugar. Mix with flour, salt, and butter, then knead until smooth. Let rise for 1 hour.

Caramelize Onions: Cook onions in butter over medium heat until golden, about 25 minutes. Cook bacon until crisp.

Prepare Filling: Whisk sour cream, eggs, nutmeg, salt, and pepper. Stir in onions, bacon, and caraway seeds.

Assemble: Roll out dough, press into springform pan, and pour filling over it.

Bake: Bake at 375°F (190°C) for 40-45 minutes until golden.

    Tuesday, October 6, 2026

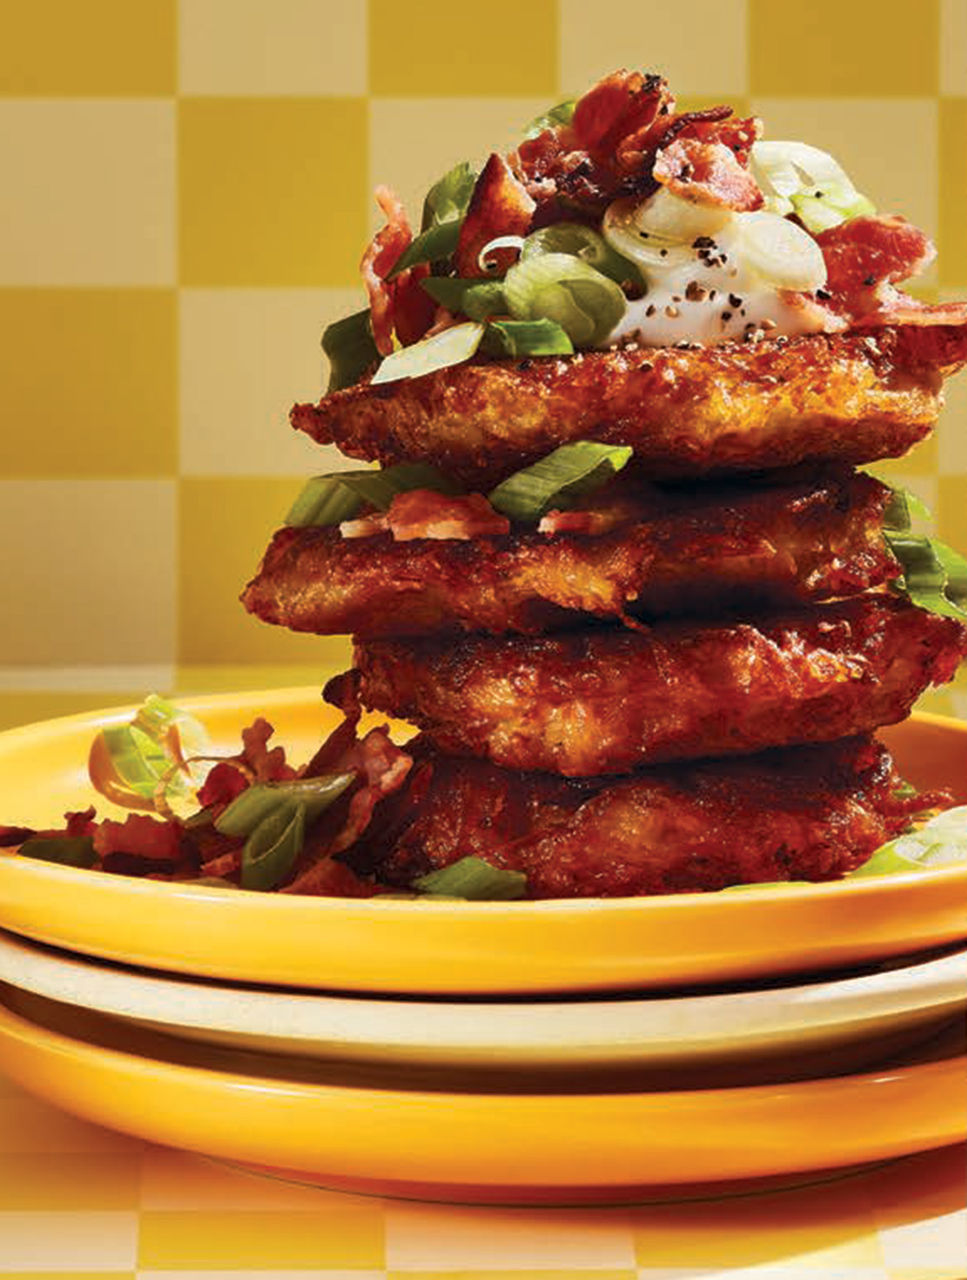
    Placki Ziemmiaccxane ~. Polish Potato Pancakes

    Placki Ziemniaczane (Polish Potato Pancakes)
    Golden, crispy and full of flavor, these traditional Polish potato pancakes make the perfect savory snack to enjoy with one of the country’s excellent crisp lagers. The pancakes can also be made slightly smaller and served as an appetizer or side for a main course.
    Ingredients:

    4 oz (115 g) sliced bacon, about 6 slices
    4 medium-size russet potatoes, about 2 lbs (905 g) total
    1/4 cup (60 mL) finely grated white onion
    2 eggs
    2 tbsp (30 mL) all-purpose flour
    Kosher salt and black pepper to taste
    Canola oil for frying
    1/2 cup (125 mL) sour cream
    1/4 cup (60 mL) finely sliced green onion


    Directions:

    Preheat oven to 400°F (204°C).

    Place bacon on parchment-lined baking tray and bake until well-browned and crisp, about 10 to 12 minutes. Remove from oven and transfer to plate or tray lined with paper towel. Allow to cool to room temperature. Crumble into small bits. Set aside.

    Peel and finely grate potatoes. Transfer to double layer of cheesecloth or clean tea towel and wring out as much liquid as possible, reserving liquid. Transfer potatoes to large mixing bowl. Allow reserved liquid to sit for 2 minutes, then pour out (a layer of white potato starch should remain at bottom of bowl). Add potato starch to grated potato along with grated onion, eggs and flour. Season to taste with salt and pepper.


    In a large frying pan, heat 1/4-inch (5-mm) layer of oil over medium-high heat until shimmering. Reduce heat to medium. Being careful not to overcrowd the pan, add 1/4-cup (60-mL) spoonfuls of potato mix to the pan and flatten with metal spatula. Fry until golden brown on first side, about 2 to 3 minutes. Carefully turn pancakes over and cook until golden brown and crisp, about 2 to 3 minutes more.

    Reduce oven temperature to 200°F (93°C).

    Transfer pancakes to tray lined with wire rack and keep warm in oven while repeating the process to cook remaining mix. Serve immediately topped with dollops of sour cream, sliced green onion and bacon bits.

    Makes about 16 pancakes; serves 6 to 8

    Friday, September 25, 2026

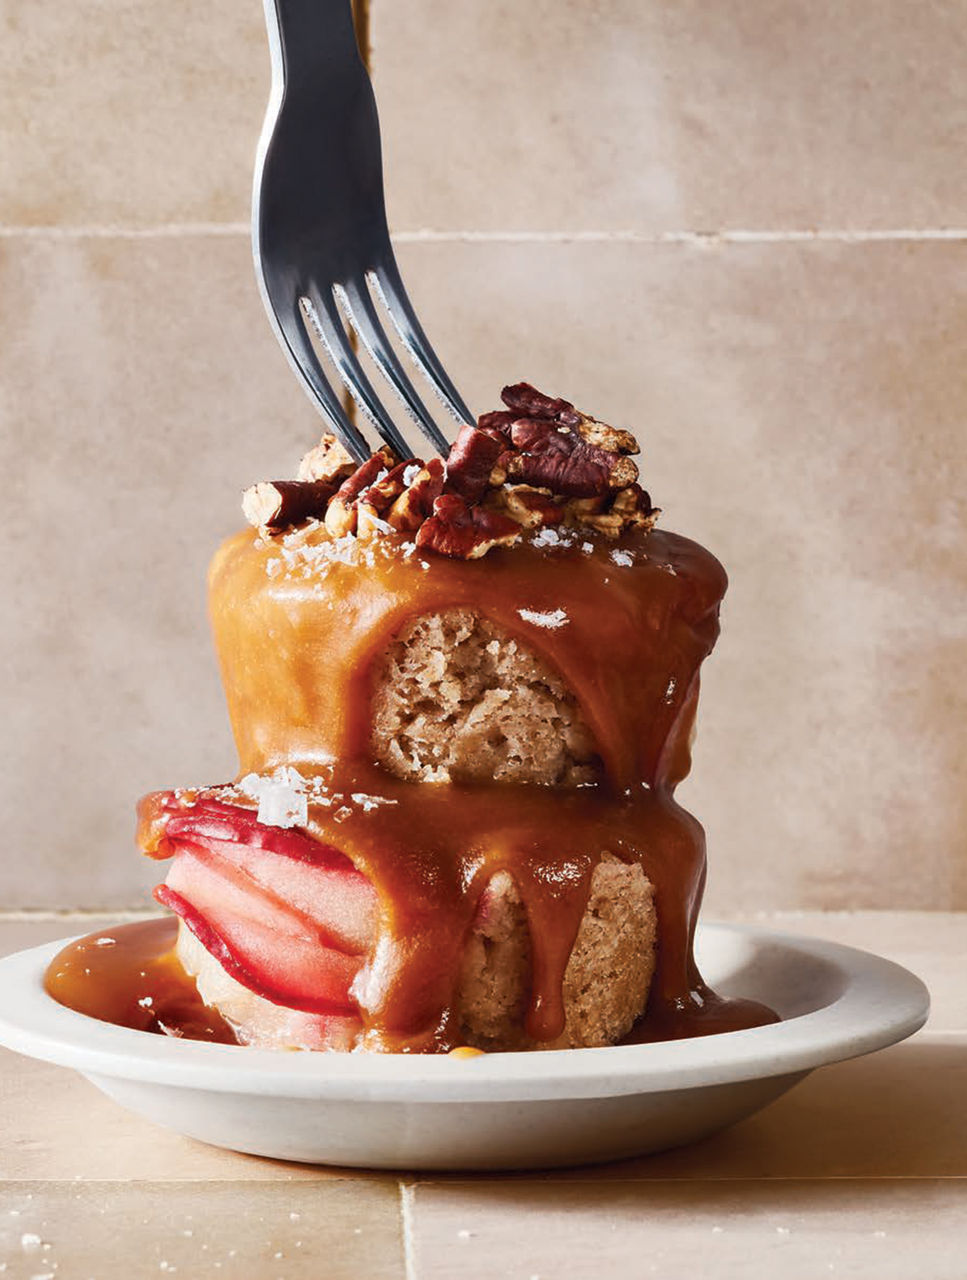
    Individual Apple Duffs With Molasses Caramel Sauce


    Individual Apple Duffs With Molasses Carmel Sauce
    This scrumptious dessert is a spin on Newfoundland's classic figgy duff, a bread like, raisin studded boiled dessert.  Individual-sized puddings are cooked in a water bath resulting in a moist, tender mixture.  Served warm, they are drizzled with a rich molasses-kissed caramel sauce and sprinkled with toasted nuts for crunch.
    Ingredients:
    Apple Duffs:
    2 1/2 cups AP flour
    2/3 cup sugar
    2 1/2 teaspoons cinnamon
    1 1/2 teaspoons baking powder
    1/2 teaspoon salt
    1/2 cup salted butter, melted
    1/2 cup milk
    1 teaspoon pure vanilla extract
    1 medium unpeeled Royal Gala apple, halved and cored
    Molasses Caramel Sauce:
    1 cup light brown sugar
    1/2 cup heavy cream
    1 tablespoon fancy grade molasses
    1/4 cup salted butter
    Chopped toasted pecans or walnuts and
    Flaky sea salt for serving (optional)
    Directions:
    Set rack in middle of oven. Preheat to 350*F.  Bring a large pot of water to a boil.  Lightly grease a 12 cup muffin tin.  Set aside.

    In a large bowl, mix flour, sugar cinnamon, baking powder, and salt until combined.  Stir butter, milk, and vanilla into dry ingredients until a soft dough forms.  Divide mixture between prepared muffin cups.  Using a spoon lightly press down to spread dough to edges and level.

    Using a mandolin, thinly slice apple halves.  Insert apple slices along one side of duffs. skin side up, tucked between dough and edge of pan, until all apple slices are used up.   Makes 12 cakes

    Set muffin pan in a large deep roasting pan .  Edges of roasting must be higher than muffin pan.  Slowly pour hot water onto roasting pan, being careful not to splash water onto dough.  Add enough water to come halfway up the muffin pan.  Tightly cover the roasting pan with aluminum foil.  Cut a few slits in the top to vent.  Carefully place pan on middle rack.  Bake until puddings are puffed and a tester inserted in the middle comes out clean, about 40 minutes.  Remove muffin pans from water bath and set on cooling rack.  Cool at least 15 minutes before serving.

    While duffs are baking make the caramel sauce by stirring sugar, cream, molasses and butter, in a medium saucepan.  Place over medium heat and cook until butter is melted and mixture is combined.  Bring to a boil and cook until slightly thickened, 2 to 3 minutes.  Scrape mixture into a bowl-- it will thicken as it cools.

    To serve, carefully lift duffs out of muffin cups and place on individual cups and place on Individual plates.  Spoon sauce over still warm cakes and sprinkle with nuts and flaky salt if using.  Makes 12 duffs.


    Tuesday, September 22, 2026

    Tender Juicy Beef Tips

    Tender Juicy Beef Tips
    This dish requires time from start to finish.  It is also a great reheat for another meal.
    Ingredients:
    2 pounds beef stew meat cut into 1-inch cubes
    2 teaspoons light brown sugar
    2 teaspoons kosher salt
    ½ teaspoon black pepper
    ½ teaspoon garlic powder
    ½ teaspoon onion powder
    2 tablespoons all-purpose flour
    2 tablespoons olive oil
    1 large yellow onion diced
    4 cloves garlic minced
    2 ¾ cups low-sodium beef broth divided
    1 tablespoon Worcestershire sauce
    1 tablespoon soy sauce
    1 tablespoon red wine vinegar
    2 teaspoons dried thyme
    Directions:
    Pat the beef dry with paper towels. In a large bowl, toss the beef with the brown sugar, salt, black pepper, garlic powder, onion powder, and flour until every piece is lightly coated.

    Heat the olive oil in a 6-quart Dutch oven over medium heat. Add the beef in a single layer without crowding the pan, working in two batches if needed. Sear 2 to 3 minutes per side, until deeply browned. Transfer the beef to a plate and set aside.

    Add the diced onion to the oil and drippings in the pot along with 1 tablespoon of the beef broth. Cook 5 to 6 minutes, until the onions are soft and translucent, scraping up the browned bits from the bottom of the pot. Stir in the garlic and cook 1 minute, until fragrant.

    Return the beef and any accumulated juices to the pot. Pour in the remaining beef broth, then add the Worcestershire sauce, soy sauce, red wine vinegar, and thyme. Stir to combine.

    Bring the liquid to a simmer, cover tightly, and reduce the heat to low. Simmer gently about 2 hours, until the beef is fork tender and the gravy has thickened. Stir every 30 minutes so the bottom does not scorch, and add more beef broth if the liquid reduces too far. Taste and adjust salt before serving.

    Friday, September 11, 2026

    Dubai-Style Chocolate & Pistachio Tart

    Dubai-Style Chocolate & Pistachio Tart
    The Dubai chocolate bar is a pistachio and chocolate confection that’s been one of the biggest viral hits of 2025, and made this combination of flavors one of the hottest food trends around. Try the pairing in this indulgent dessert from the development & innovation chef Will Torrent. Serves 8
    Ingredients:
    For the pastry
    75g pistachio kernels                                    2/3 cup
    125g caster sugar                                          2/3 cup
    300g plain flour, plus a little for dusting      2 1/2 cup +
    225g Butter with Sea Salt Crystals, cold     1 cup
    1 medium Egg
    For the pistachio layer
    70g Nestlé Shredded Wheat                        1 1/2 cup
    Pinch sea salt flakes
    200g Creamy Pistachio Spread                   5/8 cup
    1½ tsp vegetable oil
    For the ganache
    150ml whipping cream  5/8 cup or       1/2 cup plus 1 tablespoon
    25g No.1 French Butter with Sea Salt Crystals.       2 Tablespoons
    2 x 100g packs No.1 Dark Chocolate 65%.   1.14 cups or 1cup + 1 T 
    75g No.1 Milk Chocolate 49%                       3/8 cup
    25g pistachio kernels, chopped                       1/4 cup
    Directions:
    Make the Pastry by grinding the pistachio kernels in a food processor until fine. Take care not to overwork them!  Pulse in the sugar and flour. Add the cold butter in cubes, then pulse until the mix resembles fine crumbs. Beat the egg and pulse into the crumbs until a dough forms, adding 1 tbsp water if required to help it come together. Shape into a disc, wrap and chill for at least 2 hours, or ideally overnight.

    On a work surface dusted with flour, roll the pastry out to about 0.5cm thickness and large enough to line a 23cm loose-bottomed fluted tart tin with some excess. Prick the base with a fork, then chill for 30 minutes, or until firm.

    Preheat the oven to 190ºC, (375F) gas mark 5. Line the pastry with baking parchment, fill with baking beans, then bake for 15 minutes until the pastry is pale and set. Remove the beans and paper, then cook for 5-10 minutes more, until the edges are golden. Remove from the oven and leave to cool completely. Using a sharp knife, carefully trim any excess pastry from the edges and top of the tin.

    Using your hands, crush the Shredded Wheat and salt into a large bowl. Mix in the pistachio spread, then gradually add the oil to loosen slightly. Spread over the base of the cooled pastry case, then set aside.

    For the Ganache, warm the cream and butter in a small saucepan over a low heat. Meanwhile, finely chop all the chocolate and put into a separate bowl. Pour the cream mix over the top into the centre of the chocolate bowl, then leave for 1 minute to rest in the warm cream. 

    Stir with a spatula from the middle to gently mix together until smooth, melted and combined. Pour over the pistachio layer, then swirl attractively from the centre. Sprinkle the chopped pistachios around the edge of the tart.

    Chill for 1-2 hours, then remove from the fridge 20 minutes before serving. A spoonful of crème fraîche or Greek yogurt to cut through the richness of the tart makes a tasty addition, if liked, as do some raspberries on the side.

    Cook’s tip
    If the ganache seems a little split, add about 1 tbsp cold milk, then whisk thoroughly to bring it together again.
    Recipe from Waitrose Grocery Market,  London England

    Monday, August 10, 2026

    Tres Leches Layer Cake

    Tres Leches Layer Cake
    Stacking layers and homemade toasted almond milk ups the ante on one of Mexico’s favorite desserts. I’ll admit this beauty is a project, but what a tasty one. You can spread the work out over a couple of days. Begin by making the Toasted Almond Milk (recipe follows)—just don’t drink all of it before making the cake batter and the soaking liquid. Also, that same day, make the caramelized white chocolate and ganache. If you’d rather skip the time-consuming (but easy) step of caramelizing the chocolate yourself, see the TIP below. Lastly, be sure to thoroughly chill the cake before frosting. Serves 8
    Ingredients:

    Caramelized White Chocolate Ganache
    2 pkgs (each 170 g) white chocolate, chopped
    ¾ cup (175 mL) whipping cream
    Pinch salt
    Cake
    Butter for buttering tins
    1¾  cups (425 mL) all-purpose flour
    ½ tsp (2 mL) salt
    2¼  tsp (11 mL) baking powder
    3 eggs, plus 1 egg yolk
    1¼  cups (310 mL) sugar
    1 tsp (5 mL) vanilla extract or paste
    2/3  cup (150 mL) Toasted Almond Milk
    To Assemble
    ¼ tsp (1 mL) ground cinnamon
    1 tsp (5 mL) vanilla extract or paste
    1 cup (250 mL) Toasted Almond Milk
    1 can (150 mL) evaporated milk
    ¼  cup (60 mL) sweetened condensed milk
    1¼  cups (310 mL) whipping cream

    Directions:

    For the caramelized white chocolate ganache, preheat oven to 275°F (135°C).

    Spread the chocolate out on a clean baking sheet and bake on the middle rack of the oven for 40 to 50 minutes, stirring every 6 to 7 minutes, until it has the color of peanut butter.

    Add cream to a medium-size glass bowl and bring to a boil in the microwave; scrape warm chocolate into a bowl. Whisk until smooth, add salt and let cool. Cover the bowl and leave at room temperature for up to 2 days.

    For the cake, preheat the oven to 350°F (180°C). Butter three 8-inch (20-cm) round cake tins.

    In a small bowl, whisk together flour, salt and baking powder. In a separate large bowl, combine eggs, egg yolk, sugar and vanilla. Using an electric mixer on medium-high, beat until sugar is dissolved and mixture has quadrupled in volume, 6 to 7 minutes. Add half the flour mixture and beat on low until just combined. Add almond milk and once again beat until combined. Mix in the remaining flour mixture.

    Divide batter between the prepared cake tins. Tip or swirl the pans to evenly distribute batter and bake in the centre of the oven for 24 to 27 minutes or until a cake tester comes out clean.

    Let cakes rest in tins for 15 minutes then turn out onto a large baking sheet (or 2 if necessary). Cool to room temperature.

    To assemble, whisk together cinnamon, vanilla extract, almond milk, evaporated milk and sweetened condensed milk in a medium bowl. Using a fork, poke holes in the tops of each cake layer. Spoon the milk mixture in equal quantity over each. Let stand for 10 minutes.

    Gently reheat the reserved white chocolate ganache in the microwave until just spreadable but not liquid. Measure out ¼ cup (60 mL) and add to a medium bowl along with the whipping cream; refrigerate.

    Carefully transfer one of the cake layers to a serving platter or cake stand. Top with half of the remaining ganache and spread out just shy of the edge using an offset spatula. Top with another cake layer and repeat covering with the remaining ganache. Put final cake layer over top, cover and refrigerate until thoroughly chilled, about 3 hours.

    When ready to serve, whip reserved cream and ganache mixture to stiff peaks. Frost the cake with cream, and serve.

    Saturday, August 8, 2026

    Classic Spatzel

     
    Spatzle
    Spatzle is the German version of noodle. It is easy to make and a delicious addition or substitution to a meal.
    Here is a classic Spätzle recipe:

    Ingredients:
    2 cups all-purpose flour
    2 eggs
    1/2 cup milk
    1/2 teaspoon salt
    4 tablespoons butter, melted
    Directions:
    Combine flour, eggs, milk, and salt in a bowl. Mix until smooth.

    Bring a large pot of salted water to a boil.Use a Spätzlepresse or a colander with large holes to press the dough into the boiling water.

    Cook for 1-2 minutes or until the Spätzle float to the surface.  Remove with a slotted spoon and toss with melted butter.

    Top with grated cheese, herbs, or your preferred topping.

    Tips:Use a Spätzlepress for authentic texture, or a food mill/press as a substitute. Don't overmix the dough. Adjust the amount of milk for desired consistency.

    Monday, July 20, 2026

    Blueberry Lemon Biscotti


    Blueberry Lemon Biscotti

    The beauty of biscotti? They keep for weeks and weeks!
    Ingredients:
    2 large eggs
    ¾ cup granulated sugar
    1 tablespoon fresh lemon juice
    Zest of 1 large lemon
    1¾ cups all-purpose flour
    1 teaspoon baking powder
    ½ teaspoon kosher salt
    1 teaspoon anise seed
    1 cup frozen wild blueberries
    Directions:
    Preheat oven to 350° F and line a baking tray with parchment paper.

    In a large bowl, whisk eggs and sugar together until thick and lemon colored, about 3 minutes. Whisk in lemon juice and zest.

    In a medium bowl, whisk together flour, baking powder, salt, and anise seed. Add frozen blueberries and toss to coat. 

    Fold dry ingredients into the egg and sugar mixture and stir until thoroughly combined. The dough will be stiff and slightly sticky.
    Transfer dough to the parchment paper-lined baking tray. 

    With wet hands, shape dough into a log about 12 inches long and 3½ inches wide. Bake for 30 minutes, until the top is beginning to brown and is firm to the touch. Cool on a rack for 15 minutes.

    Line a second baking tray with parchment paper. Transfer loaf to a cutting board. With a bread knife, slice loaf into ½-inch slices. Arrange slices on the tray, cut side down. 

    Bake for 8 minutes, turn slices over, and bake for a further 8 minutes.

    Remove from the oven and cool on a rack. When biscotti are thoroughly cool, transfer to a tin, cover and store in a cool, dark cupboard. They will keep for several weeks.

    Serve biscotti on their own with coffee or tea, dip them into a cranberry bourbon toddy, or spoon bites of gelato or ice cream on top and crunch.   Makes about 24

    Recipe featured in the story, Running on Empty, in the Fall 2024 issue of Edible Alaska.

    Note:  A frozen blueberry will hold its shape when mixed in the dough. It will not break and color the dough.

    Monday, June 1, 2026

    Almond Croissant Blondies


    Almond Croissant Blondies

    This almond croissant blondies recipe combines the buttery,
    chewy blondie bar experience with the almond croissant flavors.
    Ingredients:
    Blondies
    1/2 cup unsalted butter, softened
    1 cup lt. brown sugar packed
    1 large egg at room temp
    1/4 teaspoon almond extract
    2 teaspoons vanilla extract
    1/4 teaspoon salt
    1 1/3 cup all purpose flour
    1/4 teaspoon baking powder
    1/3 cup almond flour
    1/2 cup sliced almond
    Powdered sugar for dusting
    Frangipane
    4 tablespoons butter
    1/4 cup granulated sugar
    1 egg yolk
    1/4 teaspoon vanilla extract
    1/4 teaspoon almond extract
    1/4 teaspoon orange zest optional but helps elevate the croissant 
       blondies
    2/3 cup almond flour
    pinch of salt
    Directions:
    Preheat your oven to 350*F.  Line an 8X8 inch baking pan with parchment paper.

    Frangipane,
    Cream the butter and white sugar together. 

    Mix in the egg yolk and orange zest, vanilla extract, and almond extract together.

    Fold the almond flour and salt until a paste forms.  Set aside.

    Blondies:
    In a large bowl, mix the softened butter and brown sugar until well combined.  Add the egg and vanilla extract.  Mix until smooth.

    Add the flour, baking powder, salt, and almond flour, and stir just until smooth.  Do not over mix.

    Spread the batter into the prepared baking pan.  Top with the frangipane then swirl with a wooden skewer.  Top with sliced almonds.

    Bake for 30 minutes, or until the edges are set and the center is slightly firm.  Allow the blondies to cool in pan before dusting with powdered sugar and slicing into 16  2"x 2" squares. 


    Friday, May 8, 2026

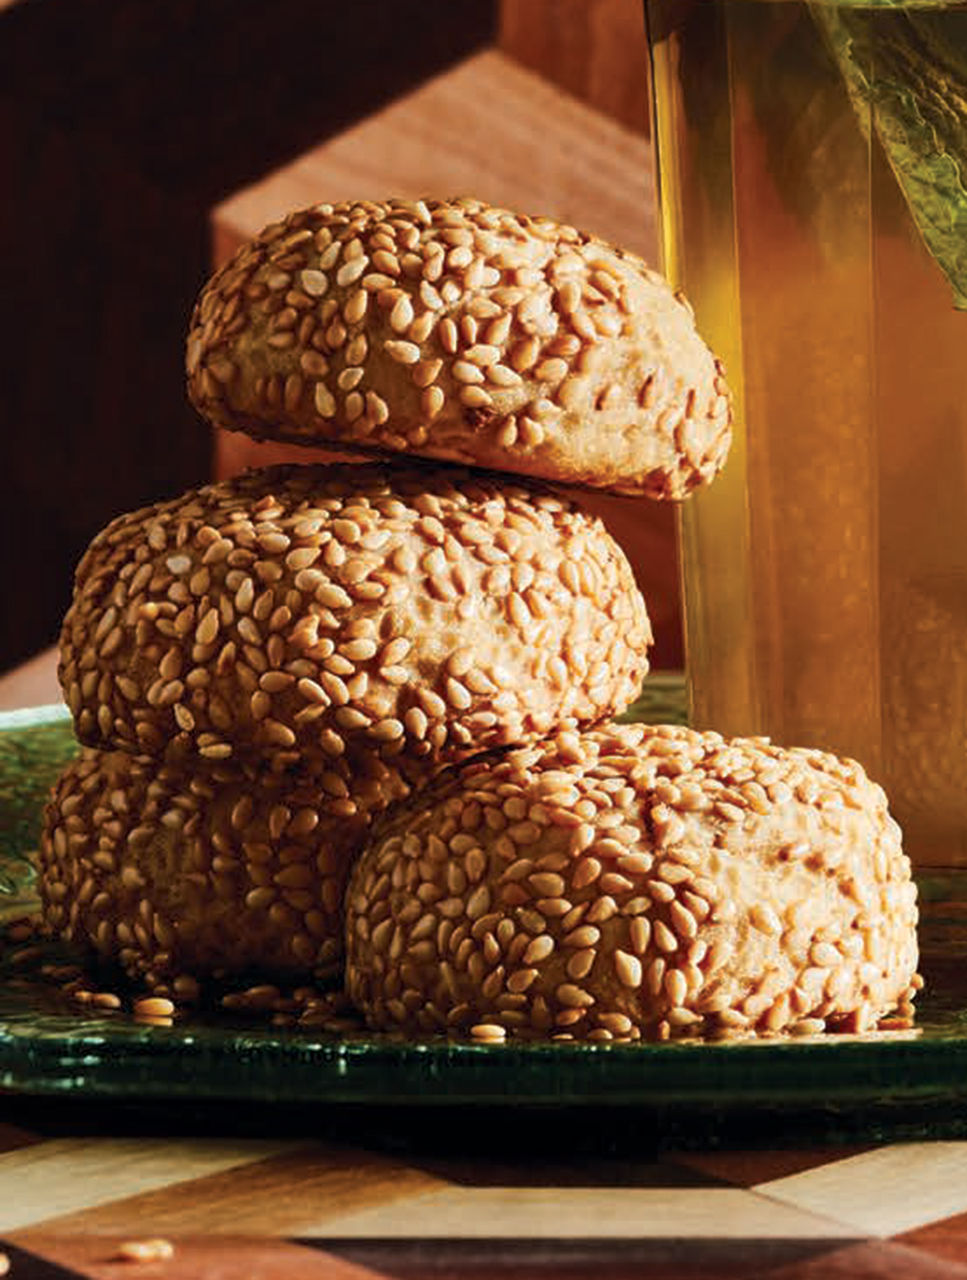
    Moroccan Sesame Cookies

    Ghoriba Dial Janjlane 
    (Moroccan Sesame Cookies)
    Golden, nutty and irresistibly crumbly, ghoriba dial janjlane are Moroccan sesame cookies that are humble yet celebratory. Toasted sesame seeds give them a deep, earthy flavor, while their rustic texture makes them the perfect companion to a cup of mint tea.
    Ingredients:
    1 1/4 cups (310 mL) sesame seeds
    1 1/2 cups (375 mL) all-purpose flour
    1 tsp (5 mL) baking powder
    1/2 tsp (2 mL) salt
    1/2 cup (125 mL) unsalted butter, softened
    1/2 cup (125 mL) sugar
    2 large eggs
    1 tbsp (15 mL) orange blossom water
    Finely grated zest of 1 medium-size lemon
    Directions:
    Arrange rack in middle of oven. Preheat to 350°F (177°C). Line two
    baking sheets with parchment paper.

    In a dry pan over medium heat, lightly toast sesame seeds, stirring
    often, until golden brown and fragrant, about 5 minutes. Transfer to a
    small, rimmed baking sheet. Stir occasionally, until completely
    cooled.

    Return pan to medium heat and add flour. Cook, stirring constantly
    until lightly golden, 4 to 5 minutes. Transfer to another small,
    rimmed baking sheet. Stir occasionally, until completely cooled.

    When seeds are cooled, place 1 cup (250 mL) sesame seeds in a
    food processor. Process until finely ground. Transfer to a mixing
    bowl along with cooled flour. Add baking powder and salt. Stir until
    combined.

    In bowl of a stand mixer fitted with paddle, beat butter and sugar
    on medium-high speed until light and fluffy, 3 to 4 minutes. Reduce
    speed to medium. Add eggs one at a time, mixing well after each
    addition. Stop and scrape down bowl. Add orange blossom water and
    lemon zest. Mix until combined. With motor running on low speed,
    gradually add dry ingredients, mixing just until a dough forms—it
    should be soft but not sticky.

    Place remaining 1/4 cup (60 mL) sesame seeds on a small plate.

    Roll 1-tbsp (15-mL) portions of dough into balls. Roll balls in
    sesame seeds to coat evenly. Place on lined baking sheet and gently
    press to flatten slightly. Repeat with remaining dough, leaving at
    least 1/2 inch (1 cm) between cookies.

    Bake cookies, one sheet at a time, on middle rack until edges are
    lightly golden, 13 to 15 minutes. They will still be soft in centres,
    but will firm up as they cool. Remove from oven and cool
    for 5 minutes before transferring to a wire rack to cool completely.

    Transfer to an airtight container and store in a cool, dark place for up
    to 5 days. Makes 30 cookies

    Thursday, April 30, 2026

    Cowgirl Cookies

    Cowgirl Cookies

    Big, hearty, and packed with goodness—Cowgirl Cookies are the ultimate “everything-in-one” cookie. Loaded with oats, chocolate chips, coconut, and crunchy nuts, these cookies are chewy, rich, and full of old-fashioned comfort. They’re the kind of cookies grandma would bake in big batches… and they disappear just as fast! You’ll love these cookies for their chewy texture, rich flavor, and loaded mix-ins. They’re perfect for sharing, gifting, or keeping all to yourself.

    Ingredients:
    1 cup butter, softened
    1 cup brown sugar
    1/2 cup granulated sugar
    2 large eggs
    2 teaspoons vanilla extract
    1 1/2 cups all-purpose flour
    1 teaspoon baking soda
    1/2 teaspoon salt
    2 cups old-fashioned oats
    1 cup chocolate chips
    1/2 cup white chocolate chips (optional)
    1/2 cup chopped pecans or walnuts
    1/2 cup shredded coconut
    Directions:

    Preheat your oven to 350°F (175°C) and line a baking sheet with parchment paper.

    In a large bowl, cream together butter, brown sugar, and granulated sugar until light and fluffy.

    Add eggs and vanilla, mixing until well combined.

    In another bowl, whisk flour, baking soda, and salt.

    Gradually add dry ingredients to the wet mixture.

    Stir in oats, chocolate chips, nuts, and coconut until evenly combined.

    Scoop dough onto baking sheet (about 2 tablespoons per cookie).

    Bake for 10–12 minutes, until edges are golden and centers are slightly soft.

    Let cool on the pan for a few minutes before transferring.

    Tips for Perfect Cookies

    • Don’t overbake—centers should stay soft for that chewy texture.
    • Chill the dough for 30 minutes if you want thicker cookies.
    • Add a sprinkle of sea salt on top for a gourmet touch.

    Thursday, April 2, 2026

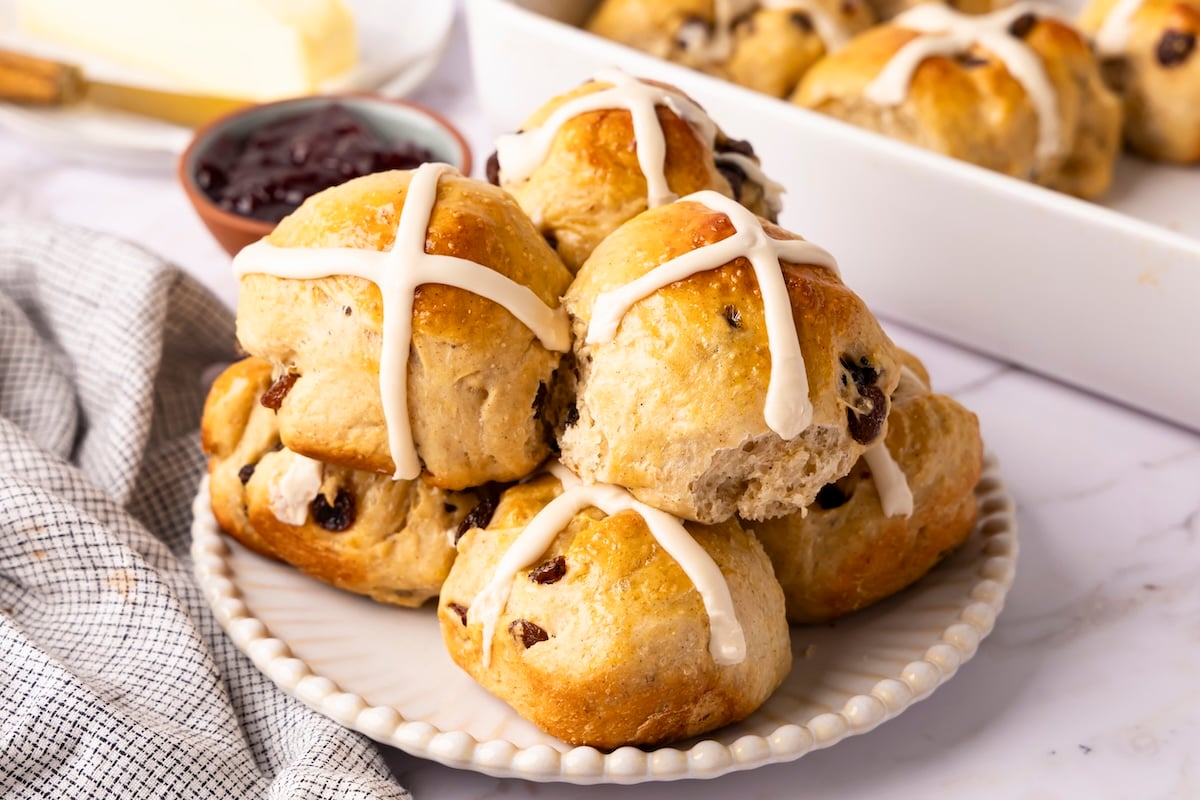
    Hot Cross-Buns Tangzhong

    Hot Cross Buns
    Classic hot cross buns—soft, lightly spiced, and studded with rum-soaked raisins for extra flavor.
    Ingredients
    For the Buns
    4½ cups all-purpose flour, spooned into measuring cup and leveled-off, plus more as needed
    1 cup warm water, divided
    1 cup raisins
    3 tablespoons rum (or water)
    ½ cup granulated sugar
    1 tablespoon instant or rapid-rise yeast (this is more than one packet)
    1¼ teaspoons ground cinnamon
    ¼ teaspoon ground nutmeg
    ¼ teaspoon allspice
    2 teaspoons salt
    6 tablespoons unsalted butter, melted and cooled slightly
    3 large eggs, divided (1 for brushing the buns)
    1 large egg yolk
    For the Icing
    1 cup (4 oz) confectioners' sugar
    3 to 4 teaspoons milk
    Pinch salt
    Directions:
    Make the Tangzhong:  Take 3 tablespoons of measured flour out of the mixing bowl and combine it in a small saucepan with 1/2 cup of the warm water (from the 1 cup): whisk until smooth.  Cook over medium heat, whisking constantly, until the mixture thickens to a smooth paste resembling pudding or thin mashed potatoes, about 2 minutes.  Scrape into a medium bowl and let cool until just warm.

    Plump the raisins and rum in a small bowl.  Cover and microwave until steaming about 1 minute.  Let set until softened, about 15 minutes.  Drain the raisins and discard the liquid, and blot dry with a paper towel.

    Mix the dry ingredients:  In a stand mixer fitted with the dough hook, add the sugar, yeast, cinnamon, nutmeg, allspice,  and salt to the flour in the mixing bowl.  Mix on low speed for about 30 seconds to combine.

     To the bowl with the tangzhong paste, add remaining 1/2 cup warm water and melted butter and whisk to combine.  Add 2 of the eggs and the egg yolk and whisk until smooth.

    Add the wet ingredients to the dry ingredients and knead on medium-low speed until you have a soft elastic dough that clings to the bottom of the bowl, 8 or 9 minutes.  The dough will be sticky, which is normal--this is what gives the buns their light, tender texture.  Reduce the speed to low,  add the raisins, and mix until incorporated, about 2 minutes.  If the raisins and fully incorporated, finish mixing the dough by hand to distribute them evenly.  

    At this point, the dough will still be quite sticky, but you should be able to handle it and shape into a ball.  If needed sprinkle in additional flour, 1 tablespoon at a time, mixing briefly just until incorporated, (you may need up to 1/4 cup more flour, add only as much as needed to make the dough easy to handle.  Lightly flour your hands and gather the dough into a smooth ball.  Transfer to a lightly oiled bowl, cover with plastic wrap, and let rise in a warm, draft free spot until noticeably puffy and lighter in texture (it may not be double in bulk 2 to 3 hours.)

    Grease a 9x13-inch baking pan with non stick spray.  Turn the dough out onto a floured counter and divide into 12 equal pieces, (about 100gm each.  To shape, pull the edges of each piece into the center to form a little pouch to seal.  Flip seam-side down, then gently roll to create a smooth ball.  Tuck any exposed raisins underneath as best you can: if some peak through, that's perfectly fine.  Arrange the balls in the prepared pan, smooth side up, in 3 rows of 4.  Cover loosely and let rise until puffy and pressing against one another.  1 1/2 hours.

    Adjust an oven rack to the middle position and preheat the oven to 350*F.

    In a small bowl, beat the remaing egg and brush the buns with it,  Bake until golden brown and the centers register 190*F with an instant read thermometer, 24 to 26 minutes.

    Transfer pan to a wire rack and let cool until just warm, about 1 hour.Run a thin knife around the edges to loosen.  You can either lift the buns out of the pan and separate them, or leave them in the pan for a more rustic presentation.

    For the Icing:  
    Combine the confectioners sugar, 3 tablespoons milk, and salt in a small bowl and whisk until smooth, adding more milk as needed.  The icing should be very thick, like a soft paste.

    Transfer the icing to a zipper-lock sandwich bag and snip the corner, about 1/8 inch opening in one of the bottom corners and pipe lines across the buns to form crosses.  If the buns are still in the pan, pipe directly over the top; if removed, pipe over the individual buns.  Serve.