Showing posts with label Orange Blossom Water. Show all posts

Wednesday, July 8, 2026

No-Cook Beet and Lentil Salad

No-Cook Beet and Lentil Salad Recipe
No Cook Beet and Lentil Salad  NYT
This vibrant salad comes to life thanks to the tangy dressing of sticky pomegranate molasses and fresh orange juice and zest. Feel free to make this recipe your own by using a different combination of soft herbs and nuts. This is quite a substantial salad, but some fried halloumi would also work nicely alongside.  Serves 6
Ingredients:
1/2 small red onion sliced very thin rounds
4 teaspoons apple cider vinegar
Fine sea salt and black pepper
3 Tablespoons EVOO
3 tablespoons pomegranate molasses, divided
1 teaspoon orange blossom water, optional
1 teaspoon grated orange zest, plus 2 tablespoons juice from 1 small orange
14 oz./ 400 grams ready to eat vacuum packed red beets cut
1 cup cannned, draied, black, browner green lentils
1/2 cup walnuts, roughly chopped
2 to 3 large handfuls roughly torn fresh mint or basil, or a combination!
Directions:
In a small bowl add the thin sliced onion, vinegar. sea-salt, black pepper.  Massage the onion to soften and set aside.

How to Make No-Cook Beet and Lentil Salad Recipe

Making this No-Cook Beet and Lentil Salad Recipe involves simple assembly steps that focus on enhancing the flavor of the fresh ingredients. Follow these instructions to assemble your No-Cook Beet and Lentil Salad Recipe efficiently and safely.

Phase One: Preparation
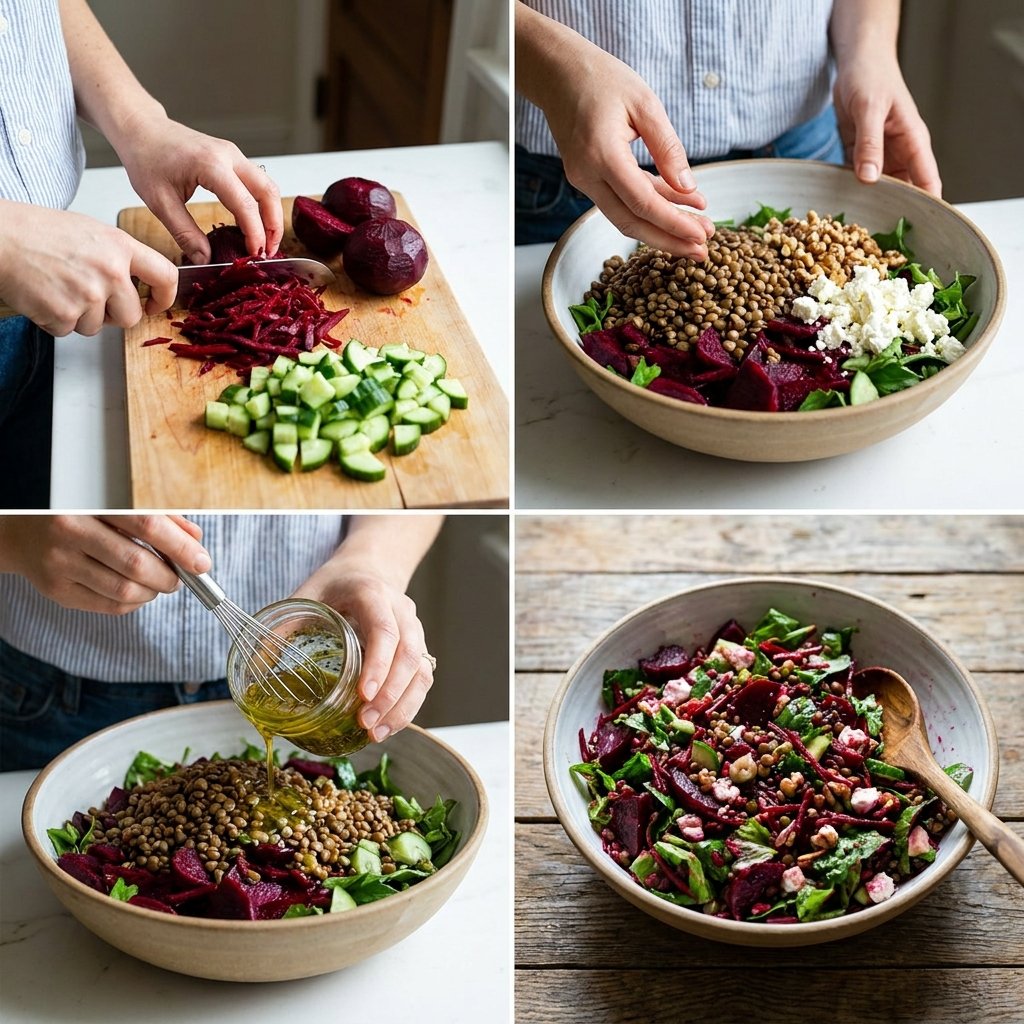
Dice the pre-cooked beets into small, uniform cubes to ensure they distribute evenly throughout the No-Cook Beet and Lentil Salad Recipe.

Rinse the canned lentils under cold running water in a colander until the water runs completely clear of any canning liquids.

Drain the lentils thoroughly to prevent the salad from becoming soggy during storage.

Phase Two: Assembly

Combine the cubed beets and drained lentils in a large mixing bowl to begin building your No-Cook Beet and Lentil Salad Recipe.

Whisk the olive oil, fresh lemon juice, salt, and pepper in a small jar to create a tangy vinaigrette for your salad.

Pour the dressing over the beet and lentil mixture and gently toss the ingredients to coat every piece evenly.

Fold in the crumbled feta cheese and chopped walnuts to add fat and crunch to your finished No-Cook Beet and Lentil Salad Recipe.

Garnish the top with fresh parsley before serving to make the dish pop with color.

Chef Tips for Perfect No-Cook Beet and Lentil Salad Recipe

Achieving the perfect flavor in your No-Cook Beet and Lentil Salad Recipe requires attention to hydration and seasoning balance. These professional tips will ensure your version is the best version of this classic dish.

Toast your walnuts in a dry pan for three minutes before adding them to the No-Cook Beet and Lentil Salad Recipe to amplify their nutty depth.
Marinate the lentils in half the dressing for thirty minutes before adding the beets to allow the legumes to absorb maximum flavor.
Always use fresh lemon juice rather than bottled concentrate, as it provides the brightness required for a top-tier No-Cook Beet and Lentil Salad Recipe.

Adjust the seasoning with an extra pinch of sea salt if the beets are particularly sweet to provide necessary balance to the salad.
Use room temperature ingredients if possible, as cold ingredients sometimes mask the delicate herbs included in this No-Cook Beet and Lentil Salad Recipe.

Common No-Cook Beet and Lentil Salad Recipe Mistakes to Avoid

Avoiding common errors ensures the consistency and flavor of your No-Cook Beet and Lentil Salad Recipe remain top-tier throughout the entire week of meal prep. Address the following issues to keep your dish from failing.

Leaving the lentils wet from the can will ruin the texture of the No-Cook Beet and Lentil Salad Recipe, so always pat them dry with a towel.

Over-tossing the salad causes the soft beets to break down and turn the entire mixture pink, which affects the presentation of the salad.
Ignoring salt content creates a bland experience, so taste your No-Cook Beet and Lentil Salad Recipe before serving to ensure the seasoning is correct.

Storing the dressing on the greens too early makes them limp, so add the final dressing components just before you plan to serve the salad.

Best No-Cook Beet and Lentil Salad Recipe Variations and Substitutions

Customizing this No-Cook Beet and Lentil Salad Recipe allows you to rotate your weekly menu while keeping the same fundamental preparation steps intact. Try these swaps based on your current pantry availability.

IngredientSubstitutionImpact on Flavor
WalnutsPecans or Sunflower SeedsAdds a milder, buttery sweetness
FetaGoat Cheese or Tofu FetaOffers a creamier, tangier profile
Lemon JuiceApple Cider VinegarProvides a deeper, fruity acidity
ParsleyFresh MintIntroduces a refreshing cooling sensation

Incorporating different nuts or herbs makes your No-Cook Beet and Lentil Salad Recipe feel new every single time you cook it. Do not be afraid to experiment with your favorites while making this No-Cook Beet and Lentil Salad Recipe.

Serving Suggestions for No-Cook Beet and Lentil Salad Recipe

This No-Cook Beet and Lentil Salad Recipe pairs beautifully with roasted chicken or seared fish for a complete high-protein dinner. For meat-free days, serve your No-Cook Beet and Lentil Salad Recipe alongside warm pita bread and a side of hummus for a complete Middle Eastern inspired meal.

Consider serving this dish in large bowls at a summer picnic where the vibrant purple contrast will stand out amongst other side dishes. If hosting a dinner party, place the salad on a bed of fresh arugula to add height and bitterness to the bowl of this No-Cook Beet and Lentil Salad Recipe.


Friday, May 8, 2026

Moroccan Sesame Cookies

Ghoriba Dial Janjlane 
(Moroccan Sesame Cookies)
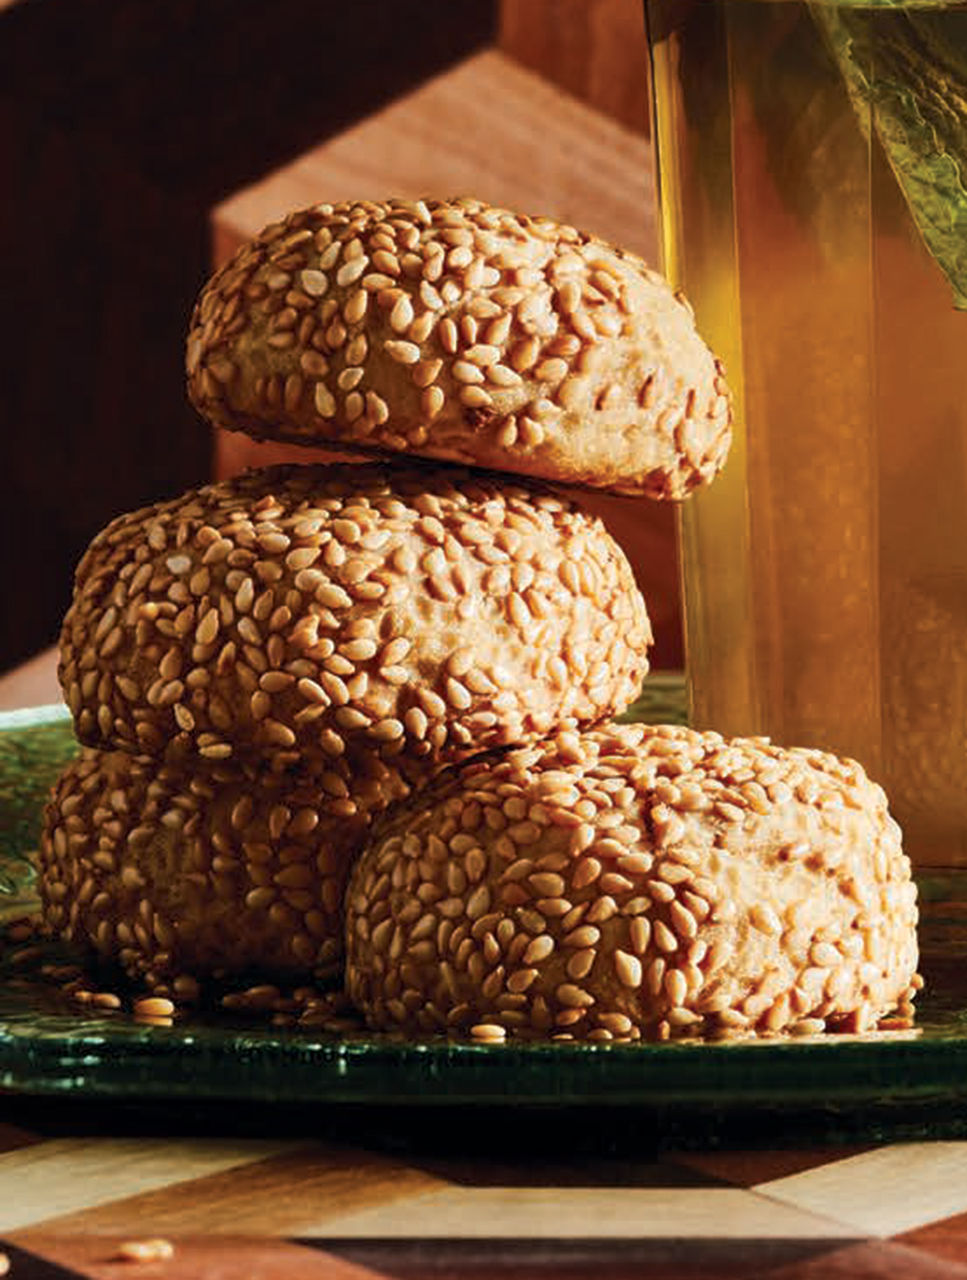
Golden, nutty and irresistibly crumbly, ghoriba dial janjlane are Moroccan sesame cookies that are humble yet celebratory. Toasted sesame seeds give them a deep, earthy flavor, while their rustic texture makes them the perfect companion to a cup of mint tea.
Ingredients:
1 1/4 cups (310 mL) sesame seeds
1 1/2 cups (375 mL) all-purpose flour
1 tsp (5 mL) baking powder
1/2 tsp (2 mL) salt
1/2 cup (125 mL) unsalted butter, softened
1/2 cup (125 mL) sugar
2 large eggs
1 tbsp (15 mL) orange blossom water
Finely grated zest of 1 medium-size lemon
Directions:
Arrange rack in middle of oven. Preheat to 350°F (177°C). Line two
baking sheets with parchment paper.

In a dry pan over medium heat, lightly toast sesame seeds, stirring
often, until golden brown and fragrant, about 5 minutes. Transfer to a
small, rimmed baking sheet. Stir occasionally, until completely
cooled.

Return pan to medium heat and add flour. Cook, stirring constantly
until lightly golden, 4 to 5 minutes. Transfer to another small,
rimmed baking sheet. Stir occasionally, until completely cooled.

When seeds are cooled, place 1 cup (250 mL) sesame seeds in a
food processor. Process until finely ground. Transfer to a mixing
bowl along with cooled flour. Add baking powder and salt. Stir until
combined.

In bowl of a stand mixer fitted with paddle, beat butter and sugar
on medium-high speed until light and fluffy, 3 to 4 minutes. Reduce
speed to medium. Add eggs one at a time, mixing well after each
addition. Stop and scrape down bowl. Add orange blossom water and
lemon zest. Mix until combined. With motor running on low speed,
gradually add dry ingredients, mixing just until a dough forms—it
should be soft but not sticky.

Place remaining 1/4 cup (60 mL) sesame seeds on a small plate.

Roll 1-tbsp (15-mL) portions of dough into balls. Roll balls in
sesame seeds to coat evenly. Place on lined baking sheet and gently
press to flatten slightly. Repeat with remaining dough, leaving at
least 1/2 inch (1 cm) between cookies.

Bake cookies, one sheet at a time, on middle rack until edges are
lightly golden, 13 to 15 minutes. They will still be soft in centres,
but will firm up as they cool. Remove from oven and cool
for 5 minutes before transferring to a wire rack to cool completely.

Transfer to an airtight container and store in a cool, dark place for up
to 5 days. Makes 30 cookies

Friday, March 21, 2025

Greek Ekmek Kataifi

                                         Greek Ekmek Kataifi
This luxurious dessert is a testament to the artistry of Greek pastry-making. It features a delicate layer of kataifi pastry (shredded phyllo) soaked in honey syrup and topped with a velvety aromatic custard layer, then whipped cream, cinnamon and pistachios. Each decadent bite is a symphony of textures and flavours. Mastic is a resin from a tree in the Mediterranean, and it has an earthy, herbal flavour. You can find it at Greek and Mediterranean grocers, though you can substitute vanilla extract in a pinch. Serves 6 to 8 
Ingredients 
Honey Syrup 
2 cups (500 ml) wildflower honey 
1/2 cup (125 ml) water 
2 strips lemon zest 
3-inch piece cinnamon stick
Kataiffi 
1/2 lb (225 g) kataifi pastry, thawed 
1/4 cup (60 mL) unsalted butter, melted, plus more for greasing dish 
3 tbsp (45 mL) chopped raw pistachios 
Directions: 
Custard
4 cups (1 L) whole milk, at room temperature
1/4 cup (60 mL) cornstarch
2 tbsp (30 mL) unsalted butter
1/2 tsp (2 mL) ground mastic
3 pkgs (8 g each) vanilla sugar
4 large eggs, at room temperature, beaten well
2 tbsp (30 mL) orange blossom water
Topping
2 cups (500 mL) heavy cream
2 tbsp (30 mL) icing sugar
1/2 tsp (2 mL) pure vanilla extract
Ground cinnamon for dusting
5 tbsp (75 mL) chopped raw pistachios. 
Directions: 
For the honey syrup, place ingredients in a medium-size saucepan over medium heat. When mixture comes to a boil, reduce heat to maintain a gentle simmer. Cook for 8 minutes. Remove from heat. Cool to room temperature.

Preheat oven to 350°F (177°C). Butter a 2.5 × 8 x 14-inch (6 × 20 × 35-cm) baking dish.

For the kataifi, place pastry in a large bowl. Using your fingers, break apart pastry into fluffy shreds—there should be no clumps. Pour in butter and gently toss. Spread evenly on bottom of baking dish.

Bake until pastry is crisp and golden, 30 to 35 minutes. Meanwhile, remove lemon zest and cinnamon stick from honey syrup. Remove pastry from oven and immediately pour honey syrup evenly all over. Gently push down pastry with a spoon to level it. Sprinkle 3 tbsp (45 mL) chopped pistachios evenly on top. Set aside for 1 hour to absorb syrup and cool.

For the custard, whisk milk, cornstarch, butter, mastic, vanilla sugar and eggs in a large saucepan over medium heat. Cook, whisking constantly, until it comes to a simmer. Continue whisking on medium so custard doesn’t clump or stick to bottom of pan until thickened, 10 to 12 minutes.

Remove from heat and whisk in orange blossom water. Let stand for 5 minutes and place a piece of plastic wrap against surface of custard to prevent skin from forming. Cool completely.

When cooled, spread custard evenly over pastry. Press plastic wrap against custard and refrigerate until set, about 1 hour. (You can prepare dessert to this poione day in advance.)

For the topping, place cream, icing sugar and vanilla in chilled bowl of a stand mixer fitted withwhisk attachment. Beat on high until firm peaks form, 2 to 4 minutes. Spread whipped cream evenly over custard. Refrigerate for 30 minutes to set.

Right before serving, lightly dust with cinnamon and top with 5 tbsp (75 mL) pistachios.

Sunday, February 27, 2022

Olive Oil Cake

Olive Oil Cake
Ingredients:
For the Cake:
1/2 cup extra virgin olive oil, plus more to coat the pan
1 1/2 cups unbleached, all-purpose flour, plus more to coat the pan
2 teaspoons baking soda
1/2 teaspoon salt
1 cup granulated sugar
Zest of two lemons
2 large eggs
3/4 cup whole milk labneh
For the Glaze:
1 cup confectioners' sugar
2 tablespoons labneh or plain yogurt
1/4 teaspoon orange blossom water

Directions:
Position an oven rack to the center of the oven and heat to 350°F. Use a paper towel or napkin to coat an 8-inch loaf pan with a couple of drops of olive oil. Coat the pan with flour, knocking out any excess.

In a small bowl, whisk the flour, baking powder, and salt.

In a medium bowl, rub the sugar and lemon zest with your fingers to release the beautiful lemon flavor. Whisk in the olive oil, eggs, and labneh.

Fold in the dry ingredients until combined. The batter will be lumpy.

Spread evenly in the prepared loaf pan and bake until deep golden brown, about 50 minutes.

Meanwhile, make the glaze. Whisk the confectioners' sugar and labneh until combined. Add the orange blossom water. Adjust adding more confectioners' sugar or labneh to create a thick, pourable glaze.

Cool the cake in the pan for 15 minutes, then remove the cake to a rack set over a piece of parchment that will catch any glaze drippings. When the cake is completely cooled, spoon the glaze over top. Allow the glaze to harden briefly before serving.

Wednesday, June 2, 2021

Orange Blossom Rice Pudding

Orange Blossom Rice Pudding

 
This pudding can be made as rich or as lean as you would like. You can use lower fat, even skim milk. Or to ramp up the creaminess, include a little heavy cream with the whole milk (leave out ½ cup of the whole milk and add ½ cup heavy cream). Often rice pudding is scented with both orange blossom water and rose water, or with vanilla. Throw in some raisins or chopped dried apricots after the pudding is done cooking, if that sounds good.
Serves: 6-8
Ingredients:
5 cups whole milk
⅓ cup medium grain rice
3 eggs
3 tablespoons corn starch
¼ teaspoon salt
½ cup sugar
½ teaspoon orange blossom water
pistachios, finely chopped, for garnish

Directions:
In a medium saucepan, heat the milk over medium heat just to boiling. Add rice, reduce heat, and simmer for 30 minutes, stirring occasionally.

In a small bowl, whisk the eggs, corn starch, salt and sugar until smooth. Temper the egg mixture by stirring in a few large spoons of the hot rice milk. This helps avoid making scrambled eggs out of your pudding by bringing the eggs to the same temperature as the milk. Pour the egg mixture into the rice mixture, stirring constantly. Simmer until thickened.

Add the orange blossom water. Eat some, or all, warm, right from the pan. To chill the pudding, place plastic wrap directly against the surface of the pudding to prevent formation of a skin on top. Serve in small bowls. A sprinkle of finely chopped pistachios is beautiful on top.

Sunday, September 6, 2020

Fruit Cobbler

The biscuits for this cobbler are light and fluffy with the addition of yogurt--be sure to take a light touch when mixing the dough. My recipe is based on a cobbler biscuit from Cooks Illustrated. Use any fruit combination, such as peaches and tart cherries, to mix it up, as I suspect you'll be making this recipe often! Serve the cobbler with vanilla ice cream or whipped cream, or as we do: just as it is.

Ingredients:
For The Fruit:
3-4 pounds nectarines and apricots, about 12 cups
3/4 cup brown sugar
1/4 cup granulated sugar
Juice of 1 small lemon
1/2 teaspoon orange blossom water
1/4 cup unbleached, all-purpose flour


For The Biscuits:
2 cups unbleached, all-purpose flour
1/3 cup granulated sugar
1 1/2 teaspoons baking powder
1/2 teaspoon baking soda
1/2 teaspoon kosher salt
10 tablespoons cold unsalted butter, cut into small cubes (1/4-inch or so)
2/3 cup plain, whole milk yogurt
2 teaspoons granulated sugar, to top the biscuits 

Directions:
Heat the oven to 350 degrees.

Thickly slice the nectarines and simply pull apart the apricots to halve them into a 13x9x2 or similar-sized oval baking dish.

Top the fruit with the brown sugar, granulated sugar, lemon juice, and orange blossom water. Stir to coat the fruit completely and "melt" the sugars. Taste the fruit, and if you think it is still very tart, add a couple more tablespoons of either of the sugars. Stir in the 1/4 cup flour. 

Bake for 30 minutes. 

While the fruit cooks, make the biscuit topping. In a food processor, pulse the flour, sugar, baking powder, baking soda, and salt to combine.

Add all of the cubed cold butter at once, then pulse in 1-second pulses until a dry crumb forms (about 10 1-second pulses). Transfer the mixture to a medium bowl.  

Use a rubber spatula to fold in the yogurt. Use a light hand and keep at it until the dough comes together. This takes some doing but is worth it for a tender biscuit! The dough should look a little rough; don't over-mix or over-handle it.

When the fruit is bubbling and baked, remove from the oven and increase the heat to 425 degrees.

Lightly and roughly shape 10 flat-ish biscuits and space them evenly over the fruit, without letting them touch one another. 

Top each biscuit with a dusting of the remaining teaspoons of granulated sugar. 

Bake for 16 minutes, or until the biscuits are golden. Cool the cobbler for about 20 minutes before serving. To make ahead, rewarm the cobbler for 15 minutes or long as you need, in a low oven (250 degrees).


Saturday, October 8, 2016

Lavender and Orange Blossom Cookies


Ingredients:
¾ cup/180 grams clarified butter, at room temperature (see note)
1 ¾ cups/215 grams confectioners’ sugar
2 teaspoons/1 gram dried lavender, ground to a powder
½ teaspoon/3 grams kosher salt
1 teaspoon/ 5 milliliters orange blossom water
1 ¾ cups/228 grams all-purpose flour, more as needed

Directions:
Heat oven to 325 degrees with a rack in the center of the oven. Line two sheet pans (not dark metal) with parchment paper.

In an electric mixer, beat the butter on high for about 6 minutes, until light and fluffy. Add 3/4 cup (92 grams) confectioners’ sugar, lavender and salt and beat another 2 minutes. Scrape down the sides of the bowl, and with the mixer on low speed, add orange blossom water and mix to combine.

Add flour to butter 1/2 cup (about 65 grams) at a time, until dough is crumbly and slightly dry but still able to hold together when squeezed, adding additional flour if necessary.

Divide dough into quarters and press each into a long narrow log about 1 inch high and 1 inch wide. With a sharp knife, cut into log diagonally to make diamond-shaped cookies 1 to 2 inches long.  
Use a spatula to transfer cookies to sheet pans, spaced about 2 inches apart. 

Bake for 15 to 20 minutes, rotating pan halfway through. Cookies should be golden brown at the edges.

Sift remaining confectioners’ sugar over baked cookies while still warm. Store in an airtight container for up to 1 week.

Tuesday, January 20, 2015

Almond Baklawa Fingers

Almond baklawa ornaments, Maureen Abood

Almond Bakalawa Fingers
Bakalava
The quantities here of syrup, nuts, and butter are flexible—make more of each if you want to make a bigger batch, and if you have any ingredients leftover, the nuts and butter freeze perfectly for at least a year and the syrup will hold, airtight, in the fridge that long or longer. This recipe makes about 30 3-inch fingers.

Ingredients:
For the syrup:
1 cup granulated sugar
½ cup water
2 teaspoons lemon juice
1 teaspoon orange blossom water


For the pastry:
1½ cups blanched almonds, toasted
½ cup granulated sugar
1 1-pound package phyllo dough (9 x 14-inch), room temperature
¾ cup clarified butter, melted

Directions:
Make the syrup: in a small heavy saucepan, bring the sugar, water, and lemon juice to a boil. Reduce the heat and simmer for about 3 minutes. Remove the pan from the heat and add the orange blossom water. Transfer the syrup to a heatproof container and place it in the refrigerator to chill.

Preheat the oven to 325°F.

Grind the almonds in a grinder or food processor until they resemble coarse crumbs, taking care not to make them too fine. In a small bowl, combine the ground almonds with the sugar.

Set up your workstation with the melted clarified butter, pastry brush, and 13x9x2-inch pan. Note that you can use a larger or smaller pan as long as one side is at least 9 inches. Brush the bottom of the pan generously with clarified butter. Open one of the sleeves of phyllo dough and lay the phyllo flat on top of the plastic it’s wrapped in. Cover the phyllo with a very slightly dampened clean kitchen towel immediately, to keep it from drying out.

Pull back the towel and carefully pull one sheet of phyllo off the top of the stack and place the short side facing you on the work surface. Recover the phyllo stack with the towel. Brush the phyllo with the clarified butter, first buttering the edges of the phyllo and then the rest of the sheet. Repeat this with another sheet of phyllo. Spoon a narrow line of almonds along the 9-inch/short side of the phyllo in front of you, leaving an inch of space along the 9-inch edge and about ½ inch of space on the side edges.

Along the 9-inch edge, carefully lift the phyllo up over the nuts, and roll the nuts up in the phyllo in a tight, compact log. Place the log, seam-side down, into the prepared pan across the 9-inch width. Brush the log generously with clarified butter.

Repeat this process, buttering two layers of phyllo and rolling up the nuts into logs, until all of the phyllo in the stack is used. Feel free to open the other package of phyllo and continue making more, but the 13x9x2-inch pan won’t hold all of the logs. In that case, use an additional pan for any overflow. It’s also fine that the logs don’t fill the pan entirely. Using a sharp chef’s knife, cut the logs into 3-inch fingers (make two cuts evenly spaced apart lengthwise across the pan).

Bake the baklawa for about 30 minutes, or until the pastry is golden brown and fragrant. Remove it from the oven and immediately pour the cold syrup evenly over the hot pastry, making the all-important sizzling sound that means everything is working out perfectly.

Cool the baklawa for at least two hours. Garnish them by spooning a bit of the ground almonds down the center of each row of fingers while they’re still in the pan, and serve. Store the baklawa in the pan until you’re ready to serve them, lightly covered with a sheet of wax paper.