Showing posts with label Lemon Juice. Show all posts

Wednesday, September 30, 2026

Easy Fattoush Salad ~. Vegetarian

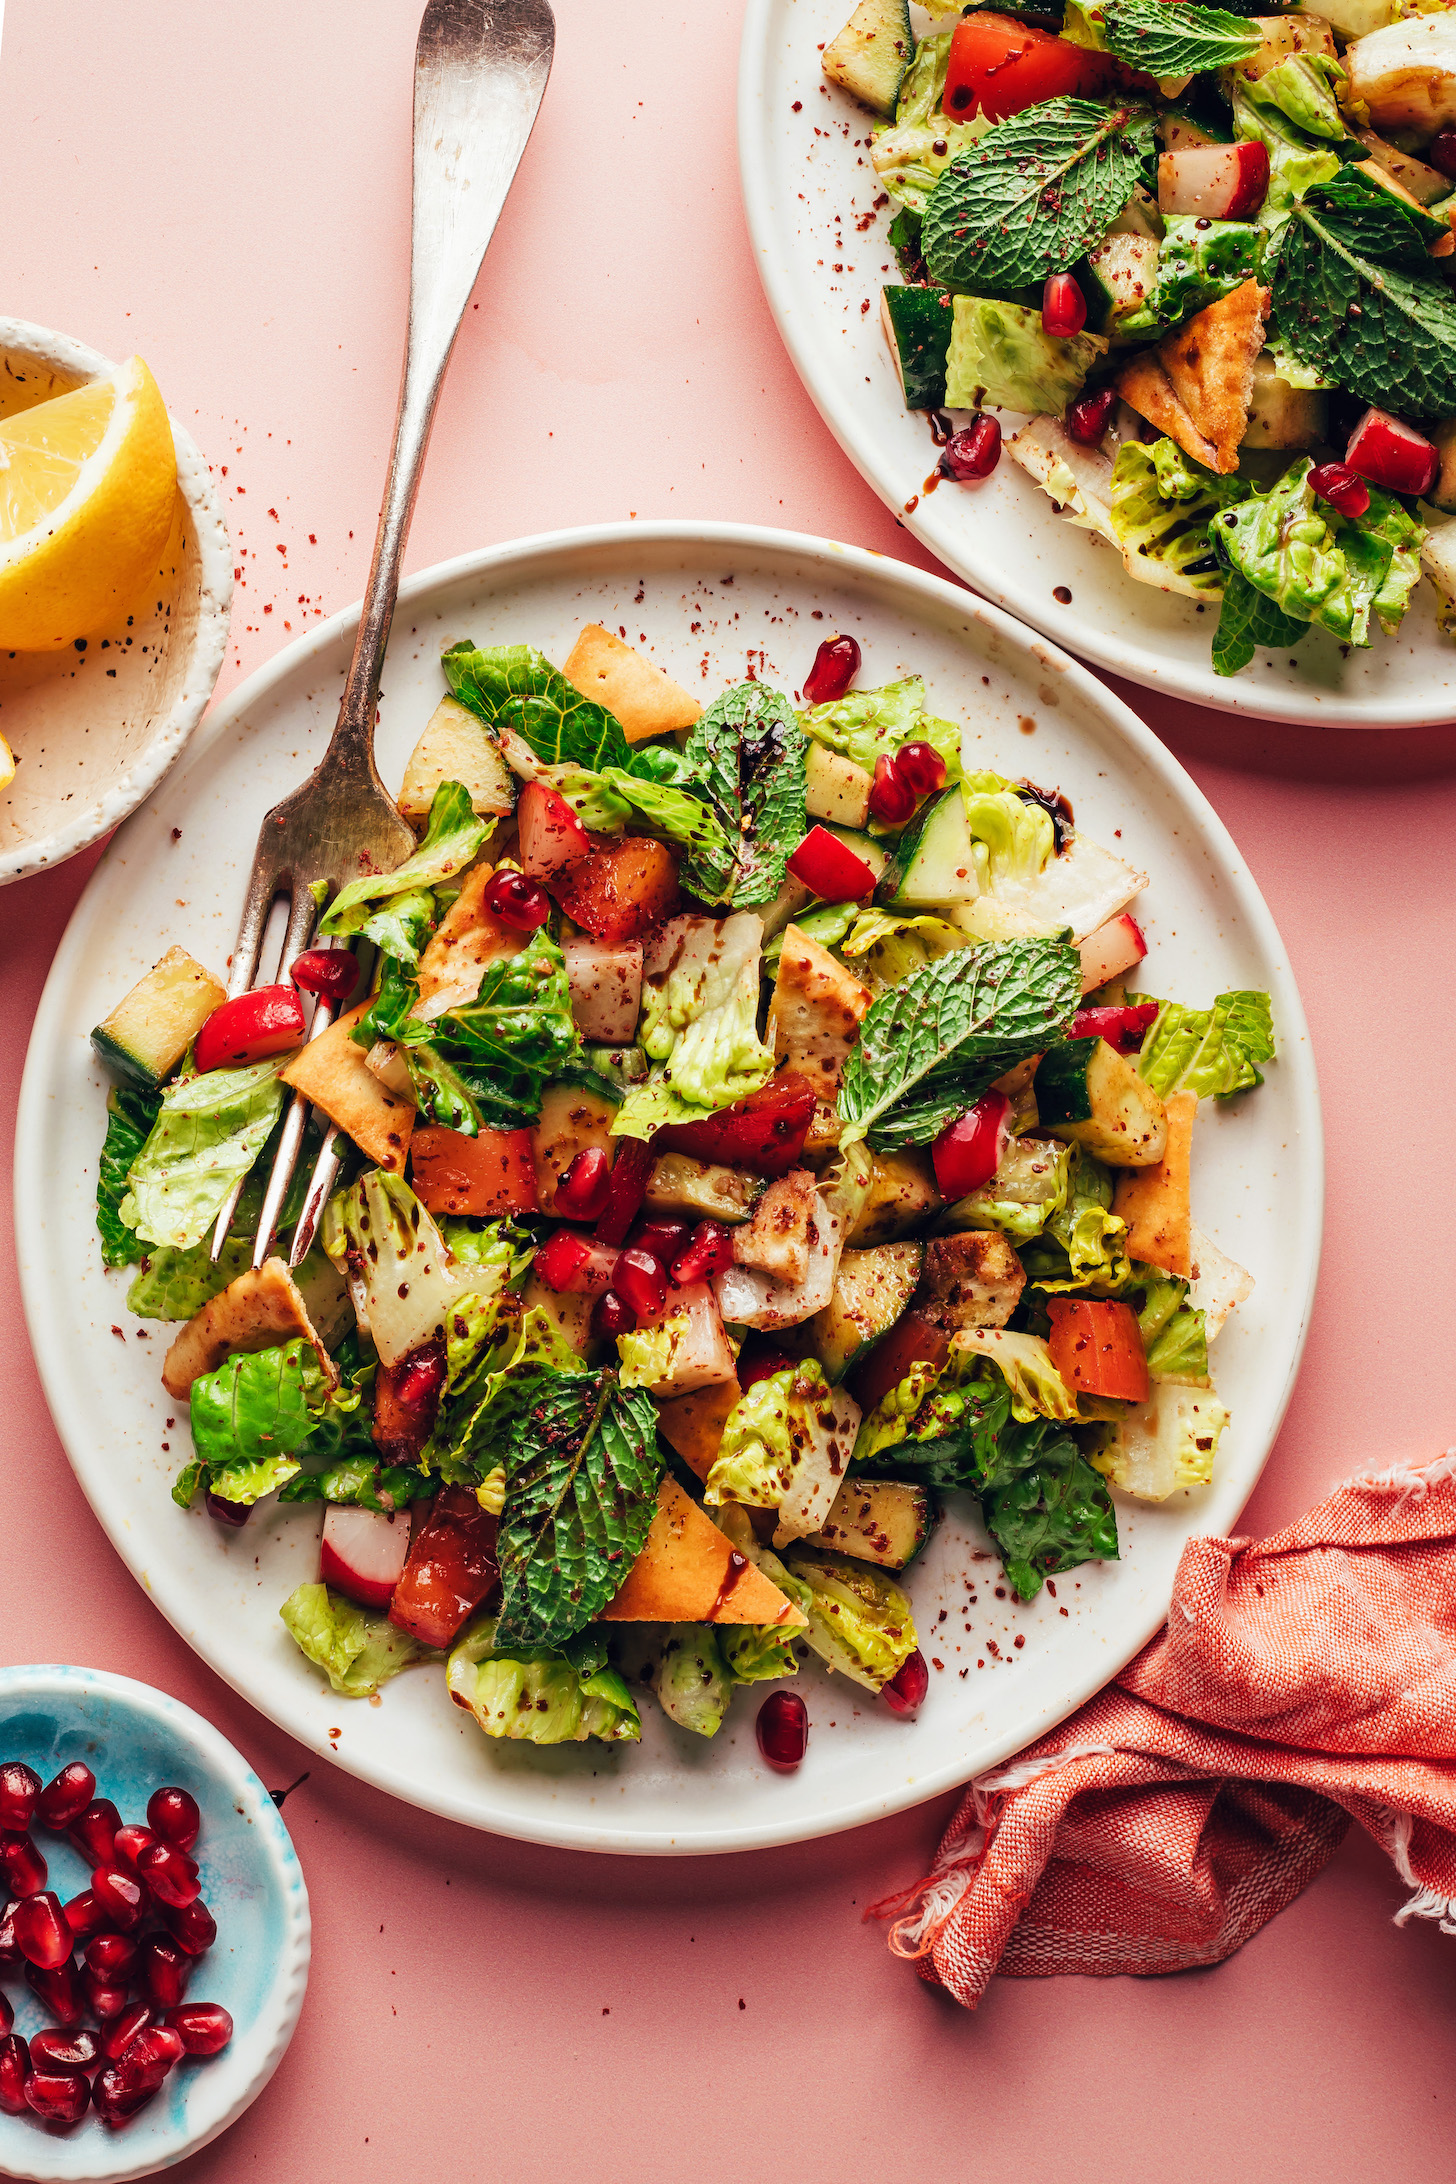
Easy Fattoush Salad
This fattoush salad is crisp, bright, crunchy, refreshing, tart-sweet, quick and easy but so delicious. When paired with chickpeas, it makes the perfect light meal for hot summer days! It’s also a great side for Mediterranean- and Middle Eastern-inspired mains including Vegan Lentil Fesenjān and Kale Falafel Hummus Wraps.
Ingredients:
Salad:
3 cups chopped romaine lettuce (or other crunchy, neutral-flavored greens // 1/2 head lettuce yields ~3 cups or 130 g)
2 cups chopped fresh, crunchy veggies of choice (we like 1 cup or 150 g cucumber*, 3/4 cup or 150 g chopped tomatoes, and 1/4 cup or 40 g radish)
1 Tbsp lemon juice
1 Tbsp pomegranate molasses (or balsamic vinegar, though not traditional)
3/4 tsp ground sumac
1 healthy pinch each sea salt and black pepper (plus more to taste)
1/2 tsp maple syrup (optional // plus more to taste, depending on the sweetness of your pomegranate molasses)
Extra virgin olive oil (optional // ensure high quality and avoid adding too much)

For Serving
1/3 cup loosely packed fresh mint leaves, removed from stems and left whole (~1 small bunch mint)
1 ½ cups pita chips, slightly crushed (gluten-free as needed 
1/4 cup pomegranate arils (find our favorite way to cut a pomegranate here // or sub sliced strawberries when in season, though not traditional)
1 (15 oz.) can chickpeas, drained and rinsed(optional // include if serving as an entrée)

Directions:
Pita chips: See notes for instructions on making homemade pita chips. We like using store-bought pita chips for ease!

Salad: To a large mixing bowl or serving platter, add lettuce, chopped veggies, lemon juice, pomegranate molasses, sumac, salt, and pepper. Toss to coat veggies with dressing. Taste and adjust as needed, adding maple syrup for sweetness (we used a sweetened pomegranate molasses, so we didn’t find it necessary), more lemon juice for brightness, more pomegranate molasses for a rich, tart flavor, or a drizzle of olive oil for richness (ensure high-quality olive oil and avoid adding too much — we found standard grocery store olive oil added too much bitterness).
FOR SERVING: When ready to serve, garnish with fresh mint leaves, pita chips, pomegranate arils, and chickpeas (optional). Serve right away to keep the pita chips from getting soggy.

Best when fresh. Leftovers will keep stored separately for up to 2-3 days. Not freezer friendly.

Monday, September 28, 2026

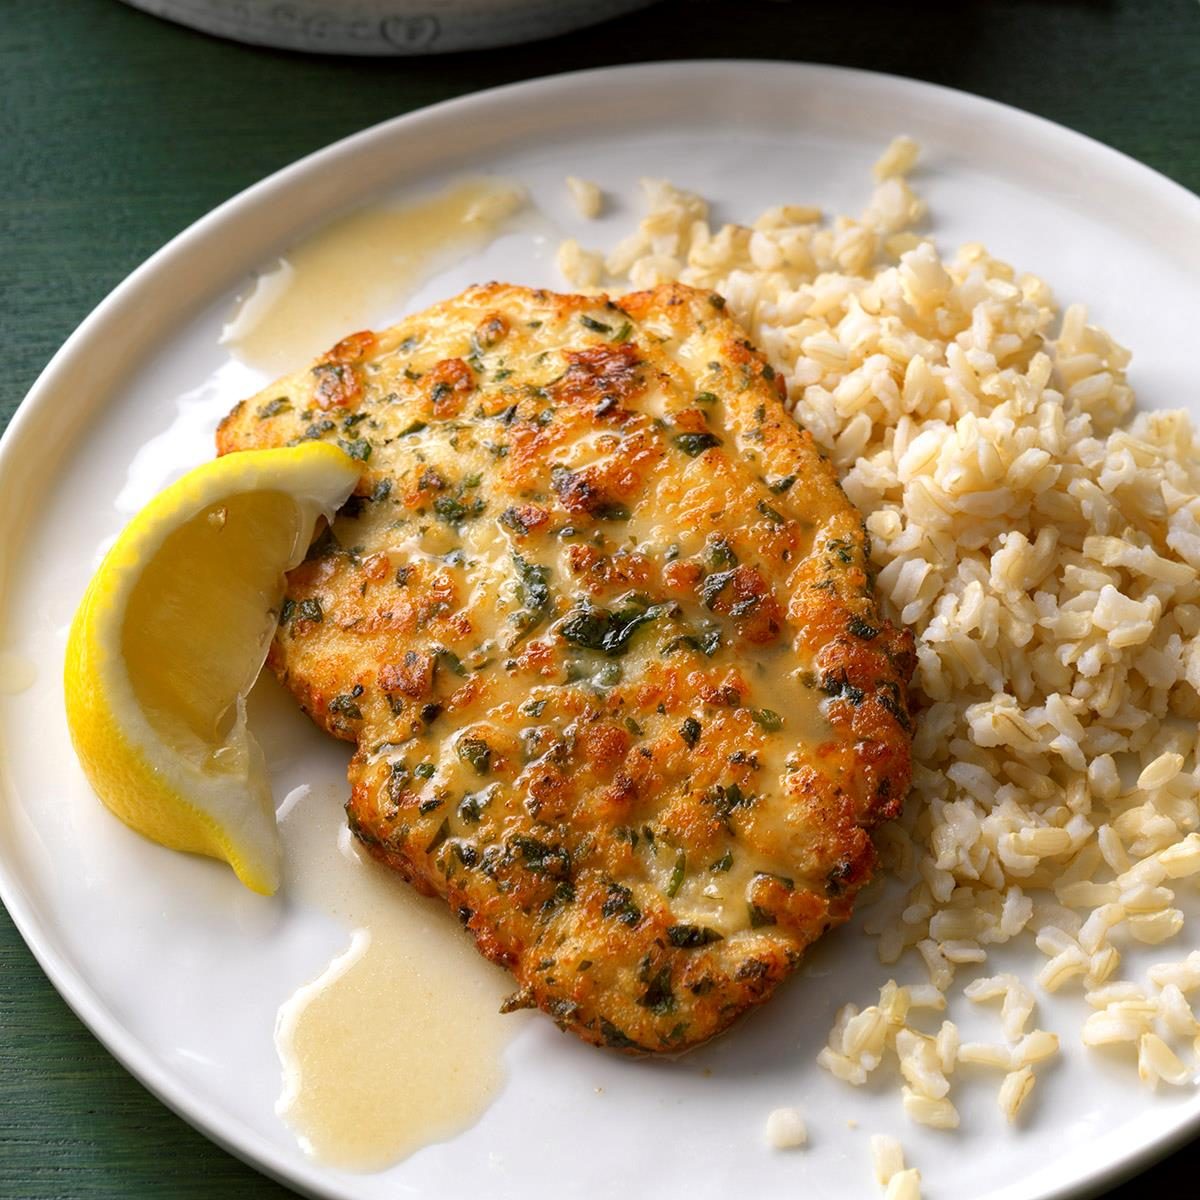
Chicken Picata With Lemon Sauce

  
Chicken Picata With Lemon Sauce
This chicken piccata recipe features thinly sliced chicken topped with a rich sauce made from butter, white wine, lemon, and capers for a simple but substantial meal loaded with incredible flavor. Learn how 
to make this deliciously easy, Italian-inspired meal.
Ingredients:
8 boneless skinless chicken breast halves (4 ounces each) 
1/2 cup egg substitute 
2 tablespoons plus 1/4 cup dry white wine or chicken broth, divided
5 tablespoons lemon juice, divided 
3 garlic cloves, minced 
1/8 teaspoon hot pepper sauce 
1/2 cup all-purpose flour 
1/2 cup grated Parmesan cheese 
1/4 cup minced fresh parsley 
1/2 teaspoon salt 
3 teaspoons olive oil, divided 
2 tablespoons butter


Directions:
Flatten chicken to 1/4-in. thickness. In a shallow dish, combine the 
egg substitute, 2 tablespoons wine, 2 tablespoons lemon juice, garlic and hot pepper sauce. In another shallow dish, combine the flour, Parmesan cheese, parsley and salt. Coat chicken with flour mixture, dip in egg substitute mixture, then coat again with flour mixture.

In a large nonstick skillet, brown 4 chicken breast halves in 1-1/2 teaspoons of oil for 3 to 5 minutes on each side until juices run clear. Remove and keep warm. Drain drippings and repeat with remaining chicken and oil. Remove and keep warm.

In the same pan, melt butter. Add the remaining wine and lemon juice. Bring to a boil uncovered until sauce is reduced by a fourth. Drizzle over chicken

Saturday, September 19, 2026

Flourless Apple And Almond Tart 5*****


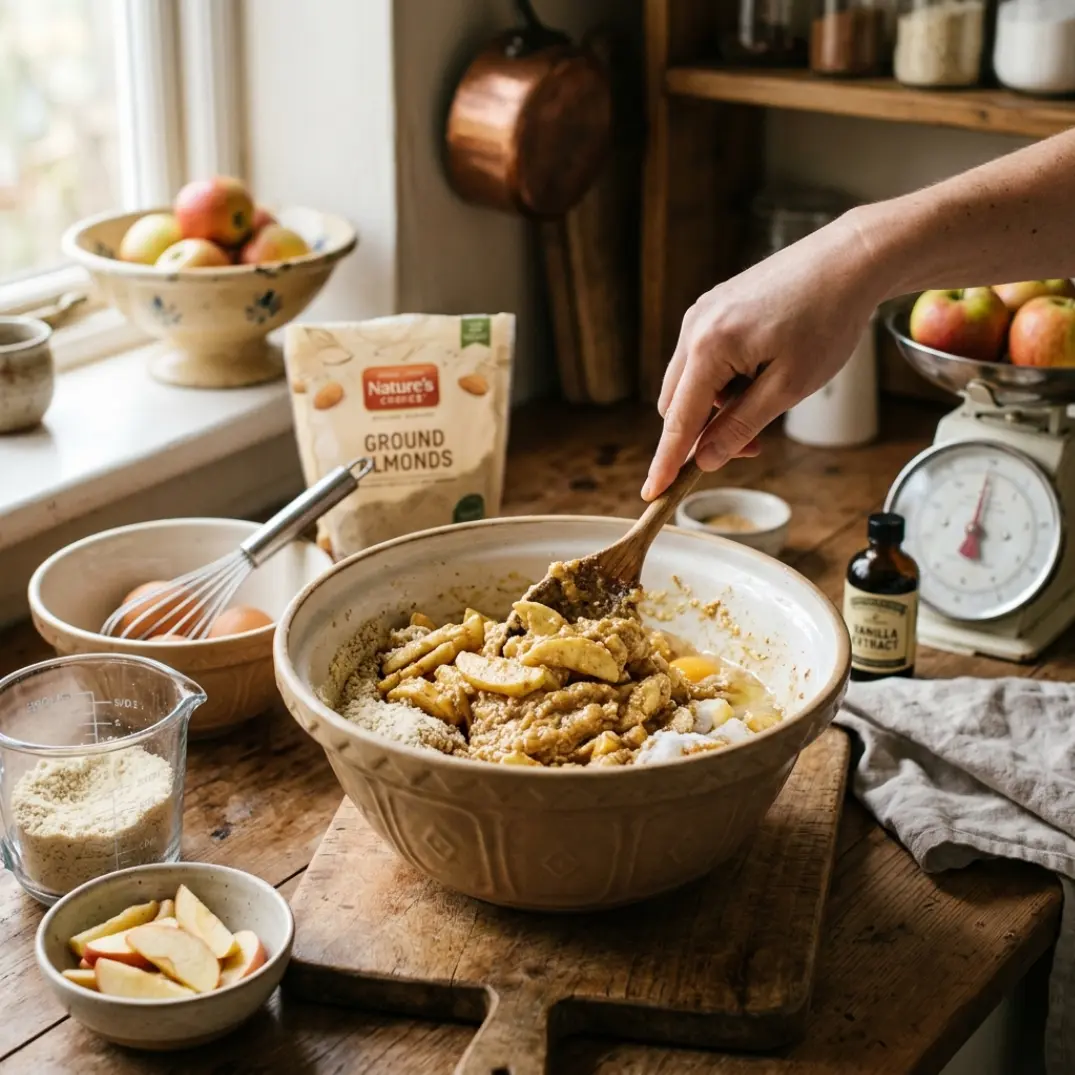
                                              Flourless Apple And Almond Tart 
For a cozy fall dessert, serve a slightly warm slice with a small scoop of vanilla ice cream. The cool creaminess against the warm cinnamon apples is hard to beat.

Ingredients:
2 cups ground almonds (almond flour)
2 tablespoons honey or natural sweetener
1 egg
1 teaspoon ground cinnamon
2 medium apples, peeled and thinly sliced
1 tablespoon lemon juice
1 teaspoon almond flavoring.
Sliced almonds for decoration
A pinch of salt

Directions:
Preheat the oven to 350°F (175°C). Lightly grease a 9-inch tart pan or shallow baking dish. If your pan tends to stick, you can also line the bottom with parchment paper.

Add the ground almonds, honey or natural sweetener, egg, cinnamon, and a pinch of salt to a mixing bowl.

Stir until the ingredients come together into a cohesive, soft almond mixture. The mixture should be moist enough to press into the pan but thick enough to hold its shape.

Transfer the almond mixture to the prepared pan and press it evenly across the bottom.

Use the back of a spoon or a spatula to smooth the surface. Try to keep the thickness as even as possible so the tart bakes consistently.

Peel the apples and slice them thinly. Toss the slices gently with the lemon juice and cinnamon.

The lemon juice adds a fresh note to the apples while also helping keep their flavor bright. Thin slices will soften more evenly in the oven and create a prettier finished tart.

Arrange the apple slices over the almond base, slightly overlapping them as you work across the surface.

You can arrange them in simple rows or create a circular pattern for a more decorative rustic tart. There’s no need to make it overly precise—the slightly imperfect look is part of its charm.

Scatter sliced almonds over the top of the apples. They will toast as the tart bakes, adding a delicate crunch and a beautiful golden finish.

Bake the tart at 350°F (175°C) for approximately 35–40 minutes, or until the almond base is set and lightly golden and the apple slices are tender.

You’ll know it’s getting close when the apples look softened and the edges of the almond mixture have developed a light golden color. If the almonds on top brown too quickly, loosely cover the 
tart with foil for the remainder of the baking time.

Remove the tart from the oven and allow it to cool on a wire rack. Letting it cool gives the almond base time to firm up, making the tart easier to slice. Serve slightly warm or at room temperature. The warm apple and almond flavors pair beautifully with simple toppings. You don’t need much because the tart already has plenty of flavor. Suggestions:
A spoonful of plain or Greek yogurt
Whipped cream
Vanilla ice cream
A drizzle of extra honey
A cup of coffee
Hot black tea or chai tea

For a cozy fall dessert, serve a slightly warm slice with a small scoop of vanilla ice cream. The cool creaminess against the warm cinnamon apples is hard to beat.

Recipe Tips
Slice the apples thin.

Thin apple slices cook more evenly and create a tender topping without requiring an excessively long baking time.

Don’t make the almond base too thick

Spread the almond mixture evenly across the pan. A very thick center may take considerably longer to cook through.

Use finely ground almonds

Finely ground almond flour creates a more cohesive and tender base. A coarse almond meal will give the tart a more rustic, crumbly texture.

Arrange the apples evenly

Try not to pile the apples too heavily in the center. A relatively even layer helps them soften at the same rate.

Watch the sliced almonds

Sliced almonds can brown quickly near the end of baking. If they become deeply golden before the center of the tart is ready, loosely cover the top with foil.

Let the tart cool

Don’t rush straight into slicing. A short cooling period helps the almond base firm up and makes cleaner slices possible.

Can I use almond meal instead of almond flour?

You can, although the texture may be a little more rustic. Finely ground almond flour will give the tart a smoother and more delicate base.

What apples work best?

Choose apples that hold their shape reasonably well when baked. A sweet-tart apple gives the best contrast against the nutty almond base and cinnamon.

Can I add other spices?

Cinnamon is the main spice in this recipe, but you can add a small amount of ground nutmeg or ginger if you want a warmer, more autumn-inspired flavor.

Can I make individual tarts?

Yes. The mixture can be divided between small tart pans or ramekins. Smaller portions will bake more quickly, so keep an eye on them as they approach the end of the baking time.

Store leftover Flourless Apple and Almond Tart covered in the refrigerator. Because the tart contains fresh apples and egg, refrigeration is the best option for keeping leftovers properly chilled.

For the best texture, bring individual slices close to room temperature before serving, or warm them gently in the oven.

The tart can also be prepared ahead of time and refrigerated until you’re ready to serve it. If making it for a gathering, baking it earlier in the day gives the tart plenty of time to cool and set.

Using very thick apple slices

Thick apple slices may remain firm while the almond base is already finished baking. Slice the apples thinly and evenly.

Overloading the tart with apples

Two medium apples provide a good balance for the almond base. Adding a very thick layer of apples can introduce extra moisture and extend the baking time.

Not mixing the almond base thoroughly

Make sure the egg and sweetener are evenly distributed throughout the ground almonds before pressing the mixture into the pan.

Skipping the lemon juice

The lemon juice isn’t there just for the apples. Its bright acidity helps balance the sweetness and richness of the almonds.

Slicing while the tart is piping hot

The almond base is softer when it first comes out of the oven. Allowing it to cool makes the tart much easier to slice cleanly.

Wednesday, September 2, 2026

Cabbage Salad With Garlic And Lemon


c
Cabbage Salad with Garlic and Lemon
A cabbage salad with garlic and lemon is a winner on all scores; the salad comes together in 10 minutes tops and packs incredible fresh flavor in just a few ingredients, and is at home with every grilled meat, vegetable, and wraps, you can think of.   Easy Peasy!
.Ingredients:
1 head cabbage
1 large clove garlic, minced or grated
1/4 cup fresh lemon juice
3 tablespoons extra virgin olive oil
Kosher salt
2 tablespoons finely chopped cilantro or mint
Directions:
Make dressing with garlic,  lemon juice, EVOO,  and salt.  Set aside to allow flavors to meld.

Slice cabbage into 1 inch slices, removing core.  Cut each plank into  1" horizontal and vertical cuts.  

Place cabbage in large bowl.  Shake dressing to emulsify and dress the salad.  Add chopped cilantro or mint.  Serve!


    Friday, August 21, 2026

    Farfalle With Salmon In A Very Light Cream Sauce

                  Farfalle With Salmon In A Very Light Cream Sauce
    Meet the cutest, quickest little pasta dish with salmon, tomatoes, and a touch of cream, tastes great with only a few ingredients in the house! (I used water as my liquid for deglazing and adding a little bit of liquid to form a sauce.) Prep your ingredients and get ready to enjoy an amazing dish! Serves 2 people.
    Ingredients:
    For 2 people: 
    4-6 oz. dried farfalle or penne pasta
    2 Tbsp olive oil
    Kosher salt 
    1/2 red onion, finely diced
    1 cup cherry tomatoes, halved
    1/4 cup of water (to use sparingly) 
    6 oz. diced salmon
    a squeeze of lemon juice
    1/4 cup cream
    1/4 cup torn basil
    Directions: 
    Cook the pasta in salted water. 

    While pasta is cooking,  saute the onion over medium heat in the olive oil with a pinch of salt until soft. 
    Add tomatoes and a splash of water. Smush ‘em up a bit. 

    Add the salmon and a pinch of salt and a little more olive oil, stir: 

    Add a little more water when or if the bottom of the pan has browned too much. Scrape up brown part. Cook until salmon has cooked through-about 2-3 minutes. Add a squeeze of lemon. 

    Reduce to low. Stir in cream and basil. Add the drained pasta. Add a splash of pasta water. Taste, Add salt!    Two Servings!

    Wednesday, August 12, 2026

    Rose Farm Lemon Cake

    Rose Farm lemon cake recipe using lemons picked from their citrus trees is baked fresh the night before for guests in a rose shaped bundt pan.
    Ingredients:
    Cake Mix
    3 cups flour, sifted
    1 cup butter, softened
    2 cups granulated sugar
    3 eggs, at room temperature
    1/2 teaspoon salt
    1/2 teaspoon baking soda
    1 cup buttermilk
    2 tablespoons fresh grated lemon rind zest, packed
    2 tablespoons fresh lemon juice
    Lemon Glaze Ingredients
    2 tablespoons butter, softened
    1 cup confectioner's sugar
    1 1/2 tablespoons fresh grated lemon rind, packed
    2 tablespoons fresh lemon juice
    Directions:
    Cream 1 cup of butter until light and fluffy. Slowly add 2 cups 
    sugar and continue beating until light and fluffy. Blend in 3 eggs, 
    one at a time.

    Sift together 3 cups of flour, 1/2 teaspoon of baking soda and 1/2 
    teaspoon of salt. Add the flour mixture alternately with 1 cup buttermilk to the creamed mixture, beating after each addition.

    Mix in 2 tablespoons of fresh grated lemon rind and 2 tablespoon 
    fresh lemon juice. Pour batter into greased and floured bundt pan.

    Bake in preheated 325 degree oven for approximately 1 hour and 10 minutes.

    To prepare the glaze, blend together 2 tablespoons butter, softened with 1 cup powdered sugar and lemon zest.  Add up to 2 tablespoons lemon juice stirring to desired consistency.  

    Or sifted powdered sugar sprinkled atop cooled cake. also is very pretty.

    Enjoy!

    Monday, July 20, 2026

    Blueberry Lemon Biscotti


    Blueberry Lemon Biscotti

    The beauty of biscotti? They keep for weeks and weeks!
    Ingredients:
    2 large eggs
    ¾ cup granulated sugar
    1 tablespoon fresh lemon juice
    Zest of 1 large lemon
    1¾ cups all-purpose flour
    1 teaspoon baking powder
    ½ teaspoon kosher salt
    1 teaspoon anise seed
    1 cup frozen wild blueberries
    Directions:
    Preheat oven to 350° F and line a baking tray with parchment paper.

    In a large bowl, whisk eggs and sugar together until thick and lemon colored, about 3 minutes. Whisk in lemon juice and zest.

    In a medium bowl, whisk together flour, baking powder, salt, and anise seed. Add frozen blueberries and toss to coat. 

    Fold dry ingredients into the egg and sugar mixture and stir until thoroughly combined. The dough will be stiff and slightly sticky.
    Transfer dough to the parchment paper-lined baking tray. 

    With wet hands, shape dough into a log about 12 inches long and 3½ inches wide. Bake for 30 minutes, until the top is beginning to brown and is firm to the touch. Cool on a rack for 15 minutes.

    Line a second baking tray with parchment paper. Transfer loaf to a cutting board. With a bread knife, slice loaf into ½-inch slices. Arrange slices on the tray, cut side down. 

    Bake for 8 minutes, turn slices over, and bake for a further 8 minutes.

    Remove from the oven and cool on a rack. When biscotti are thoroughly cool, transfer to a tin, cover and store in a cool, dark cupboard. They will keep for several weeks.

    Serve biscotti on their own with coffee or tea, dip them into a cranberry bourbon toddy, or spoon bites of gelato or ice cream on top and crunch.   Makes about 24

    Recipe featured in the story, Running on Empty, in the Fall 2024 issue of Edible Alaska.

    Note:  A frozen blueberry will hold its shape when mixed in the dough. It will not break and color the dough.

    Wednesday, June 24, 2026

    Roasted Cauliflower, Chickpeas and Dates. ~ Sheetpan Dinner

    Roasted Cauliflower, Chickpeas and Dates
    An ideal weeknight sheet pan dinner features: 1) a protein and vegetable that can be roasted at the same time; 2) a flavorful sauce that comes together in one bowl; and 3) a little pizzazz. Here, cauliflower and canned chickpeas are roasted until browned and tender (along with whole garlic cloves that become divinely sweet). Torn Medjool dates are added near the end of roasting, adding irresistible bites of slightly crisp, caramelized sweetness. While the oven works its magic, tahini is whipped until creamy to act as the bed for the main ingredients and bring all the Middle Eastern-inspired flavors together. If you don’t mind using another pan, toasted pine nuts make for a fabulous garnish.
    Ready in 45 minutes.
    Ingredients:
    1 large cauliflower (or 1½ pounds medium-sized cauliflower florets)
    7 fat garlic cloves
    4½ tablespoons extra-virgin olive oil, divided, plus more for the dates Kosher salt (such as Diamond Crystal) and black pepper 2 (15-ounce) cans chickpeas, drained and rinsed 6 Medjool dates ½ cup tahini, well-stirred 2 tablespoons freshly squeezed lemon juice, plus more to taste ½ teaspoon ground cumin 1 to 2 teaspoons Aleppo pepper (or ¼ teaspoon crushed red pepper) 4 tablespoons ice cold water, plus more as needed 1 big handful flat-leaf parsley, chopped Warm pita, for servingDirections:                                                                                       Arrange racks in the top third and in the bottom third of the oven. Heat the oven to 425 degrees. 
    • Prep the cauliflower: Cut out the core from the cauliflower, then cut into medium florets, ideally cutting in half through the stem so you end up with a flat surface on one side. Smash down on 6 of the garlic cloves with the back of a chef’s knife to remove the peels and lightly flatten. 

      Transfer florets and smashed garlic to a large bowl. Drizzle with 3 tablespoons of olive oil, rubbing it into the florets’ nooks and crannies. Season with 1 teaspoon salt and several grinds of pepper until well seasoned. Spread out on a rimmed sheet pan, flat sides facing down.

      Prep the chickpeas: Pat the chickpeas dry with a towel, then transfer to the large bowl and toss with the remaining 1½ tablespoons olive oil, 1¼ teaspoons salt, and lots of black pepper. Spread out on a second rimmed sheet pan in a single layer. Save the bowl for the dates. 

      Roast the chickpeas on the top rack of the oven and the cauliflower on the bottom for 20 minutes, until the bottoms of the florets and garlic are nicely browned (if your oven runs hot, check the cauliflower at 15 minutes). 

      Meanwhile, tear the dates into pieces (not too small) and discard the pits. Add to the large bowl, toss the dates with just enough oil to lightly coat, then sprinkle with a pinch of salt. 

      After 20 minutes, remove both pans. Shake the pan of chickpeas around. Toss the cauliflower and flip the garlic pieces (if the garlic is soft and golden brown on both sides, remove and set aside). Scatter the dates across the pan of cauliflower. 

      Return to the oven, but switch the pans’ locations (i.e., cauliflower goes on the top rack). Roast for 7 to 10 minutes, until the cauliflower is tender and nicely browned, the dates are browned in spots and even a little charred, and the chickpeas are crisp and golden (if you want the chickpeas to be really crunchy, roast them for 5 to 10 minutes longer).

      While everything roasts, make the tahini whip: Finely grate the remaining clove of garlic into a medium bowl. Add the tahini, lemon juice, cumin, Aleppo pepper, ¼ teaspoon salt and 4 tablespoons ice water. Stir with a fork until thick and very creamy yet spreadable (see Tip). Taste, adding more lemon juice for brightness or salt to taste. 

      Assemble: Spread the tahini whip onto the bottom of a serving platter (or 4 shallow plates). Top with the roasted cauliflower, dates and chickpeas. Scatter the parsley on top and serve with warm pita.
      TIP
      The tahini whip is meant to have a thick, spreadable consistency, but if you prefer a looser consistency, use ⅓ cup tahini. You can also make the tahini whip several days in advance and store in the fridge, though you’ll want to whisk in more water, as it thickens considerably.

    Friday, June 19, 2026

    Asparagus Wine Pairing.

    Asparagus Wine Pairing
    To choose a wine to serve with asparagus, the best choice would be to select a Riesling, probably one with just a hint of sweetness and a good acid backbone. Other options might include a Sauvignon Blanc, Grüner Veltliner, Pinot Gris or a Sparkler: stellar cool climate wines. 

    The choice of a white wine will then dictate the elements in the rest of the meal.


    To begin, prepare a salad of mixed greens, goat cheese, toasted walnuts and a very light vinaigrette. (Riesling is often wine of choice by chefs looking for something that works with salad greens, so it works well here too.)


    Then for the entrée, chicken is something that is complemented by Ohio's most widely grown vinifera.  A baked herb-roasted or grilled chicken breast with garlic and garnished with fresh thyme will be both attractive on your plate and very enjoyable to taste.


    Side dishes might include some creamy Parmesan risotto (the acid backbone in the Riesling will cut both the starch and creaminess). Either grill or roast the asparagus, drizzle a bit of olive oil, gently sprinkle some sea salt and squeeze just a bit of lemon juice on the top.


    Add some warm, crusted sour dough bread with fresh herbed butter.


    Friday, May 15, 2026

    Cod Air Fryer Recipe

    Air Fryer Cod Recipe 

    Ingredients:
    2 cod fillets (about 6 oz each)
    1 tbsp olive oil
    ½ tsp garlic powder
    ½ tsp paprika
    ½ tsp salt
    ¼ tsp black pepper
    ½ tsp lemon juice
    Optional: fresh parsley for garnish
    You can also add 1 tbsp panko breadcrumbs for extra crispiness.
    Directions:
    Preheat the air fryer to 380°F (193°C) for about 3 minutes.
    Pat the cod dry, brush with olive oil, and season with garlic powder, paprika, salt, and pepper.
    Place the fillets in the air fryer basket in a single layer.
    Cook for 10–12 minutes until the fish flakes easily with a fork.
    Drizzle with lemon juice and sprinkle with fresh parsley before serving.
    Tips:
    Don't overcrowd the air fryer basket.
    For extra crispiness, add 1 tbsp panko breadcrumbs.

    Works great with tilapia, haddock, or pollock too. 

    Thursday, April 16, 2026

    Asparagus Soup With Lemon and Parmesan


                                    Asparagus Soup with Lemon and Parmesan
    This asparagus soup tastes rich, yet it's made without heavy cream – just veggies, broth, and a bit of Parmesan cheese puréed to silky perfection.  Serves 4 to 6
    Ingredients:
     2 bunches asparagus (about 2¼ pounds/1 kg), bottom ends trimmed
     3 tablespoons unsalted butter
     2 medium yellow onions, chopped
     3 cloves garlic, peeled and smashed
     6 cups low-sodium chicken broth
     1 teaspoon salt
     1/4 teaspoon freshly ground black pepper
     2 tablespoons freshly squeezed lemon juice, from one lemon
     1/2 cup shredded Parmigiano-Reggiano
     Handful fresh herbs, such as thyme, dill or basil (optional, for garnish) 

    Directions
    Melt the butter in a large pot over medium heat. Add the onions and garlic and cook, stirring frequently, until soft and translucent, about 8 minutes. Do not brown; reduce the heat if necessary.In the meantime, cut the tips off of one bunch of the asparagus and set aside (you'll use those for a garnish). Cut the remaining spears and the other bunch of asparagus into ½-inch (13-mm) pieces.

    Add the chopped asparagus to the pot (minus the reserved tips), along with the chicken broth, 1 teaspoon salt and ¼ teaspoon pepper. Bring to a boil, then cover and turn the heat down to low. Simmer for about 30 minutes, or until the vegetables are very tender.

    Meanwhile, bring a small pot of salted water to a boil. Cook the reserved asparagus tips for a few minutes, or until tender-crisp. Drain the tips and then place them in a bowl of ice water to "shock" them—this stops the cooking process and preserves their bright green color. Once the tips are cool, drain them and set aside.

    Purée the soup with an immersion blender until completely smooth. (Alternatively, use a standard blender to purée the soup in batches, then return the soup to the pot.) Bring the soup back to a simmer and stir in the lemon juice and Parmigiano-Reggiano. Taste and adjust seasoning, if necessary. To thicken the soup, allow it to simmer, uncovered, until the desired consistency is reached.

    Ladle the soup into bowls, then top each bowl with asparagus tips, Parmigiano-Reggiano, herbs (if using), and freshly ground black pepper.  Serves 4 to 6