Showing posts with label Neutral Oil. Show all posts

Monday, November 25, 2024

Red lentil and Cauliflower Soup

Red Lentil And Cauliflower Cream Soup
This is another nutritious dish but also quick!  Quick-cooking red lentils and cauliflower come together with aromatic seasonings for a sumptuously tasty and satisfying pureed soup. With layers of flavor from the spices and sweet-savory tomato paste, extra creaminess from coconut milk, and a brightening splash of lemon at the end, it’s a beautiful meal in a bowl that provides equal parts pleasure and nourishment.

Ingredients:
2 tablespoons neutral oil
1 large onion (approximately. 12 ounces) diced
3 cloves garlic 
1 tablespoon grated fresh ginger
1/4 teaspoon ground turmeric
1/2 teaspoon ground cumin 
2 tablespoons tomato paste
1/8 teaspoon cayenne pepper
1 1/2 cup dried red lentils 
7 cups vegetable stock or chicken broth
1/2 teaspoon sea salt
4 cups bite size cauliflower
1 cup coconut milk
2 tablespoons lemon juice plus more to taste

Directions:
Heat the oil and when shimmering add the diced onion.  Cook for 4 to 5 minutes just until slightly translucent stirring to prevent browning.  Add garlic  and ginger, cook for 30 seconds.  Add the turmeric, cumin, and cayenne pepper, stirring to mix well and cook for 30 seconds more. Stir in the tomato paste to incorporate followed by the lentils. Add the broth and salt and bring to a boil.

Reduce the heat to medium-low and simmer uncovered for 15 minutes.  If the lentils have absorbed most of the broth, add more starting 1 cup at a time for a thick but soupy consistency.  Add the cauliflower and return the mixture to a boil.  Reduce the heat so the soup is at a simmer and cook the cauliflower for 20 to 25 minutes.  Reduce the heat and use an immersion blender, puree until smooth.  Or puree the soup. in batches with a blender.  Remove the cap in the lid and hold a towel over the opening.  Stir in coconut milk and lemon juice, then taste.   Season with additional salt if desired.  

Ladle in individual bowls and drizzle with coconut milk if desired.

Friday, April 5, 2024

One Pan Honey Glazed Chicken With Shallots

One Pan Honey Glazed Chicken with Shallots
This One Pan Honey Glazed Chicken with Shallots is a one-pan wonder with notes of honey, chili pepper heat with dressed shallots and parsley.
Ingredients:
2 lbs. Bone-in, Skin-on Chicken Thighs or Drumsticks (4 to 8 pieces)
Kosher Salt
2 tbsp. Neutral Oil, such as Grapeseed or Canola, divided
1 lb. Shallots (about 8), peeled and halved, quartered if large
3 tbsp. Honey
2 tbsp. Fresh Lime Juice
1 Garlic Clove, minced
1 Fresh Hot Chile, such as Thai, JalapeƱo or Serrano, minced with or without seeds
1 tbsp. Sherry Vinegar
1/2 cup Chopped Flat Leaf Parsley
Directions:
Pat your chicken thighs very dry with paper towels. Then sprinkle all sides of each of thigh with Kosher salt; set the plate of thighs aside.

Over medium heat, heat 1 tablespoon of grapeseed or vegetable oil and toss in the shallots. Let the shallot pieces lightly caramelize, stirring often. This should take about 10 minutes.

When the shallots are looking evenly browned and have softened, transfer them to a separate bowl and set aside.

Raise the heat under your skillet to medium-high and heat 1 tablespoon of grapeseed or vegetable oil. Add the chicken thighs, skin side down and let cook, undisturbed for about 10-12 minutes, or until the chicken thighs easily release from the pan and the skin is browned and crisp. Flip the chicken thighs and let cook on the meat side for about 5 minutes.  Serves 2 to 4.

Transfer 1-2 chicken thighs to a plate and top with some of the dressed shallots. Drizzle pan sauce over the shallot-topped chicken and serve.

Prep Time: 10 Minutes – Cooking Time: 30 Minutes – Total Time: 40 Minutes

Tuesday, December 5, 2023

Cheddar-Stuffed Mushrooms With Wild Rice Crunch

Cheddar-Stuffed Mushrooms With Wild Rice Crunch
Much like popcorn, wild rice can be popped, though perhaps not quite as dramatically. Exposed to dry heat in a skillet, they pop and split, modestly exposing their white interiors, and toast to a deliciously nutty flavour. Give them a whirl in a spice grinder, toss them with melted butter and chopped pecans and you have a seriously tasty topping to an already more-ish stuffed mushroom, a terrific side to simply prepared steak or chops.  Serves 6
Ingredients:
¼ cup (60 mL) wild rice
¼ cup (60 mL) chopped pecans
¼ cup (60 mL) butter, divided
Salt and freshly ground pepper
6 large portobello mushrooms
8 oz (250 g) mixed mushrooms, roughly chopped
1 leek, white and light green part only, thinly sliced
1 clove garlic, finely chopped
2 tbsp (30 mL) flour
1 cup (250 mL) milk
2 tsp (10 mL) miso
1 cup (250 mL) coarsely grated old cheddar
3 green onions, chopped
2 tbsp (30 mL) Japanese soy sauce
2 tbsp (30 mL) neutral-flavour oil such as grape-seed or safflower
⅓ cup (80 mL) coarsely grated Parmesan
Directions:
Heat a skillet with a tight-fitting lid over medium heat; add rice, cover and, shaking pan from time to time, pop and toast rice, about 2 minutes. (The amount of moisture in rice will determine how much the rice opens. The grains should be distinctly split and smell nutty.) Cool to room temperature and grind to a powder in a spice grinder. Turn out 
into a small bowl; add pecans. Melt 2 tbsp (30 mL) butter and pour over rice mixture. Stir to combine, season with salt and pepper and set aside.

Remove stems from portobello mushrooms; roughly chop and add stems to chopped mixed mushrooms.

Preheat oven to 425°F (220°C).

Melt remaining 2 tbsp (30 mL) butter in a large skillet over medium. Add leek and cook for 4 minutes, stirring, until wilted. Stir in garlic and mixed mushrooms, season with salt and pepper; cook for 8 to 10 minutes or until mushrooms are tender and pan is dry. Sprinkle flour over and stir to combine. Add milk and miso; continue to stir until smooth and thickened, about 2 minutes. Remove from heat, stir in cheese and green onions.

Combine soy and oil; brush it over both sides of portobello caps and arrange, hollow-side up, on a baking sheet. Divide cheese mixture between caps, then add Parmesan, then the wild rice mixture. Bake for 25 to 30 minutes or until portobellos are tender and cheese is golden at edges. Let stand for 10 minutes before serving. Serves 6

Serve a Pinot Noir


Thursday, November 30, 2023

Thai Coconut Soup With Shrimp

Thai Coconut Soup with Shrimp
Laced with ginger, lime and fish sauce, this weeknight-easy recipe is a version of tom kha goong, a brothy, aromatic coconut soup. To make tom kha gai, swap in 3 cups shredded cooked chicken for the shrimp.
Ingredients
1 tablespoon neutral oil, like vegetable or canola
2 shallots, thinly sliced
2 inches piece fresh ginger, peeled and finely chopped (2 Tbsp.)
5 cups low-sodium chicken broth
½ teaspoon kosher salt
1 13.5-ounce can unsweetened coconut milk
1 pound shrimp, peeled and deveined
4 ounces shiitake mushrooms, sliced
1 tablespoon brown sugar
¼ cup fish sauce
1 small green chile*, such as Serrano or Thai, finely chopped   
   optional
1 tablespoon lime zest
⅓ cup lime juice
Cilantro, for garnish
Lime wedges

Directions
Heat the oil in a stockpot or Dutch oven over medium heat. Add the shallots and ginger and cook until fragrant, stirring frequently, about 3 minutes.

Add the chicken broth and salt, raise the heat to high and bring the soup to a boil.

Reduce the heat to medium-low and add the coconut milk, shrimp, mushrooms, brown sugar, fish sauce, and chile, if using, stirring to combine. Simmer until the mushrooms are tender and the shrimp is opaque and cooked through, approximately 3 to 4 minutes. (Do not allow the soup to boil once the coconut milk has been added.) 

Add the lime zest and lime juice.

Serve the soup garnished with sprigs of cilantro and a lime wedge.

Variation: With Chicken Follow the instructions as directed, except use 3 cups shredded cooked chicken (from one supermarket rotisserie chicken) instead of the shrimp. In step 3, simmer until the mushrooms are tender and the chicken is warmed through, about 3 minutes.

Monday, October 23, 2023

The 3 X 2 Smash Burger

                                    The 3 X 2 Smash Burger
 The best burger? Everyone has thoughts. Thick, thin, rare, well-done, lots of toppings, barely any. What can’t be argued? That said, the smash burger is here to stay. As dangerously close (in the best way) to a salty meat pudding as any sandwich ought to be, a smash burger owes its ultra-beefy flavour to ground meat cooked over high heat in its own fat. Inspired by the Four Guys Burger at Gold Standard in Toronto and the Animal Style burger at California’s In-N-Out Burger, this three-patty, two-cheese babe is as local as your own kitchen. Marmite, an MSG-laden (again, in the best way!) yeast extract, is available at most large grocers. See TIP below for customizing your burgers.  Serves 2 
Ingredients:
Burger Sauce
3 tbsp (45 mL) mayonnaise
1 tbsp (15 mL) ketchup
1 tbsp (15 mL) sweet pickle relish
1/2 tsp (2 mL) Marmite Pinch cayenne

2 tbsp (30 mL) neutral-flavoured oil
2 medium-size onions, halved and thinly sliced
Salt
12 oz (340 g) medium ground beef
Freshly ground black pepper
2 very soft, small potato or brioche burger buns
1 cup (250 mL) loosely packed shredded iceberg lettuce
Yellow mustard, about 3 tbsp (45 mL), divided
4 thin processed cheese slices
1 medium-size dill pickle, preferably Vlasic, sliced into
1/4‑inch (5-mm) thick coins
2 slices cooked bacon, halved lengthwise (option

Directions
For the Burger Sauce, place all ingredients in a small bowl and stir to combine—the Marmite will take some coaxing to dissolve.  Cover and refrigerate for up to a week.

To caramelize the onions, add oil to a 10- or 12-inch (25- or 30-cm) cast-iron skillet set over medium heat. Once shimmering, add onions and 1/2 tsp (2 mL) salt. Spread out into an even layer and cook until light golden, about 3 minutes. Stir and repeat process twice more. Reduce heat to low and continue to cook, stirring from time to time, 30 to 35 minutes longer or until deeply caramelized.

Meanwhile, divide cold ground beef into six equal portions. Working on a parchment-lined baking sheet, pat each out into a large flat patty 4 inches (10 cm) in diameter. Season generously with salt and pepper.

Scrape onions out into a heatproof bowl; set aside. Return pan to heat, place buns cut side down in pan and toast until golden at edges, 30 seconds or so.

Divide Burger Sauce between top and bottom buns. Divide lettuce between bottoms.

Clean pan; set over high heat. Turn kitchen fan to high. Once pan is smoking, add 3 patties. Press each lightly with a large offset spatula to make contact with pan. Cook 1 minute.

Meanwhile, squirt a heaping teaspoon of mustard onto uncooked side of each patty and spread to edges. Flip and immediately top two patties with a slice of cheese and one quarter of the onions. Cook 45 seconds total then stack the patties with the undressed one on top.

Set onto bottom bun, top stack with half the pickle slices, half the bacon, if using, and the top bun.

Serve right away and repeat process to make a second burger.  Serves 2

TIP You can make and stack as many patties as you like, even change the ratio of meat to cheese (for instance, a double burger with 2 cheese slices) or leave the cheese out altogether. Each patty requires 2 oz (55 g) ground beef; if you don’t have a scale, visit a meat counter where you can ask for a very specific weight of beef, then divide by eye at home.

Wednesday, September 20, 2023

From Scratch Bean Tostados

 
From Scratch Bean Tostados
We teamed up with Hayden Flour Mills to make from-scratch bean tostadas – a kitchen project with minimal lift that can deliver what may be the most flavorful tostadas you've ever had and impress all your friends. It all starts with fresh, regional ingredients: our Ojo de Cabra beans – a meaty favorite in Northern Mexico – and Hayden Flour Mills x Masienda Tortilla Flour – made with Olotillo Blanco heirloom corn and White Sonora heritage wheat. The smooth bean purĆ©e piled on the homemade crunchy tortilla is a treat in and of itself, but you can amp it up with all kinds of toppings. This recipe makes 24 tostadas, so be sure to invite friends over!

Tools
Bean cooking vessel of your choice
Pastry cutter (optional)
Large cast iron pan
Potato/bean masher
Blender (optional)
Tea Towel
Tortilla press or rolling pin
Parchment paper
Pastry brush
2 rimmed cookie sheets

Ingredients 
Refried beans
1 lb Ojo de Cabra beans, cooked according to the Primary Beans cooking guide (broth reserved)
3 tbsp neutral oil, divided
1 yellow onion, minced or grated
1 jalapeƱo, diced
4 cloves garlic, minced

Tortillas
1 box Tortilla Flour
¼ cup neutral oil or solid coconut oil, plus extra for brushing
1-½ tsp salt
1-½ tsp baking powder
1-½ cups warm water

Topping suggestions
Diced avocado
Diced Roma tomatoes
Crumbled Cotija cheese
Chopped cilantro
Lime juice
Fresh salsa


Directions:
Make the tortillas: 
While the beans are cooking, mix tortilla flour, salt, and baking powder with oil until well combined and small crumbles begin to form. Add warm water and mix until well incorporated. Knead for 2-3 minutes. (Hint: A pastry cutter
works great for this step.)


Prepare the refried beans: 
Drain cooked beans, reserving bean broth. Heat 1 tbsp oil in cast iron skillet over medium heat. Add onion and jalapeƱo and sautƩ until beginning to soften and onion is translucent (taking care not to burn). Add garlic and cook for 1 more minute. Add drained beans and remaining 2 tbsp of oil and cook until warm. Using potato/bean masher, mash beans, ladling bean broth to add moisture until you reach your desired consistency. For the most beautiful, pillowy refried beans, add mixture to a blender and blend until it reaches a completely smooth texture, adding bean broth as needed.

Make the crispy tostadas: 
Preheat oven to 400 F. Brush tortillas lightly with oil. Place tortillas in a single layer on cookie sheets. Bake for 5 minutes, then flip tortillas and rotate cookie sheets and bake for an additional 3 to 6 minutes until tortillas are crispy and light brown. Repeat to make all 24 tostadas.

Assemble: 
Spread a thin layer of refried beans over tostadas. Add toppings of your choice and enjoy immediately.


Saturday, September 9, 2023

Pomegranate Marinated Flank Steak

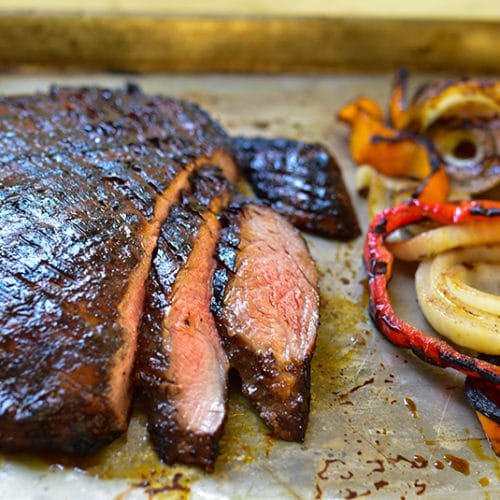
Grilled flank steak slices on a sheet pan with grilled peppers

Pomegranate Marinated Flank Steak
The longer the flank steak marinates, the more flavorful it will be. Use the ziploc bag to keep the meat and vegetables fully coated in the marinade. Be sure to cut against the grain when slicing the meat. For the dipping sauce, never use the marinade from the steak; instead set aside a separate, unused portion of the sauce from the outset.
Ingredients:
1 1/2 pounds flank steak
2 teaspoons kosher salt
1 teaspoon black pepper
3/4 cup pomegranate molasses
1/3 cup extra virgin olive oil
1/2 teaspoon ground mustard
3 tablespoons brown sugar
1/2 teaspoon granulated garlic powder
1 orange bell pepper, sliced in 1-inch rounds
1 red bell pepper, sliced in 1-inch rounds
1 vidalia onion, sliced in 1-inch rounds
2 tablespoons neutral oil, such as canola, avocado, or safflower, to coat the grill

Directions:
With a fork, prick the flank steak all over. Season both sides of the steak with the salt and pepper.

In a small bowl, whisk the pomegranate molasses, olive oil, mustard, brown sugar, and garlic powder. Set aside about 1/3 of the sauce to use when serving the meat after grilling.
Pour the rest of the marinade in a gallon ziploc bag. Add the flank steak, pepper slices, and onion slices. Pushing out as much air as possible, close the bag and refrigerate the meat for at least 12 hours and up to 24 hours.

To grill the meat, coat the grill grates with the neutral oil using tongs and a bit of paper towel. Heat the grill to medium high.
Once the grill is hot, lay the flank steak, pepper and onion on the oil-coated grates. Grill for 6- to 8 minutes, then flip the steak and vegetables. Grill for another 6 minutes, or to 150 degrees at the center of the steak.

Brush the finished steak with some of the reserved sauce while it rests for 15 minutes. Slice the steak on an angle against the grain, and serve with more of the reserved sauce over top or on the side.

Thursday, January 27, 2022

Spicy Chickpeas With Tomatoes and Kale

 Spicy Chickpeas With Tomatoes And Kale

This recipe has been slightly adapted from Jenny Rosenstrach’s latest book, The Weekday Vegetarians.
A FEW NOTES:
I’ve been making this with these slow cooker chickpeas, which couldn’t be simpler, and which are so tasty. If you don’t have a slow cooker and want to cook the chickpeas from scratch, here’s my guide. Of course, canned chickpeas are fine. I like the Goya brand.

The original recipe calls for 1/4 cup of coconut milk. It also suggests serving it with rice, so I have been making this coconut rice to serve along side. The coconut rice calls for 3/4 cup coconut milk, and so I have been reserving this amount for the rice and then using the rest of the can for the chickpeas. The extra coconut milk makes the dish a little richer, I suppose, but it certainly does not taste too rich or sweet.

Finally, the original recipe calls for stirring 1/4 cup of warm water into a teaspoon of miso and stirring this in at the end. If you have miso on hand, go for it! If you don’t, don’t run out and get it. The dish is plenty flavorful without it, especially if you add a splash more coconut milk, as noted above. Alexandra Cooks

Ingredients: 
Preparing Chickpeas
2 tablespoons grapeseed, olive, or other neutral oil
1/2 small yellow or white onion, finely chopped, about 1/2 cup
1 clove garlic, minced
1-inch piece ginger, peeled and minced
crushed red pepper flakes to taste (I use 1/2 teaspoon or less)
kosher salt and pepper to taste
3 tablespoons curry powder, I love Madras brand
1 tablespoon tomato paste
3 cups cooked chickpeas or two 15-oz cans, drained and rinsed
one 14.5 ounce can diced tomatoes or 1 lb. diced fresh tomatoes (about 2 cups)
1 cup water or vegetable stock (I always use water)
2 to 4 cups stemmed and chopped fresh kale
1 teaspoon miso, optional, see notes above
1/4 cup (or more) unsweetened coconut milk
For Serving:
coconut rice, see notes above
naan
cilantro, optional
lime, optional

Directions:
In a large skillet set over medium-low heat, combine the oil, onion, garlic, ginger, red pepper flakes, pinch salt, and black pepper to taste. Cook until slightly softened, 4 to 5 minutes.

Add the curry powder, and stir, coating it in the aromatics and toasting it a bit, another 2 to 4 minutes. Add the tomato paste, stirring it into the curry-coated aromatics, and cook for another minute or until the red color darkens and it smells toasty. 

Add the chickpeas and stir to coat them in the curry mixture. Cook for another two minutes or until the chickpeas are evenly coated in the spices; then taste a chickpea for seasoning. Adjust accordingly if it needs more salt or pepper to taste. 

Add the tomatoes and water (or stock) and simmer for 10 minutes or until everything is warmed through. Add more water as needed if it looks too thick — chickpeas can absorb a ton of liquid. Add the kale and cook until wilted. 

If using the miso, stir it into 1/4 cup warm water and add it to the skillet along with the coconut milk. Stir to combine and cook for another minute or two. As noted above, I add more like 3/4 cup coconut milk and use another 3/4 cup coconut milk for this coconut rice. 

Serve with rice or naan, a lime wedge, and a sprinkle of cilantro, if you wish.

Monday, July 19, 2021

Pomegranate Marinated Flank Steak

 Grilled flank steak slices on a sheet pan with grilled peppers  

Pomegranate Marinated Flank Steak

The longer the flank steak marinates, the more flavorful it will be. Use the ziploc bag to keep the meat and vegetables fully coated in the marinade. Be sure to cut against the grain when slicing the meat. For the dipping sauce, never use the marinade from the steak; instead set aside a separate, unused portion of the sauce from the outset.


Ingredients:

1 1/2 pounds flank steak
2 teaspoons kosher salt
1 teaspoon black pepper
3/4 cup pomegranate molasses
1/3 cup extra virgin olive oil
1/2 teaspoon ground mustard
3 tablespoons brown sugar
1/2 teaspoon granulated garlic powder
1 orange bell pepper, sliced in 1-inch rounds
1 red bell pepper, sliced in 1-inch rounds
1 vidalia onion, sliced in 1-inch rounds
2 tablespoons neutral oil, such as canola, avocado, or safflower, to coat the grill.

Directions
With a fork, prick the flank steak all over. Season both sides of the steak with the salt and pepper.

In a small bowl, whisk the pomegranate molasses, olive oil, mustard, brown sugar, and garlic powder. Set aside about 1/3 of the sauce to use when serving the meat after grilling.

Pour the rest of the marinade in a gallon ziploc bag. Add the flank steak, pepper slices, and onion slices. Pushing out as much air as possible, close the bag and refrigerate the meat for at least 12 hours and up to 24 hours.

To grill the meat, coat the grill grates with the neutral oil using tongs and a bit of paper towel. Heat the grill to medium high.

Once the grill is hot, lay the flank steak, pepper and onion on the oil-coated grates. Grill for 6- to 8 minutes, then flip the steak and vegetables. Grill for another 6 minutes, or to 150 degrees at the center of the steak.

Brush the finished steak with some of the reserved sauce while it rests for 15 minutes. Slice the steak on an angle against the grain, and serve with more of the reserved sauce over top or on the side.

Saturday, November 21, 2020

Perfect Pie Crust

 Perfect Pie Crust

Ingredients:
For 9" Double Pie Crust
1 3/4 cups unbleached, all-purpose flour
1 teaspoon kosher salt, or 1/2 teaspoon table salt
1/2 cup plus 1 teaspoon vegetable, canola, or other neutral oil
4 tablespoons ice water
1/4 cup milk (of any sort, to top the unbaked pie to encourage browning)

For 10"Dlouble Pie Crust
2 2/3 cup unbleached, all-purpose flour
1 1/2 teaspoons kosher salt, or 3/4 teaspoon table salt
3/4 cup plus 1-2 teaspoons vegetable, canola or other 
   neutral oil.
5 - 6 tablespoons ice water
1/4 cup milk (of any sort)


Directions:
In a medium bowl, whisk together the flour and salt. Add the oil, all but the extra teaspoon, and lightly stir with a metal spoon until most of the flour is incorporated and pea-sized meal forms. There will be some larger clumps of dough too.

Add the water 1 tablespoon at a time, incorporating after each addition. The dough should be soft and pliable, not cracking and dry. Add another teaspoon of oil to get there if needed, but do not add extra water. Divide the dough in half.

Tear off two 15” sheets of waxed paper. Wipe the work surface with a sponge dampened with cold water to keep the paper from slipping. Place one sheet of waxed paper on the damp surface lengthwise in front of you, and place half of the dough in the center of the paper. Shape the dough into a flat disk and cover with the other sheet of paper lengthwise.

Roll the dough, starting from the center of the disk and working your way out in every direction (think of working around the clock). The dough and paper do not turn; they stay fixed. As the rolling pin moves to the outer edges of the dough, be careful not to press to hard or else the dough will get too thin at the edges. Press more in the center, less at the edges, as you roll.

Roll the dough 2 inches larger than the pie pan, making room for the dough to slide down into the pan and still cover the rim. The crosswise edges of the waxed paper can serve as a guide at 12 inches. Roll to that edge for a 10” crust, and just inside at 11 inches for a 9” crust. If the dough is rolled beyond the waxed paper, just scrape under it with a thin, sharp knife or spatula to loosen it before picking the crust up off the counter.

Peel off the top piece of waxed paper and discard. Place the pie plate right next to the crust. Pick up the crust with its paper and invert it over the pie plate. Move the crust to arrange it evenly over the rim of the plate. Remove the waxed paper and discard. Gently lift the edges of the crust and ease the crust into the pan. Trim the crust all the way around the rim right up against the rim. If an area is short of the rim, patch it with trimmings.

Fill the pie with filling (usually 5-6 cups of sugared fruit with some starch like flour or cornstarch or tapioca to hold it together), then roll the second half of the dough for the top crust just as you did the bottom crust, but roll this circle slightly smaller than the bottom crust (about an inch smaller). After the top crust has been arranged over the pie, trim the crust so that there is ½-1 inch overhang of the top crust beyond the rim. Tuck that overhang under the bottom crust all around the rim. This seals the pie and prevents drips.

Crimp the edges of the pie in a rope design: place your thumb on the pastry rim at an angle and firmly pinch the dough between thumb and bent index finger. Push down into the rim as you pinch. Make the next pinch with thumb resting against the last pinched edge.

Cut vents decoratively in the top. Rub or brush the entire top of the pie with milk. Cover the edges of the pie with a pie guard or pieces of foil, crunching it well so it stays in place. The foil is not a perfect science; just get it to cover as much of the edge as possible.

Bake as directed depending on your pie filling. A general rule is 425 degrees for 50 minutes or so, until a fruit filling is bubbling vigorously and the crust is golden brown. Remove from the oven and cool; the filling will firm up some as the pie cools, so it's always best to bake your pies early in the day on the day they will be served.. Serve lukewarm or at room temperature. The pie will keep on the kitchen counter for a couple of days, loosely covered with waxed paper or foil.