Showing posts with label Egg Yolks. Show all posts

Wednesday, July 15, 2026

Roasted Hazelnut Creme Brûlée

                                                  
Roasted Hazelnut Crème Brulée
This recipe is finished with a classic bronzed sugar topping. Crack it open joyfully at the table to reveal the luxurious custard below. Combining the chocolate spread with warmed cream adds a caramelized sugar and toasted hazelnut flavor. 
* Create the topping with an Air Fryer. Set the temp at 400*F with a careful eye.
Ingredients:
1 1/4 cup double cream
3/4 cup whole milk
5 medium free range egg yolks
1/4 cup caster sugar, plus 2 tbsp for topping
1/3 cup Nutella Spread
Directions:
Preheat the oven to 300*F. Heat the cream and milk together in a saucepan until almost boiling. Remove from the heat and set aside for 10 minutes. 

Meanwhile, whisk the egg yolks and 1/4 cup sugar together, then mix in the Nutella spread until combined. Gradually whisk in the cream and milk mixture, then pour into 3 oz small ramekins. 

Place the ramekins into a roasting tin and pour enough cold water into the tray to come two-thirds of the way up their sides. Carefully put the roasting tin in the oven and cook for 30-40 minutes, or until just set with a little wobble, then leave in the turned-off oven with the door ajar to cool for 2 hours and set.

Preheat the broiler to high. Put the ramekins onto a baking tray, then sprinkle 1 tsp caster sugar in an even layer over each brulée. Broil – or use a blowtorch – until the sugar melts and caramelized to a golden brown colour, 2-4 minutes. Leave to cool until the sugar has set, then serve immediately.  Or use your Air Fryer at 400*F. with a watchful eye.


Monday, April 20, 2026

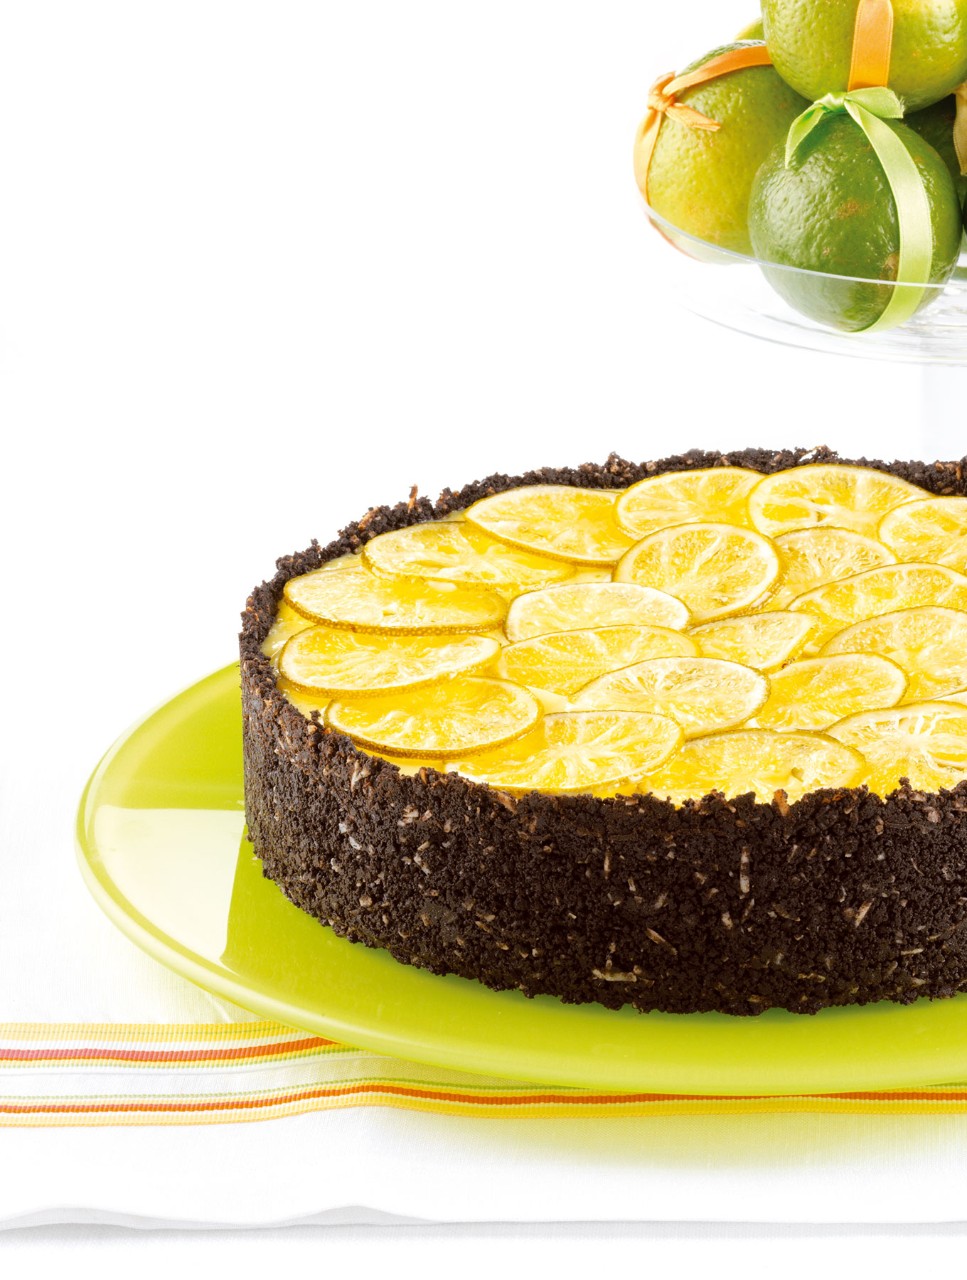
Key Lime Pie

Key Lime Pie
This classic key lime pie recipe follows the traditional technique of not baking the filling. The acidity in the lime juice cooks the eggs as the fillings chill. Pasteurized egg yolks are best for this recipe, but if fresh eggs are used bake the pie at 325ºF (160ºC) for 30 minutes to set the eggs.
Ingredients:
Crust
3 cups (750 mL) chocolate cookie crumbs 
1 cup (250 mL) sweetened coconut 
½ tsp (2 mL) fine salt 
¾ cup (175 mL) unsalted butter
Filling
Two 300 mL tins condensed milk 
12 pasteurized egg yolks 
1½ cups (375 mL) fresh lime juice 
4½ tsp (22 mL) lime zest
Candied Lime Slices
2 limes 
1 cup (250 mL) sugar 
1 cup (250 mL) water 
Sugar for sprinkling
Directions:
Crust, preheat oven to 375ºF (190ºC).

Combine chocolate cookie crumbs, coconut and salt. Stir in melted butter and blend to an even, crumbly texture. Press crust into an ungreased 9-inch (23-cm) springform pan. Bake for 7 to 8 minutes, until coconut browns. Allow to cool.

Filling, whisk together all ingredients until smooth and pour into baked pie shell. Chill for at least 4 hours before slicing.

Candied Lime Slices; slice limes into thin rounds Blanch first in a pot of boiling water for 2 minutes, then drain. In a saucepan, combine sugar and water, bring up to a simmer and add lime slices. Simmer for 10 to 15 minutes, until white pith of limes looks translucent. Drain and spread out on a cooling rack over a baking tray to dry for about an hour. Coat limes with sugar and store in an airtight container, layered between parchment or plastic until ready to use.

Top cake with candied lime slices and serve.  Serves 10 to 12

Saturday, April 4, 2026

Coconut Cream Cake


Coconut Cream Cake
This is a recipe I have been waiting to create.   Easter will be a perfect occasion. 
Ingredients

Filling
1/2 cup sugar
1/4 cup cornstarch
1/8 teaspoon table salt
4 large egg yolks
1 cup half-and-half
1 cup coconut milk
1 cup sweetened flaked coconut
3 tablespoons butter
1 teaspoon vanilla extract
1/4 teaspoon coconut extract
Cake Layers
1 cup butter, softened
2 cups sugar
4 large eggs
3 cups cake flour
1 tablespoon baking powder
1/2 teaspoon table salt
1/2 cup milk
1/2 cup coconut milk
1 teaspoon vanilla extract
1/2 teaspoon coconut extract
Shortening (for greasing pans)
1 cup heavy cream
Fluffy Coconut Frosting
Garnish 
Toasted coconut shavings

Directions:
Prepare Filling: Whisk together first 3 ingredients in a heavy saucepan. Whisk egg yolks and next 2 ingredients in a glass bowl. Gradually whisk egg mixture into sugar mixture. Cook over medium heat, whisking constantly, 6 to 7 minutes or until mixture just starts to bubble. Cook, whisking constantly, 1 more minute; remove from heat.

Whisk flaked coconut and next 3 ingredients into sugar-egg mixture; transfer to a medium bowl. Place plastic wrap directly on warm filling to prevent film from forming. Let stand 30 minutes; chill 4 to 24 hours.

Meanwhile, prepare Cake Layers: Preheat oven to 350°. Beat 1 cup butter at medium speed with a heavy-duty electric stand mixer until creamy. Gradually add 2 cups sugar, beating until light and fluffy. Add 4 eggs, 1 at a time, beating just until blended after each addition.

Stir together cake flour and next 2 ingredients in a bowl. Stir together milk and 1/2 cup coconut milk in a measuring cup. Add flour mixture to butter mixture alternately with milk mixture, beginning and ending with flour mixture. Beat at low speed just until blended after each addition. Stir in 1 tsp. vanilla and 1/2 tsp. coconut extract. Spoon 
batter into 2 greased (with shortening) and floured 9-inch cake pans.

Bake at 350° for 25 to 30 minutes or until a wooden pick inserted in center comes out clean. Cool in pans on wire racks 10 minutes. Remove from pans to wire racks, and cool completely (about 1 hour).

Beat 1 cup heavy cream at high speed with an electric mixer until stiff peaks form. Gently fold whipped cream into chilled Filling.

Assemble cake: Split each layer in half horizontally with a serrated knife to make 4 layers. Place 1 layer, cut side up, on a serving platter; spread with 1 1/3 cups Filling. Repeat with remaining Cake Layers  and Filling, ending with a Cake Layer, cut side down. Spread top and sides of cake with Fluffy Coconut Frosting.


Monday, March 30, 2026

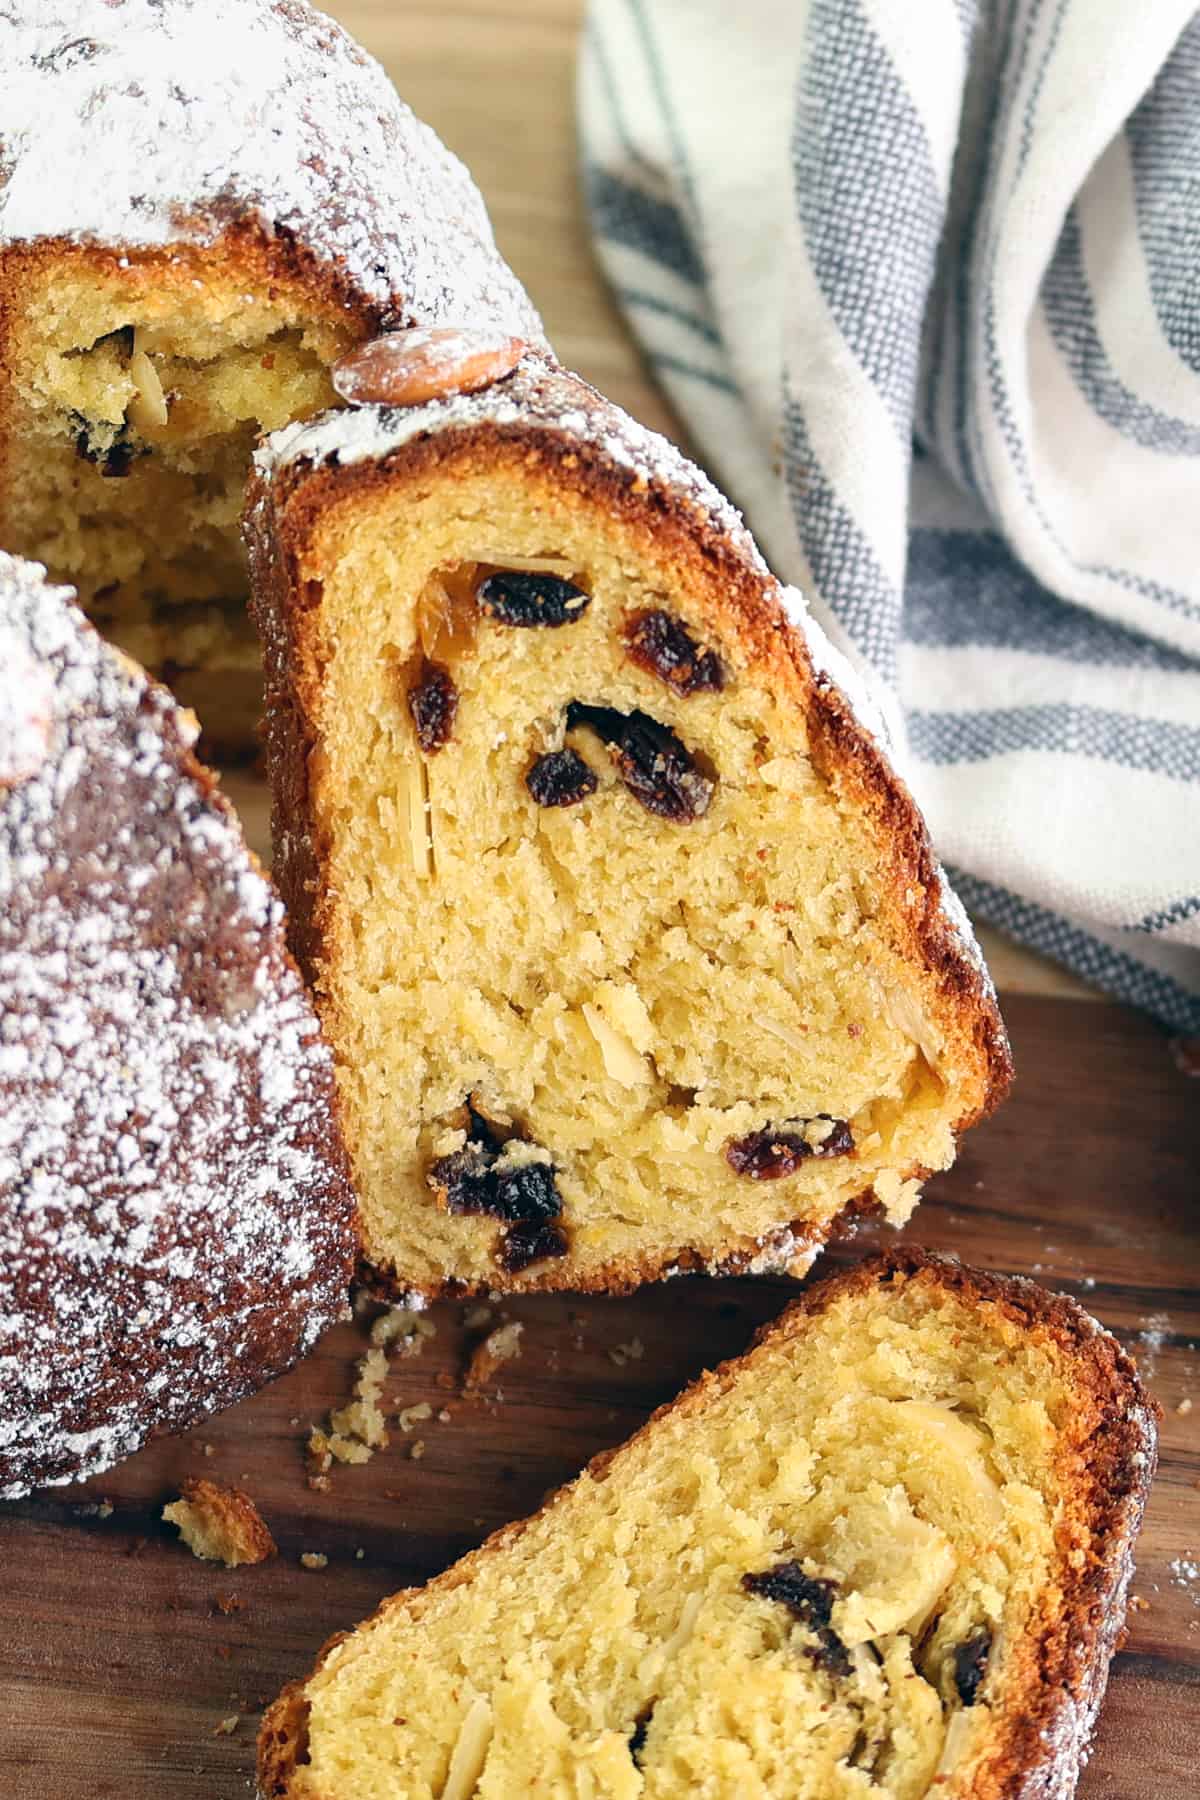
Gigelhupf or Gugelhupf Cake

 
                                  Gugelhupf  or Kugelhopf Cake                                                                                                                           Combining the delicious flavors of lemon, rum, raisins, almonds and butter in a wonderfully fragrant yeasted cake, look no further for a thoroughly traditional Gugelhupf recipe! Also known as Kugelhopf, this special cake has been known and loved for literally centuries throughout Germany, France, Austria and Switzerland.
Ingredients:
12 whole blanched almonds 
   (to blanch/remove the skins, place the almonds in boiling water, let
    sit for one minute, drain, and squeeze the almonds between your  
    fingers to slip the skins off)
1 cup heavy cream
2 1/4 teaspoons active yeast
1/2 cup granulated sugar
4 cups all-purpose flour
1/2 teaspoon salt
2/3 cup unsalted butter
1/3 cup lard or butter
5 large egg yolks
1 1/2 teaspoon vanilla extract
zest one lemon
3/4 cup raisins 
1 tablespoon rum
1/3 cup slivered almonds
12 whole almonds
    Directions:
    Butter a 8.5 inch Kugelhopf pan or a bundt pan  (8 to 9 cup capacity).
    Place the raisins and rum in a small bowl, stir to combine, and let the raisins soak for at least an hour or overnight.
    Place the lukewarm cream in a bowl or cup and stir in the yeast along with one tablespoon of the sugar. Let sit for 10-15 minutes until nice and frothy.

    In the bowl of a stand mixer fitted with a paddle attachment, cream butter, lard (if using) and sugar until pale and fluffy. Add lemon zest and vanilla and beat until combined. Add egg yolks and beat until combined.
    Add half of the flour and yeast mixture and mix until combined. Add the remaining half of the flour and yeast mixture and the salt and mix until combined. Once the mixture comes together continue to knead with the paddle attachment for 10 minutes, scraping down the sides as needed. If the mixture is too dry, add some additional egg yolk. If it's too wet, add some additional flour. Cover loosely with plastic wrap and put in a warm place (like a warm oven) to rise for up to two hours or until doubled in size.

    Roll out onto clean non-stick work surface. Press or roll out to for a rectangle about 1/4 inch thick. 
    Sprinkle evenly with the raisins and almonds. Roll it up from the widest side. Bring the ends together to form a circle, pressing the ends together, and place it into the Kugelhopf mold. Press gently down to ensure the dough is evenly spread in the pan. Cover loosely with plastic wrap and put in a warm place (like a warm oven) to rise for about another hour or until the dough has risen just barely above the mold. 
    In the meantime, preheat the oven to 350 F.

    Bake the Gugelhupf until it is nicely browned and a toothpick inserted into the middle comes out clean, about 30-40 minutes. Let the cake sit in the pan for 10 minutes and then invert onto a wire rack to cool completely. Dust with powdered sugar.

    Serve immediately. Best eaten the same day.
    To store leftovers, wrap well in plastic wrap (will keep up to 3 days) or freeze. (See blog post for ideas on how to use leftover Kugelhopf.)


Monday, March 16, 2026

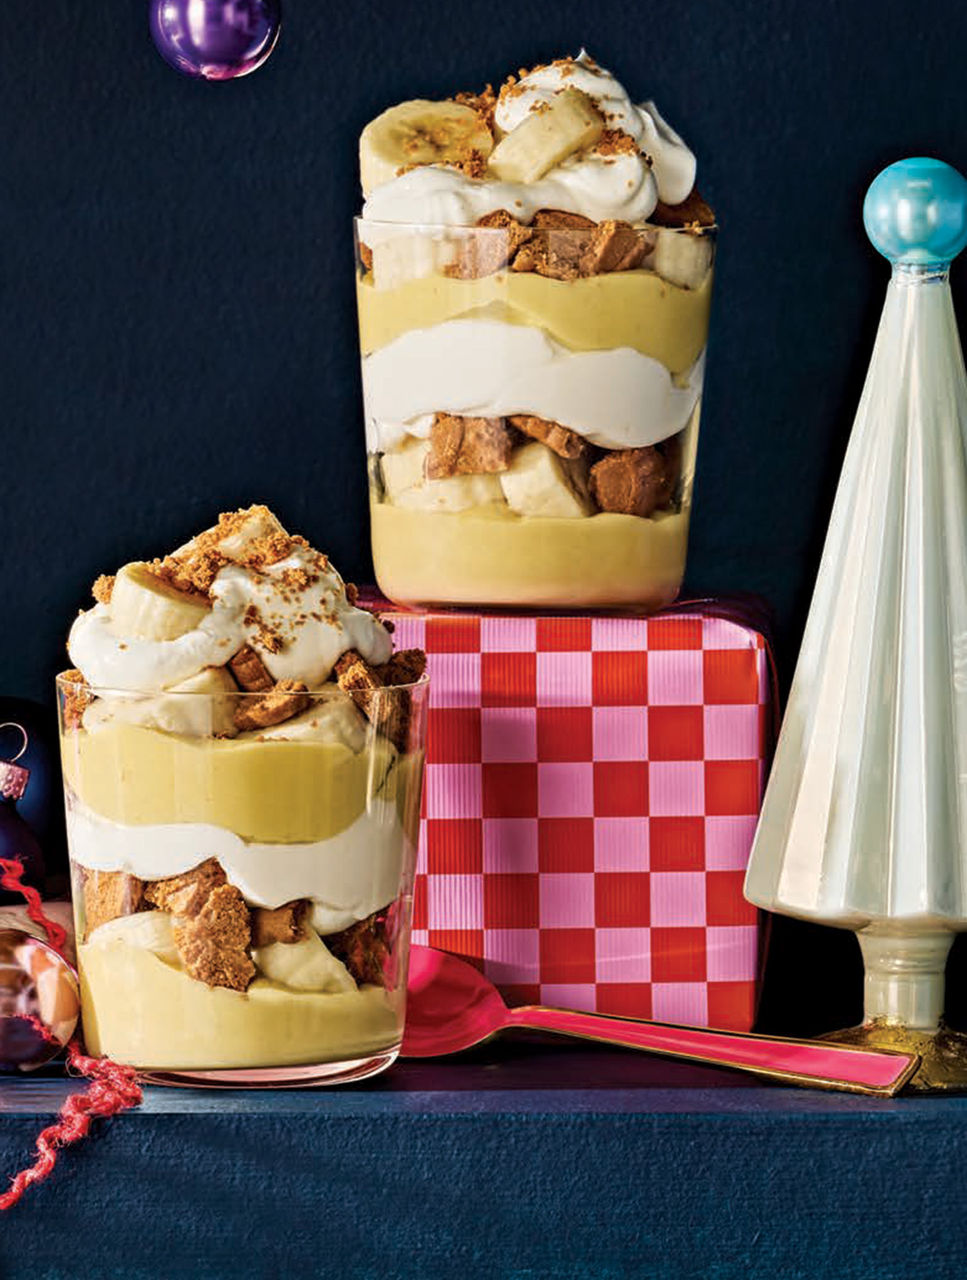
Banana Biscoff Pudding

Banana Biscoff Pudding
Popularized by New York City’s Magnolia Bakery, banana pudding traditionally encompasses layers of vanilla pudding, fresh bananas, whipped cream and vanilla wafers. In our decadent spin, we’ve made a banana pudding enriched with brown butter, swapped out wafers for Biscoff cookies and subbed in sour cream for whipped cream. If you prepare the pudding element in advance, the rest comes together in a snap.  Serves 6 
Ingredients:
3 ripe bananas, divided
1/4 cup (60 mL) unsalted butter
2 cups (500 mL) whole milk
3 egg yolks
1 egg
1/4 cup (60 mL) cornstarch
1/2 cup (125 mL) sugar
1 tbsp (15 mL) pure vanilla extract
1/4 tsp (1 mL) salt
3/4 cup (175 mL) heavy cream
1/4 cup (60 mL) full-fat sour cream
3 tbsp (45 mL) icing sugar
18 Biscoff cookies
Directions:
Peel and slice 1 banana into 1/2-inch- (1-cm-) thick coins. Heat
butter in a medium-size saucepan over medium heat. When melted,
add sliced banana. Cook, stirring often with a wooden spoon to
ensure nothing sticks, until caramelized and fragrant, about 7 minutes. Add milk and stir until hot—do not let boil. Remove from heat. Using an immersion blender, blend until smooth.

In a medium-size mixing bowl, whisk yolks, egg, cornstarch,
sugar, vanilla and salt until smooth. Slowly stream 1/2 cup (125 mL) hot milk mixture into the egg mixture while vigorously whisking. Repeat with another 1/2 cup (125 mL) milk mixture, then whisk egg mixture into pot with remaining milk mixture.

Return pot to medium heat. Whisk gently but constantly until
mixture thickens to a pudding-like consistency, 5 to 6 minutes. Pass
through a fine-mesh sieve into a bowl, discarding any solids.

Place a piece of plastic wrap against surface of pudding. Cool 30
minutes then refrigerate until completely cool—about 3 hours, or up
to 3 days in advance.

When ready to serve, peel and slice remaining 2 bananas into 1/2-inch- (1-cm-) thick coins.

Place heavy cream, sour cream and icing sugar in bowl of a stand
mixer with whisk attachment. Beat on medium-high until stiff peaks
form, about 3 minutes.

Break cookies into 1/2-inch (1-cm) pieces, reserving any crumbs.

Place 2 tbsp (30 mL) pudding into six 8-oz parfait glasses, or other
glass of choice. Layer bananas, cookie pieces and cream mixture on
top, so you have two layers of each and saving six slices of banana to
garnish top along with cookie crumbs. Serve immediately or
refrigerate up to 1 hour in advance.    Serves 6

Tuesday, December 30, 2025

Anita's Nut Roll.


Anita's Nut Roll
Barbara's former co-worker and very dear friend Anita who drove to Tahoe to visit and bring her Christmas wishes with the most wonderful Nut Roll.  What a fabulous friend!
Ingredients:
Soak a handful of raisins in hot water to plump
Chop 8 cups walnuts, set aside.

Mix and allow to proof:
1/4 cup warm milk
1 pkg yeast
1 teaspoon sugar

In a small bowl:
Whisk 3 egg yolks beaten (save egg whites for later use.) with
1 cup plus 1 tablespoon half and half, set aside

Measure in a large bowl:
4 1/2 cups flour 
1 teaspoon salt
1 cup sugar
2 sticks butter
                                                                                                                                                                                                             
Directions for dough;
Work 2  sticks softened butter into flour  into flour mixture:  Use hands to blend.  

Add proofed yeast mixture of yeast, sugar and milk, and mixed egg yolk, and half and half: mix well. 
then add to flour mixture creating the dough.

Knead about 10 minutes until all butter is well incorporated in dough.
Separate into 4 rounds of dough; allow to rest until double in size

Meanwhile mix: 
8 cups finely chopped walnuts
1 cup sugar
2 tablespoons vanilla
Toss to coat well.

Drain raisins and pat dry.

When ready, roll dough thin to 12" X 18" rectangle on a lightly floured surface.                                                                         

Pat down firmly 
2 cups of nut mixture to the ends of dough.   Next sprinkle a few handful of the plumped golden raisins which have 
been patted dry. Generously drizzle honey.  Begin to roll so that your finished roll is approximately 18" X 3".  Place seam side down on parchment paper lined baking sheet.  Check that the ends of each roll are sealed.

Brush top with whipped egg whites   Let set for one hour in a draft 
free space.   Bake at 325*F for 35 to 38 minutes.  When cool, dust with confectioners sugar.

Friday, December 26, 2025

Classic Tiramisu


                                                                   Classic Tiramisu
Meet my friend James who is a "can do anything" in the kitchen.  When his wife and I left for a club program, I took the first photo but when we returned later, his finished dessert was on the counter.  His secret ingredient added was a purchased flavor enhancer, Pistachio Paste.  James shared the recipe he used.  This Classic Italian Tiramisu is seriously one of the easiest desserts to make! It's picture perfect with a sweet mascarpone filling, espresso dipped lady fingers and all the cocoa powder on top! 
Ingredients:
¼ cup Dutch Processed cocoa powder, plus more for dusting
1 cup brewed espresso (optional to add a few tablespoons of dark rum)

1 tablespoon vanilla extract
5 large egg yolks, cold (I use pasteurized eggs)
½ cup white sugar
¼ teaspoon kosher salt
16 ounces mascarpone cheese, chilled
1.75 cups heavy cream, chilled  (1 3/4 cups)
3 tablespoons Pistachio Paste
28 hard ladyfinger cookies
Directions:
Whisk together the cocoa powder, espresso and vanilla in a bowl and set aside

In a mixer or using a hand mixer, beat the egg yolks and sugar until pale and thick, about 5 minutes. Add in the salt, mascarpone cheese and continue to whip until smooth. Add the chilled heavy cream and continue to whip, until light, creamy, smooth and can hold a soft peak.

Dunk each ladyfinger in the espresso mixture to absorb the liquid and start to line a 7x11 oval baking dish with the cookies. Top the first layer of cookies with ½ of the whipped mascarpone mixture and use the back of a metal spoon to spread it into an even layer. Dust with cocoa powder. Repeat for another layer and then finish by dusting with cocoa powder on top. Cover with plastic wrap and chill for at least 2 hours before serving.

How to Store Tiramisu
You can store tiramisu covered with plastic wrap for 3-4 days. The flavors of the tiramisu marry and develop as it keeps, especially once it's been stored overnight.

How to Freeze Tiramisu
I do not recommending freezing tiramisu since. The no-bake and nature of other ingredients do not make it a great candidate for freezing.

Tips and Tricks

ALL the ingredients for the filling must be cold. So when you read the recipe below, pay attention to the few things that need to be taken directly from the fridge. 

Get the ladyfingers from an Italian market if possible!!

Mascarpone is essential. There is no substitution for it - so while you're out looking for the ladyfingers, grab the Mascarpone. 

No espresso on hand - no problem! Use coffee! 

Dunking the ladyfingers is an art form - you need enough to get a good flavor and texture, but you don't want them to fall apart. Just a quick dunk will do - nothing more than 1-2 seconds!

NOTE - DO NOT SERVE IT RIGHT AWAY! 

While it will be delicious, the cocoa powder needs time to soften up and infuse into the cream topping otherwise you'll inhale straight cocoa powder and let me tell you from experience, it's not cute lol.


Saturday, July 26, 2025

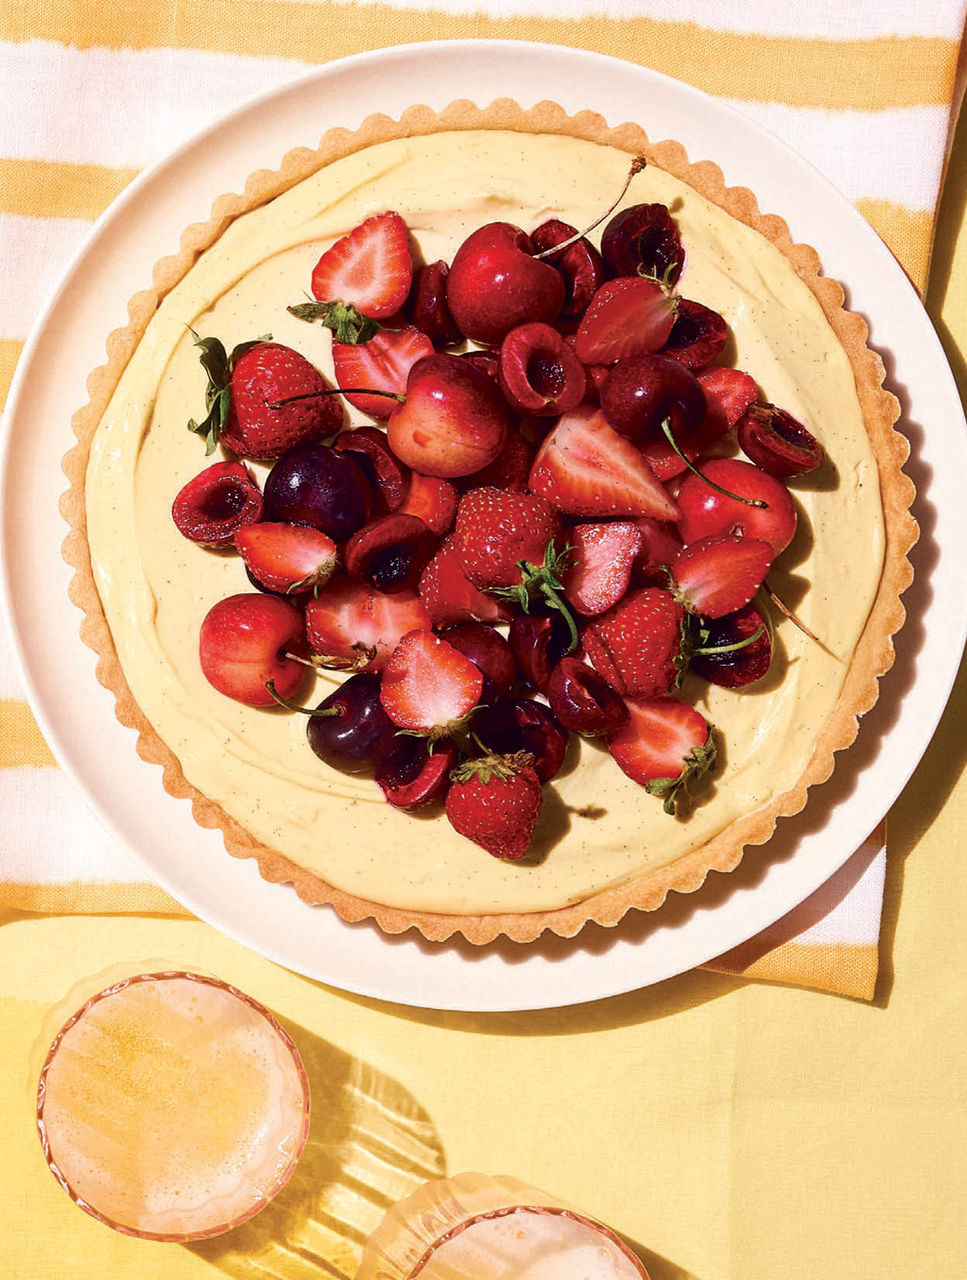
Vanilla Bean Cream Tart With Salted Butter

                                                        
Vanilla Bean Cream Tart with Salted Butter Crust
Salted butter provides depth you can’t get from salting alone in this pâte sucrée crust, a perfect base for an ultrasmooth vanilla cream. Think of this tart as a canvas for any seasonal fruits as the months go by. This is a great way to use local currants, gooseberries and even florals like elderflower to showcase the best of summer.
Ingredients:
Vanilla Bean Cream
1 cup (250 mL) whole milk, divided
1 1/4 cups (310 mL) heavy cream, divided
1/3 cup (80 mL) granulated sugar
1 vanilla bean, split lengthwise, seeds scraped out
2 tbsp (30 mL) cold water
1 tsp (5 mL) unflavoured gelatin
3 large egg yolks
1/4 cup (60 mL) cornstarch
Salted Butter Crust
1 3/4 cups (425 mL) all-purpose flour
1/2 cup (125 mL) icing sugar
1/2 cup (125 mL) salted butter, cold, cubed
1 large egg yolk
2 tbsp (30 mL) whole milk
Fresh strawberries and cherries to finish
Directions:
For the vanilla bean cream, set a fine-mesh sieve over a medium-size
bowl. Set aside.

Combine 3/4 cup (175 mL) milk, 1/2 cup (125 mL) cream, sugar,
vanilla seeds and pod in a medium saucepan. Bring just to a simmer
over medium heat, then remove from heat, cover and let steep for 20 minutes.

Once steeped, pour cold water in a ramekin. Sprinkle gelatin overtop, then stir to combine. Let bloom for 5 minutes.

Whisk remaining 1/4 cup (60 mL) milk, egg yolks and cornstarch in a medium-size heatproof bowl until smooth. Return vanilla bean mixture to a gentle simmer over medium heat. Slowly pour vanilla mixture
into yolk mixture, whisking constantly, until combined. Pour mixture back into pot and return to medium heat. 

Cook, whisking constantly, until thickened, about 1 minute. Remove from heat and whisk in gelatin mixture until fully combined. Pass through sieve to remove any lumps and vanilla pod. Cover surface with plastic wrap. Cool until barely warm then refrigerate until chilled, at least 2 hours or up to 2 days.

For the salted butter crust, combine flour and icing sugar in bowl of
a food processor. Add butter and pulse until fine crumbs form. Add
egg yolk and milk and continue blending until a dough just comes
together, up to 1 minute. Shape into a disc. Wrap in plastic and
refrigerate for 30 minutes.

Preheat oven to 325°F (163°C).

Knead dough a few times to soften, then roll dough on a lightly

floured work surface to a circle about 1/8-inch (3-mm) thick.

Transfer dough to a 9-inch (23-cm) fluted tart pan with removeable

bottom. Gently press into bottom and up sides of pan, overhanging

edges. Trim the edges even with the top by running a rolling pin overtop. Prick bottom

with a fork. Freeze for 15 minutes.

Set tart pan on a baking sheet. Cover shell with a piece of parchment

paper and fill with pie weights or dried beans. Bake on middle rack

for 20 minutes. Remove paper and weights. Continue baking until l

ightly golden, 14 to 16 minutes. Cool completely.

To assemble, remove ring from tart pan. Run an offset spatula gently

under pastry to separate from base, then transfer to a plate or serving

dish.Whisk remaining 3/4 cup (175 mL) cream in a large bowl until

soft peaks form, 2 to 3 minutes.

Using same whisk, mix chilled vanilla bean cream in its bowl until smooth (cream will be very thick). Scrape cream into whipped cream and continue whisking until mixture is fully smooth and blended. Scrape into tart shell;

smooth top.

To finish, arrange strawberries and cherries overtop. Refrigerate until

chilled, 1 hour.

Serves 6 to 8

Wednesday, July 23, 2025

Iron Skillet Peach Ice Cream

Iron Skillet Peach Ice Cream
Roasting peaches intensifies their flavor, and in this old-school recipe, they're mashed and mixed into a rich custard before churning into a creamy, fruit-forward ice cream. Serve with a drizzle of caramel sauce, dollop of whipped cream, or additional roasted peaches to take this dessert over the top.  
Servings:
 
8.  

Ingredients

2 1/4-2 1/2 lb. peaches (6 to 8 peaches)
1 pinch kosher salt
1 1/4 cups granulated sugar, divided
1 1/2 cups whole milk
4 large egg yolks
1 1/2 cups heavy whipping cream

Directions

  1. Preheat oven to 350°F. Peel and slice peaches; place in a medium bowl along with any juices to yield about 3 cups. Stir in salt and 1/2 cup sugar. Transfer peach mixture to a 10- or 12-inch cast-iron skillet; cook over medium, stirring constantly, until sugar dissolves, 2 to 3 minutes. Remove from heat; transfer skillet to oven. Bake until juices are lightly syrupy, 25 to 35 minutes, stirring once halfway through cook time. Remove skillet from oven, and use a potato masher to crush peaches until nearly smooth. Transfer to a medium heatproof bowl, and cool to room temperature, 1 1/2 to 2 hours.

  2. While peach mixture cools, heat milk in a medium saucepan over low, stirring often, until steam rises and small bubbles begin to form around edges of pan (but do not boil), about 8 minutes. Meanwhile, whisk together egg yolks and remaining 3/4 cup sugar in a large bowl. Gradually pour half of the hot milk mixture into yolk mixture, whisking rapidly to combine. Whisk in remaining milk, and return mixture to saucepan. Cook over medium-low, stirring constantly, until mixture slightly thickens and lightly coats the back of a spoon, about 5 minutes. Remove from heat, and transfer custard to a large heatproof bowl. Loosely cover with plastic wrap, and chill, stirring occasionally, until cold, about 1 hour.

  3. Once peaches and custard have cooled, whisk peaches and heavy cream into custard mixture. Cover with plastic wrap, and chill overnight (at least 12 hours) or up to 20 hours.

  4. When ready to make the ice cream, pour the cold custard mixture into a 2-quart or larger ice-cream machine canister; churn mixture according to the manufacturer’s instructions until it reaches a soft-serve ice- cream consistency, about 1 hour. Transfer to a freezer-safe container, and freeze until firm and scoopable, 3 to 4 hours.


Saturday, January 4, 2025

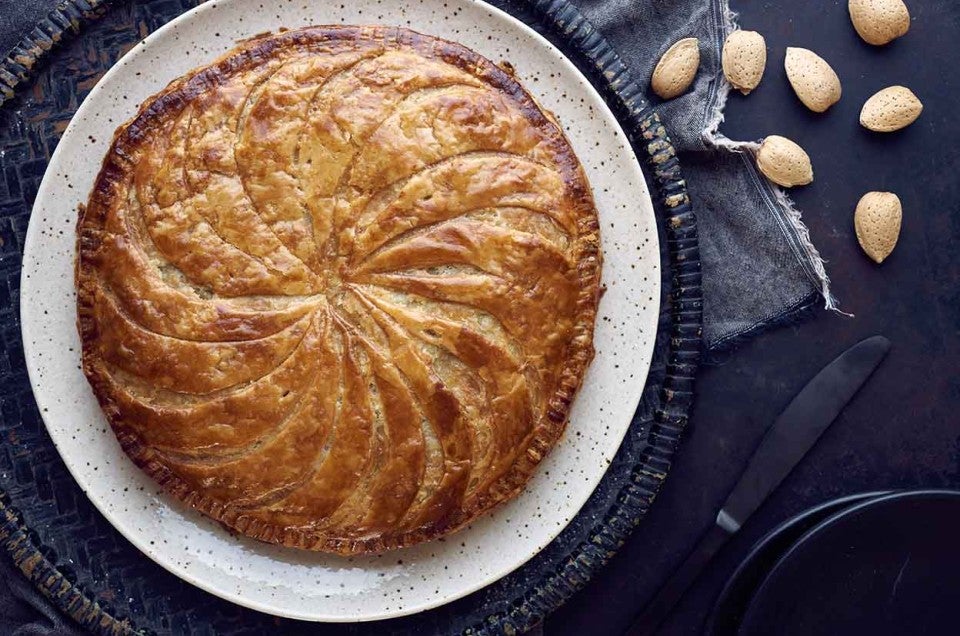
Almond Galette


Almond Galette
In France, almond galette (known as Galette des Rois) is typically
served on January 6: Epiphany, the Feast of the Kings. An ultra-buttery, remarkably flaky pastry crust stuffed with almond filling, this is quite possibly the easiest "fancy" dessert you'll ever make.  This is a King Arthur Recipe and can I say a no fail recipe?  Celebrate the Feast of Three Kings or The 12th Day Of Christmas!
Ingredients:
Crust
1 1/2 cups (180g) King Arthur Unbleached All-Purpose Flour
1/4 teaspoon table salt
1/2 teaspoon baking powder
16 tablespoons (227g) unsalted butter, cold
1/2 cup (113g) sour cream
Filling
2/3 cup (170g) almond paste
6 tablespoons (85g) unsalted butter
1/2 cup (99g) granulated sugar
1/2 teaspoon table salt
2 large egg yolks
1 teaspoon King Arthur Pure Vanilla Extract
1/3 cup (40g) King Arthur Unbleached All-Purpose Flour
1/2 cup (48g) almond flour or very finely ground whole almonds
*If you've purchased a 7-ounce tube or block of almond paste, feel free to use the entire amount.
Glaze
1 large egg yolk
1 teaspoon water, cold

Directions:
To make the crust: Weigh your flour; or measure it by gently spooning it into a cup, then sweeping off any excess. Whisk together the flour, salt, and baking powder. Cut the cold butter into pats, and work it into the flour mixture until it's unevenly crumbly, with larger bits of butter remaining intact.

Stir in the sour cream. The dough will be craggy but cohesive. Turn the dough out onto a well-floured surface and bring it together, if necessary, with a few quick kneads.

Pat the dough into a rough square. Roll it into a rough 8" x 10" rectangle. Make sure the underside is sufficiently dusted with flour that you can move it around easily.

Starting with one of the shorter (8") ends, fold the dough in thirds like a business letter. Flip it over (so the open flap is on the bottom), and turn it 90°. Roll the dough into an 8" x 10" rectangle again. Fold it in thirds again.

Wrap the dough in plastic, and place it in the refrigerator to chill for at least 30 minutes (or overnight).

When you're ready to proceed, start preheating the oven to 400°F. Lightly grease a baking sheet, or line it with parchment.

Divide the pastry in half. Roll one half into a 10" square.

Using a 10"-round template (e.g., a dinner plate), cut a 10" circle. Set the circle onto the prepared baking sheet.

To make the filling: Beat the almond paste, butter, sugar, and salt until thoroughly combined.

Add the egg yolks and vanilla, and beat until well incorporated.

Mix in the flours.

Roll the other piece of pastry into an 11" square. Cut an 11" circle.

To assemble the galette: Spread the filling over the smaller circle, leaving a 1" rim around the edge of the pastry.

To make the glaze: Mix the egg yolk and water together. Brush some glaze over the uncovered edge of the pastry.

Center the larger round of dough over the filled bottom crust, and smooth it over the filling. Using a fork, press and crimp the edge of the galette to seal.

Brush an even coat of the glaze over the surface of the galette. (Doing this step before decorating the top will give your design nice definition and contrast.)

Decorate the galette by using the back of a knife to trace a pattern on the surface; you'll just barely cut into the surface without cutting all the way through to the filling. Poke a vent hole in the center, and four additional small slits at other random spots, hiding the slits in the pattern you've drawn.

Bake for 30 to 35 minutes or until it's golden. Don't be afraid to let it become deeply browned; this slight caramelization gives the butter in the crust wonderful flavor. Remove the galette from the oven, and cool it slightly right on the baking sheet.

Serve galette warm or at room temperature. Store any leftovers at room temperature for several days; freeze for longer storage.

Tips from our Bakers

Want a shinier galette? Try brushing the top of the baked pastry with a teaspoon or so of syrup (maple, agave, golden syrup, or your favorite) while it's still hot from the oven.


Thursday, September 5, 2024

Preserved Lemon Aioli

Preserved Lemon Aïoli
Moroccan-style preserved lemons (and a bit of their brine) give this aïoli a depth of flavour you can’t get from fresh lemons. Look for them at gourmet food shops.   Makes 1 1/2 cups (375 mL)
Ingredients
2 large egg yolks
2 cloves garlic, grated
1 whole small preserved lemon, rinsed, seeded, chopped, about 4 tsp (20 mL)
1 tbsp (15 mL) fresh lemon juice
1 tbsp (15 mL) preserved lemon brine
1 1/4 cups (310 mL) canola oil
Salt to taste
Directions:
 In a food processor, combine egg yolks, garlic, preserved lemon, lemon juice and brine. Process until smooth and uniform. With motor running, add canola oil in a slow, steady stream until it is fully incorporated and emulsified. Taste and season with salt, if necessary. Transfer to an airtight container. Refrigerate up to 5 days.

Tuesday, July 16, 2024

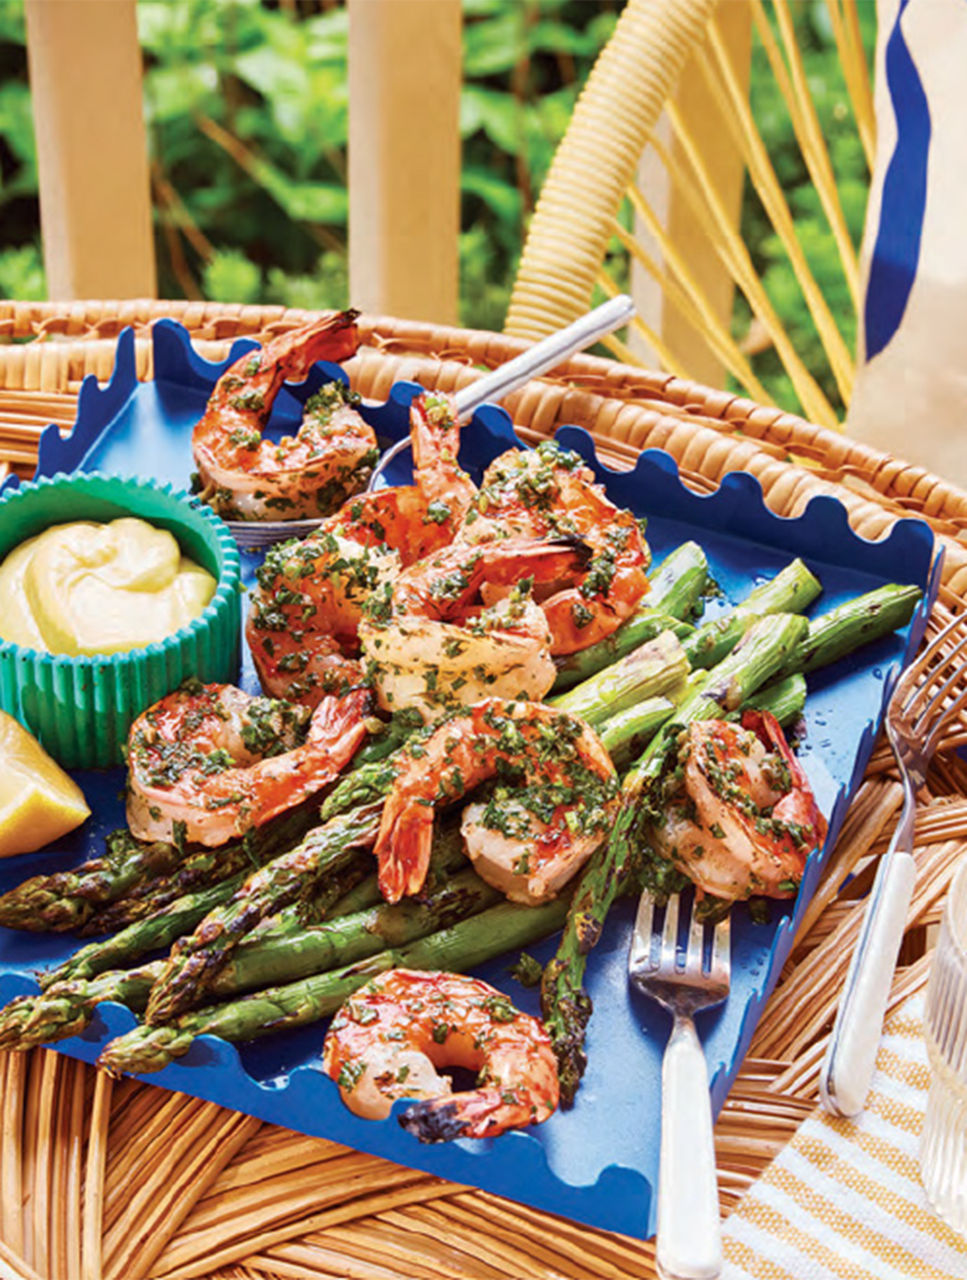
Grilled Shrimp And Asparagus With Preserved Lemon Aioli


Grilled Shrimp and Asparagus with Preserved Lemon Aïoli
In this tasty dipping platter, shrimp are grilled then tossed in a caper-spiked green sauce for maximum flavor, while asparagus is thrown on the grill dry for the best texture. They’re both swiped in a thick aïoli amped up with preserved lemon. Adding baking soda to shrimp is an Asian technique that helps firm up the texture.   Serves 6 to 8

Directions and Ingredients:
Combine sugar and baking soda in a medium bowl. Add shrimp and toss to coat. Season with salt. Place shrimp in a colander set over a bowl for 1 hour at room temperature or in fridge for up to 3 hours.

Combine parsley, garlic and capers in a mini food processor, and pulse until well combined. Add 3 tbsp (45 mL) olive oil. Pulse, scraping down sides as needed, until you have a loose sauce. Season with salt to taste. Set aside.

Preheat grill on high heat.

While grill is heating, toss shrimp with 1 tbsp (15 mL) olive oil and thread tightly onto metal skewers. Grill shrimp until lightly browned and just cooked through, about 2 1/2 minutes per side. Remove from heat and drizzle with lemon juice.

Grill asparagus, turning occasionally, until the spears turn bright green and are beginning to soften, about 3 minutes. Transfer to a baking sheet. Toss with remaining 1 tbsp (15 mL) olive oil. Season with salt and pepper. Return to grill. Cook, turning occasionally, until lightly charred and tender-crisp, about 1 minute more. Transfer to a serving platter.

Remove shrimp from skewers into a bowl. Add green sauce and toss. Transfer to platter with asparagus and serve with Preserved Lemon Aïoli.
Preserved Lemon Aioli
Moroccan-style preserved lemons (and a bit of their brine) give this aïoli a depth of flavour you can’t get from fresh lemons. Look for them at gourmet food shops.
Ingredients:
2 large egg yolks
2 cloves garlic, grated
1 whole small preserved lemon, rinsed, seeded, chopped, about 4 tsp (20 mL)
1 tbsp (15 mL) fresh lemon juice
1 tbsp (15 mL) preserved lemon brine
1 1/4 cups (310 mL) canola oil
Salt to taste

Directions:
In a food processor, combine egg yolks, garlic, preserved lemon, lemon juice and brine. Process until smooth and uniform. With motor running, add canola oil in a slow, steady stream until it is fully incorporated and emulsified. Taste and season with salt, if necessary. Transfer to an airtight container. Refrigerate up to 5 days. Makes 1 1/2 cups (375 mL).


Tuesday, April 23, 2024

Golden Corn Creme Brûlée

 
Golden Corn Crème Brûlée
Enhanced with fresh turmeric and a pinch of saffron, peak-season corn makes a delicious base for a summery crème brûlée. If you have a powerful, high-speed blender, this is a great time to use it. As an optional final flourish, a corn nut (toasted corn) topping adds deep, roasted flavour and crunchy texture.  The post of April 22 was the instruction of making the sweet corn stock.    Serves 6

Ingredients:
2 cups (500 mL) corn kernels (from 2 to 3 ears), cobs reserved
2 1/2 cups (625 mL) heavy cream
1 cup (250 mL) whole milk
1/8 tsp (0.5 mL) crumbled saffron threads
1 small piece fresh turmeric, about 2 inches (5cm) , thinly sliced

4 egg yolks
1/3 cup + 6 tbsp (80 mL + 90 mL) sugar, divided
1/4 tsp (1 mL) salt
3 tbsp (45 mL) chopped salted corn nuts (toasted corn, optional)
Directions:
In a wide pot, combine corn cobs (broken in half), cream, milk, saffron and turmeric. Bring just to a boil over medium-high heat, watching carefully. Remove from heat. Cover and let stand 30 minutes.

Preheat oven to 300°F (149°C).

Strain cream mixture into a clean pot. Add corn kernels and place over medium-high heat. Bring just to a boil, watching carefully. Reduce heat to maintain a gentle simmer. Cook until corn is tender, about 4 minutes. Remove from heat and transfer to a blender. Purée corn cream as smoothly as possible then pass through a fine-mesh strainer to remove any solids—you should have about 3 1/3 to 3 2/3 cups (830 to 900 mL).

In a large mixing bowl, whisk egg yolks, 1/3 cup (80 mL) sugar and salt until uniform. Add warm corn cream to egg yolks in a slow, steady stream while whisking constantly until fully incorporated. Place six shallow 1/2-cup (125-mL) ramekins in a large roasting pan and divide corn cream between them. Bring a kettle of water to a boil. Place roasting pan in the oven and fill with boiling water to three quarters of the way up the sides of the ramekins.  

 Bake until cream is set but still jiggles in middles, about 40 minutes.Carefully remove pan from oven then carefully transfer ramekins to a cooling rack. Cool to room temperature then cover and refrigerate until completely set, about 3 hours. Custards will keep for up to 3 days in refrigerator.

When ready to serve, working one at a time, sprinkle each with 1 tbsp (15 mL) sugar. Use a small blowtorch to caramelize sugar until it is fully golden. Sprinkle with chopped corn nuts, if using. Serve immediately.  Serves 6 

What to serve:  Brut


Friday, November 24, 2023

Lemon Pound Cake

Lemon Pound Cake
There’s something about lemon pound cake that is so supremely satisfying. The tartness of the lemon flavor is subdued by the butter and sugar in the recipe, making for a delectable treat that is perfect all year round. Add a hot cup of tea or a glass of cold milk and you’ve got a perfect afternoon snack, but this cake also really shines as the dessert after dinner.
Ingredients:
Cake
3/4 cup unsalted butter, softened
1 1/4 cups granulated sugar
8 egg yolks
2 1/2 cups all-purpose flour
3 teaspoons baking powder
1/4 teaspoons salt
3/4 cup milk
1 teaspoon vanilla extract
2 teaspoons lemon juice
1 teaspoon lemon zest
Lemon glaze: 
2 cups powdered sugar
1-2 tablespoons fresh lemon juice
1-2 teaspoons buttermilk
Zest of one lemon
Directions:
Preheat oven to 325°F and grease a bundt pan with butter or nonstick spray.

In a large bowl, cream together the butter and sugar with an electric mixer until fluffy.

In a separate bowl, beat the egg yolks until light and pale yellow. Add to creamed butter mixture and mix to combine.

Sift together the flour, baking powder, and salt three times. Add to the butter mixture, alternating with the milk and mixing in between.

Add vanilla, lemon zest, and lemon juice and beat for two minutes.

Pour batter into prepared pan and bake until a toothpick inserted into the center comes out clean, about 1 hour.

Remove from oven and allow to cool 20 minutes before inverting onto a serving plate. While cake cools, make the glaze.

Glaze directions: in a medium bowl, stir together the powdered sugar, lemon juice, buttermilk, and lemon zest.

Add more lemon juice and buttermilk as needed. Once cake is on serving platter, pour glaze over, slice, serve, and enjoy!

Wednesday, October 25, 2023

Salted Caramel Pudding

 
Salted Caramel Pudding
Ingredients:
¼ cup (60 mL) cornstarch
7 tbsp (105 mL) water
4 egg yolks
1 cup (250 mL) 10% cream
2 tbsp (30 mL) maple syrup
1 cup (250 mL) packed brown sugar
1 tsp (5 mL) salt
3 cups (750 mL) 35% whipping cream
4 tbsp (60 mL) dark rum
1 tbsp (15 mL) butter
Maldon or pink Himalayan salt, to finish

Directions
Mix cornstarch with 3 tbsp (45 mL) water, and reserve. Whisk together egg yolks and 10% cream, and reserve.

Combine maple syrup, brown sugar, salt and remaining 4 tbsp (60 mL) water in a heavy pot over high heat. Stir until sugar has dissolved. Let mixture boil, swirling the pan occasionally, until it reaches 270°F (132°C) on a sugar thermometer, about 3 minutes. Mixture will be very thick.

Remove from heat and whisk in ½ cup (125 mL) whipping cream until smooth. Return to a medium heat and gradually whisk in remaining whipping cream. There may be some lumps. Bring to a simmer, stirring constantly. Add cornstarch mixture and rum and continue whisking until mixture thickens, about 1 minute. Reduce heat to low. Mix ¼ cup (60 mL) hot mixture into egg yolks and add egg yolk to pot.

Cook the custard, whisking constantly, until yolks thicken the mixture a little more, 3 to 4 minutes. Remove from heat and whisk in butter.Strain the pudding and pour into 6 serving dishes. Top each with a sprinkle of finishing salt. Serve with a biscotti cookie if desired.   Serves 6

Saturday, March 4, 2023

Alpine-Style Stuffed Duchess Potatoes

Alpine-Style Stuffed Duchess Potatoes
Have you ever found yourself staring at a mound of mashed potatoes, perhaps nestled alongside a perfectly seared steak or jostling for room on an overfilled holiday plate, and thought, “I love my grade-school gravy moat, but there has to be a fancier, fussier, French-ier way of plating these spuds”? If you answered yes, and aren’t already familiar with pommes duchesse, then it’s time to get acquainted. Duchess potatoes are classic old-school French cuisine: riced boiled potatoes, mounted with egg yolks and butter, and seasoned with nutmeg. This mixture could be used as a base for other potato preparations such as pommes dauphine, which incorporates pâte à choux for airy fried potato puffs, or stuffed into a pastry bag fitted with a decorative star tip, then piped and baked into pretty individual portions of rich mashed potato.
Ingredients
1 whole garlic bulb 1 tablespoon olive oil
2 1/2 pounds Yukon Gold potatoes, peeled and quartered
2 teaspoons salt
4 ounces Roelli Little Mountain cheese (Or a good Swiss Cheese)
1/4 cup butter, melted
4 large egg yolks
3 tablespoons heavy whipping cream
1 teaspoon minced fresh rosemary
Salt and pepper
1 large egg, lightly beaten
Minced fresh rosemary

Instructions
Heat oven to 400°F.

Remove papery outside from garlic (keeping cloves together). Cut off the top third of garlic bulb; drizzle with olive oil. Wrap tightly with aluminum foil. Bake for 35-40 minutes or until garlic is tender. Cool for 15 minutes. Squeeze garlic into a small bowl. Mash with a fork. Set aside.

Place potatoes into a large saucepan; cover with water. Add salt. Bring to a boil. Reduce heat to medium. Cook, uncovered, for 20-22 minutes or until potatoes are tender. Drain. 

Meanwhile, cut Little Mountain into 8 cubes, about 1/2-inch each. Freeze for at least 30 minutes. 

Place potatoes on a 17 x 12-inch baking pan. Bake for 12-15 minutes or until the outside of potatoes dries slightly. 

Mash potatoes. Add the butter, egg yolks, cream, rosemary and reserved garlic; mash until smooth. Season with salt and pepper. 

Line the same baking pan with parchment paper. Coat with cooking spray. 

Pipe or spoon potato mixture into eight 3-inch circles on prepared pan. Place Little Mountain into the center of each. Pipe or spoon potato mixture into mounds to cover. 

Bake for 10 minutes. Brush potatoes with egg wash. Bake for 8-10 minutes longer or until golden brown. Garnish with rosemary. 


Sunday, December 11, 2022

Skillet Strawberry Cookies

 Skillet Strawberry Cookies


Ingredients:
8 tablespoons butter
8 ounces dates, pitted and chopped
2 egg yolks
3/4 cup white sugar
1 cup crisp rice cereal
1 cup chopped pecans
1 teaspoon vanilla extract
*
Directions:
In a saucepan over medium heat combine the butter, dates, egg yolks and sugar. Bring to a boil and cook for 2 minutes. Remove from heat stir in the rice cereal, chopped pecans and vanilla. Stir and let
cool.

When you can handle roll into small balls then roll in a ball and then with your fingers squeeze top into strawberry shape.  Roll in red sugar crystals leaving the top plain.  With a decorating tip, apply leaves and a stem.

Yield 2 dozen